Software Supply Chain Security on AWS - Signing, Attestation, and Admission Control
First Published:
Last Updated:
This article discusses the design for proving the origin of container artifacts on AWS and enforcing that proof on the admission side. This is not about eliminating vulnerabilities.
To state the conclusion upfront: Signing alone does not provide any protection. Signing is an act of making a claim, and it is only when you build a system to read that claim and reject it that you achieve actual defense. AWS made signing managed in November 2025. It did not make verification managed. This asymmetry is at the core of this article.
Every specification in this article was verified against official AWS documentation on August 17, 2026. That verification turned up four discrepancies inside AWS's own documentation. One of them is a pair of numbers that disagree on the same page, and another is a passage of the user guide that was rewritten so that a sentence it used to carry is now gone. All four bear directly on the container path, so each relevant section quotes both original texts and gives the reasoning for which one this article treats as correct.
Table of Contents
- 1. Scanning and Provenance Are Separate Problems
- 2. What the Four Artifacts Prove, and What They Do Not
- 3. The Chain of Trust, and Where It Breaks
- 4. Dependency Intake - Funneling What Comes From Outside Into One Place
- 5. Build - Provenance Describes the Environment, Not the Result
- 6. Registry - What Managed Signing Automates
- 7. Registry - Where the Signature Is Stored, and What Remains
- 8. Describing the Artifact - What an SBOM Answers and What It Does Not
- 9. Continuous Evaluation - What a New Vulnerability Does to an Existing Image
- 10. Admission - Where Verification Is Enforced
- 11. Revocation and Expiry
- 12. What Is Left When a Stage Is Broken
- 13. The Four Artifacts, Side by Side
- 14. One Repository, Start to Finish
- 15. Design Checklist
- 16. Frequently Asked Questions
- 17. Summary
- 18. References
1. Scanning and Provenance Are Separate Problems
1.1 The Two Questions Do Not Substitute for Each Other
Two different questions get asked about a container image. The first is whether it contains any known vulnerability. The second is who made it, from what input, and in what environment.Scanning answers the first question, while provenance answers the second. And the answer to one does not necessarily imply the answer to the other. An image can be clean of every CVE and still have come out of an attacker's build environment. Conversely, an image you can prove came out of your own build can still carry vulnerabilities.
The two get confused in practice for a simple reason: both look like the result of inspecting an image. However, the focus of the inspection is different. Scanning examines the contents of the image, while provenance examines what sits outside the artifact, namely the signed claims about the process that produced it.
1.2 What This Article Covers
Seven things are in scope. Where the chain of trust breaks. What claim the dependency intake stage can produce. What claim the build stage can produce. What ECR managed signing automates and what it leaves behind. Where SBOMs and vulnerability reports sit. How to enforce verification on the admission side, together with the limits of doing so. And what happens when a signature is revoked or expires.What is out of scope, stated up front: no attack procedures and no proof-of-concept code. The published timeline already holds the detail of past supply chain incidents, so this article touches them only as design consequences. Package vetting on the MCP client side belongs to another published article. No prices. No comparison of CI/CD tools.
1.3 Where the Line Falls Against the Published Articles
This site holds several related articles, and this one differs in subject from every one of them. In particular, one article already contains a nearly identical argument to the central claim of this article. Rather than assembling that argument again from scratch, this article links to it.| Published article | What it answers | How it relates to this article |
|---|---|---|
| Content Provenance for AI-Generated Media | Asymmetry between the signing party and the verification party, the impact of certificate revocation on previously signed content, and how to write ingestion policies. Focus is on media. | The skeleton of the argument overlaps with this one. The general case for the asymmetry, and for the blast radius of a revocation, is held there. This article starts from how that general case shows up on the container artifact side. |
| Major Security Vulnerabilities History and Timeline | The story of how supply chains shifted, and what triggered those changes. Includes presidential orders, the minimum elements of SBOM, and incidents involving package registries. | That one holds the history; this one holds the design on AWS. The details of individual incidents are not repeated here. |
| MCP Tool Poisoning Defense Guide | How the MCP client vets and pins servers. | The subject is packages and endpoints, not container artifacts. Both use the word vetting, but the domains differ. |
| AI Bill of Materials on AWS | A catalog of currently running AI assets. Discovering and cataloging models, agents, and external endpoints. | This article sits on the producing side and that one on the consuming side. Here you build an artifact's provenance and inventory and verify them. There you take a finished inventory and answer what is running right now. SBOM appears in both, but here it is the thing you sign and attach, and there it is the raw material for discovery. |
| Agent Skills Security Vetting Guide | Static vetting of skills. Reading the bundled files all the way through. | That one is about a person reading an artifact and judging it. This one is about forcing a machine to verify one cryptographically. |
| AWS Nitro Enclaves and Confidential Computing on AWS | Proof provided by hardware. Attestation documents, PCR measurements, and KMS condition keys. | Both use the word attestation, but the concepts are different. The distinction is defined in section 2.1. |
| AWS Private CA Hierarchy Design | How to structure a certificate hierarchy. Includes trust points, templates, and path lengths. | Designing the trust anchor for a signature belongs there. This article takes the trust anchor that AWS Signer manages as given. |
| Amazon EKS Capabilities - Managed Argo CD, ACK, and kro | Delivering a platform. Moving GitOps and resource management to AWS. | ECR appears in both. There it is the destination manifests are delivered to, here it is the thing that gets signed. That article draws the line explicitly. |
| OWASP Top 10 for Large Language Model Applications Mapped to AWS Controls | The supply chain for model artifacts and dependencies. Specifically, item LLM04:2026 Supply Chain. | The focus is on model weights and adapters. This article focuses on container images. |
| Hardening GitHub Actions for AWS Deployments | The workflow file that produces the artifact. Workflow permissions, untrusted triggers, pinning an action to a commit SHA, and what leaves a run through logs, artifacts, and caches. | That one hardens the job that emits the claims; this one starts from the claims once they exist and follows them to the admission side. Section 5 here reads the claim a build emits; that article is where the job emitting it gets written. |
| Policy Engines Compared | What a decision means in four different engines. What IAM, Cedar, Rego, and Kyverno each return when nothing matches, when an input is missing, and when the engine never answers. | Kyverno appears in both. Here it is the mechanism that enforces image verification at admission; there it is one of four evaluation models placed side by side. Section 10 holds the concrete case, that article the general one. |
| Publishing npm and PyPI Packages Without Long-Lived Tokens | Publishing a package version without a stored token. Trusted publishing on npm and PyPI, npm staged publishing, and the publishing records that npm provenance and PyPI attestations leave. | The subject is packages published to a registry, not container artifacts. Here a build's claims are verified at admission; there npm provenance and PyPI attestations show where a version came from, and that article sets out what they do not assert. |
| Install-Time Scripts by Package Manager | What runs when a dependency is installed. Whether each package manager runs dependency lifecycle scripts and native builds by default, since which version, and where the approval is recorded. | The subject is the moment a package enters a build, not a container artifact after it is built. Here an image is signed and verified at admission; there the question is what code runs on the build machine while the dependencies are installed. |
1.4 Why This Article States the Date It Was Verified
The features this article covers are new. ECR managed signing became available on November 21, 2025, and the ability for pull through cache to synchronize referrers became available on April 17, 2026. The default re-scan value for Amazon Inspector changed on May 16, 2025.Design from a year-old memory and you will be wrong, but that is not the whole of it. The primary sources moved while this article was being written. The ECR user guide passage on referrers and lifecycle policies, the one section 7.2 deals with, was rewritten between August 14 and August 16, 2026: a sentence disappeared and a new condition took its place. Two days.
Everything in this article rests on official documentation as of August 17, 2026. Check the primary sources again before you make a design decision.
2. What the Four Artifacts Prove, and What They Do Not
2.1 The Term Attestation Refers to Two Different Things
One term needs separating before the rest of this article makes sense. The word attestation refers to two entirely different things in an AWS context.The first is hardware-based attestation. The attestation document that Nitro Enclaves produces carries measurements of the software currently running, and the Nitro Hypervisor signs it. In this case, the attesting entity is the hardware. The published article on Nitro Enclaves covers that side.
The second meaning, the one this article uses, is a signed claim about the provenance of software. In this case, the attesting entity is the organization that executed the build, and hardware is not involved. Amazon EKS best practices define it as follows:
An attestation is a cryptographically signed "statement" that claims something - a
"predicate" e.g. a pipeline run or the SBOM or the vulnerability scan report is true
about another thing - a "subject" i.e. the container image.
The structure is divided into three parts: the subject, which specifies what is being asserted; the predicate, which states the assertion itself; and the signature, which indicates who made the assertion. Only when all three elements are present does it constitute an attestation.
The two types of attestation have fundamentally different bases for verification. Hardware attestation traces the execution of the code back to a physical trust anchor. Software provenance only shows that an organization stated how it made the artifact, and whether to believe that organization is left to whoever receives the claim. The latter provides no physical guarantees whatsoever. Confusing the two can lead to unrealistic expectations regarding software provenance.
2.2 The in-toto Statement as a Provenance Container
The interoperability format for software provenance is the in-toto Statement layer. The schema for Statement v1 is as follows:{
"_type": "https://in-toto.io/Statement/v1",
"subject": [
{
"name": "<NAME>",
"digest": {"<ALGORITHM>": "<HEX_VALUE>"}
},
...
],
"predicateType": "<URI>",
"predicate": { ... }
}The crucial field is
predicateType. The specification definition is a single line.predicateType URI identifying the type of the Predicate.This URI identifies the type of claim the attestation makes. Whether it is a build provenance record, an SBOM, or a vulnerability scan result, this field is what tells them apart. It is a common container, with different contents.
What this structure means is that knowing an attestation exists tells you nothing on its own. The receiving party must examine the
predicateType to verify that the attestation actually contains the claim they are requesting. If you request a build provenance record but receive an SBOM attestation and process it as valid, you have not verified anything.The
subject side carries a provision that bears on the later part of this article.Set of software artifacts that the attestation applies to. Each element
represents a single software artifact. Each element MUST have `digest` set.
Subjects are assumed to be _immutable_, i.e. the artifacts identified by the
subject SHOULD NOT change.
IMPORTANT: Subject artifacts are matched purely by digest, regardless of
content type.Matching is performed solely based on the digest. Names and tags are not used for matching. The specification also states outright that the artifacts a
subject points to are assumed to be immutable. Issuing an attestation against a mutable tag steps outside that assumption. Section 10.6 argues for admitting images by digest rather than by tag, and this is one of the reasons.2.3 SLSA - The Vocabulary for How Hard a Claim Is to Forge
Provenance existing and provenance being trustworthy are two different things. SLSA expresses that gap as levels. As of August 17, 2026, the latest version is v1.2 and its status is Approved. The build track has four levels, and the specification summarizes them as follows.Build L0: No guarantees
No requirements—L0 represents the lack of SLSA.
Build L1: Provenance exists
Package has provenance showing how it was built. Can be used to prevent mistakes
but is trivial to bypass or forge.
Build L2: Hosted build platform
Forging the provenance or evading verification requires an explicit “attack”,
though this may be easy to perform. Deters unsophisticated adversaries or those
who face legal or financial risk.
Build L3: Hardened builds
Forging the provenance or evading verification requires exploiting a vulnerability
that is beyond the capabilities of most adversaries.The note attached to L1 carries the most weight.
Provenance may be incomplete and/or unsigned at L1. Higher levels require more
complete and trustworthy provenance.
The specification itself says that provenance alone is trivial to forge. L2 requires a hosted build platform to generate and sign the provenance. Only there does provenance start to mean something against tampering after the build. L3 goes further and requires the build platform itself to be hardened, so that runs do not influence one another and the secret material that signs the provenance is not visible from the build steps the user wrote. In v1.2, the Source track has been reintroduced, bringing the source code side back under the scope of the specification.
The specification also lays the levels out as a list, which is the more useful form at design time.
Track/Level   Requirements                                             Focus
Build L0      (none)                                                   (n/a)
Build L1      Provenance showing how the package was built             Mistakes, documentation
Build L2      Signed provenance, generated by a hosted build platform  Tampering after the build
Build L3      Hardened build platform                                  Tampering during the build
The Focus column names what raising a level actually prevents. L1 covers mistakes and documentation, and assumes no attacker at all. Tampering after the build starts to be addressed at L2, and tampering during the build at L3. Section 12 lays out what is left when each stage is broken. That table counts stages of the chain and this column counts levels of the build track, so the two do not line up one to one. Both answer the same question all the same: what is prevented, and what is not.
One fact about AWS is worth settling here. AWS does not generate SLSA provenance as a managed service. AWS Signer generates signatures, but it does not create the predicates that describe the build inputs or execution environment. The task of assembling an in-toto Statement and binding it to the artifact falls to your own pipeline. Section 5.2 covers this in detail.
2.4 The Four Artifacts Are Independent
From all of that, four distinct kinds of claim appear around a container artifact, and each operates independently.Signature. It says that the holder of a particular key signed the digest of this artifact. It says nothing about the contents.
Provenance. It describes which inputs and which environment produced this artifact. Whether that description is true comes back to whether you trust the party that issued it.
SBOM. It enumerates the components inside this artifact. It does not say whether any of them has a problem.
Vulnerability report. It states whether the listed components carry known issues, as of what was known at one point in time. Given time, the answer changes.
Produce each of the four separately, and verify each separately. If any one of them were to replace another, it would create a flaw in the design.
3. The Chain of Trust, and Where It Breaks
3.1 The Six Stages
The path from source code to execution is divided into six stages. Each stage receives an artifact from the previous stage, adds something to it, and then passes it on to the next stage.- Source — Who wrote which commit.
- Dependency — What was taken in from outside.
- Build — Which environment produced the artifact from which inputs.
- Registry — Where the artifact is placed and how it is identified.
- Admission — The runtime decides whether to accept the artifact.
- Runtime — The artifact runs.
3.2 Who Claims What at Each Stage
The entity that issues the claim, and the content of the claim, change from stage to stage.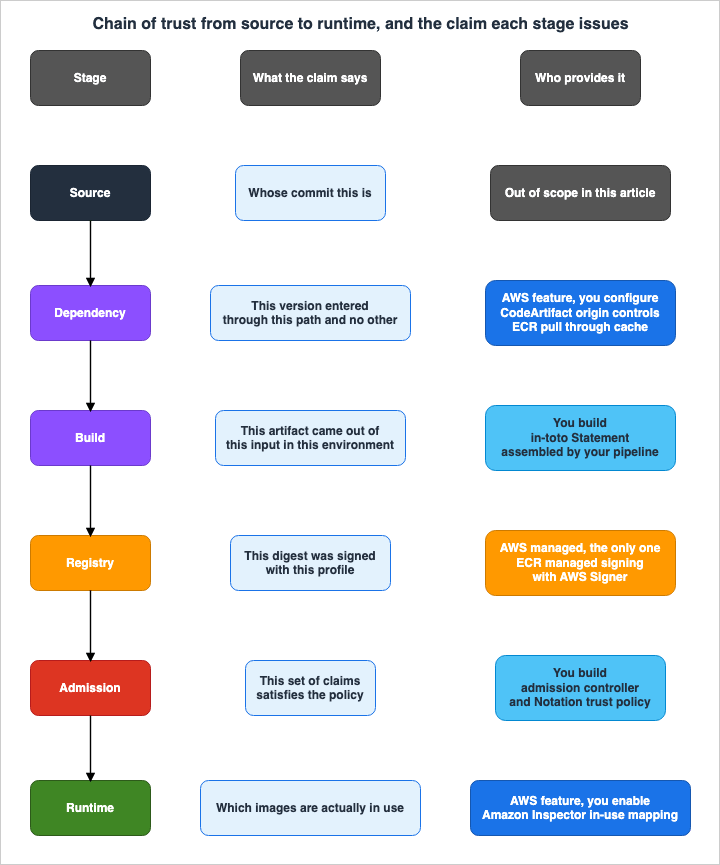
| Stage | Who issues the claim | What the claim says | What AWS offers | Who provides it |
|---|---|---|---|---|
| Source | The version control system and the signer | Whose commit this is | Outside the scope of this article | Out of scope |
| Dependency | The internal registry | That this version entered through this path and no other | CodeArtifact package origin controls and the ECR pull through cache | An AWS feature that you configure |
| Build | The build platform | That this artifact came out of this input in this environment | None | You assemble the in-toto Statement |
| Registry | AWS Signer | That this digest was signed with this profile | ECR managed signing | AWS provides this as a managed feature |
| Admission | The admission control | That this set of claims satisfies the policy | None | You build the admission controller or the lifecycle hook |
| Runtime | The runtime environment | Which images are actually in use | The Amazon Inspector in-use image mapping | An AWS feature that you enable |
Read the last column from top to bottom and you can see what AWS supplies and what it does not. Only one row can be called managed. Dependency and runtime do have AWS features behind them, but configuring and enabling them stays with you. Build and admission have no AWS component at all. Section 13 reorganizes the same division by artifact.
3.3 The Strength of the Chain Is Set by Its Weakest Claim
Every claim rests on the artifact handed over by the stage before it. Build provenance states that it used this input, but whether that input is itself correct depends on the claim made at the dependency stage. The signature states that someone signed this digest, but whether what sits behind that digest is correct depends on the claim made at the build stage.In essence, a chain of claims works like multiplication; if any single claim lacks a valid basis, all subsequent claims lose their validity. Organizations that focus solely on obtaining signatures often overlook this point: the signature only fixes the digest as it existed at the time it was registered, and it provides no guarantee that the digest was derived from a correct input.
3.4 A Chain Breaks in Two Different Senses
There are two ways a chain can break.The first is that some stage has nobody issuing a claim. If nobody produces build provenance, the build stage stays blank. In this case, the recipient will have to make a judgment based on the signature alone, without knowing what was actually built.
The second is that the claim exists and nobody reads it. Even with signature, provenance, and SBOM all in place, if the recipient launches the image without verifying this information, the claim is essentially meaningless. The second scenario is more dangerous. The artifact carries a signature, the console displays it, and in an audit you can say the images are signed. In fact nothing is being stopped.
4. Dependency Intake - Funneling What Comes From Outside Into One Place
4.1 Why route dependencies through an internal registry?
There are two problems with directly incorporating dependencies from external, public registries. First, records of what has been incorporated become scattered across various build environments. Second, the same name can still carry different contents.By introducing an internal registry as an intermediary, both of these issues can be resolved simultaneously. What you take in stays in one place, and you gain control over which path admitted it. This second point is the focus of this section.
4.2 CodeArtifact Package Origin Controls
AWS CodeArtifact provides settings to restrict the paths through which package versions can enter a repository. The official documentation notes that there are three potential paths, and highlights the risks associated with certain combinations.Package versions can be added to a repository by directly publishing them, pulling them
down from an upstream repository, or ingesting them from an external, public repository.
Allowing package versions of a package to be added both by direct publishing and
ingesting from public repositories makes you vulnerable to a dependency substitution
attack.There are two settings. Setting Upstream to Allow permits new versions to be ingested from upstream repositories and external connections. Setting Publish to Allow lets a package manager publish that version directly. Allowing both at once is the dangerous combination.
For packages developed in-house, permit Publish only and deny Upstream. For packages ingested from outside, reverse the two. This separation helps structurally prevent substitution attacks that exploit naming conflicts.
You need to know how the default behaves. The official documentation states:
By default, package origin controls will be configured based on how the first version
of a package is added to the repository.
The first path a version takes into the repository sets the default. If direct publishing happens first, Publish is allowed and Upstream is blocked. If ingestion from an external source occurs first, the opposite will be true. Leaving the settings to their defaults can result in inconsistent configurations for each package. The settings are not unset. An unintended setting is in force.
The scope of that rule is narrower than it looks. The section on default values on the same page states that the settings of the package group a package belongs to decide that package's default first.
If a package is associated with a package group with restriction settings of ALLOW for
every restriction type, the default package origin controls for a package will be based
on how the first version of that package is added to the repository.

Otherwise, if a package is associated with a package group that has at least one
restriction setting of BLOCK or ALLOW_SPECIFIC_REPOSITORIES, then the default origin
control settings for that package will be set to Publish: ALLOW and Upstream: ALLOW.
The first path decides the default only when every restriction on the group is
ALLOW. If the group carries even one BLOCK or ALLOW_SPECIFIC_REPOSITORIES, the package default becomes Allow for both Publish and Upstream. That pairing does not mean the package is open. It means the decision has been deferred to the group. Section 4.3 covers what a package group is and what its restrictions can be set to.Furthermore, there are packages for which this default does not apply.
Packages that existed in CodeArtifact repositories prior to around May 2022 will have
a default package origin controls of Publish: ALLOW and Upstream: ALLOW. Package
origin controls must be set manually for such packages.
The default setting for older packages is precisely the combination that the official documentation explicitly identifies as dangerous. A state where both direct publishing and external ingestion are permitted remains active simply because the settings have never been explicitly modified. Newer packages get the safer default, which makes it hard to notice this issue even after briefly examining a few packages within a repository. When you introduce origin controls into existing repositories, the first job is a full sweep to find out what default settings are currently in place for all packages. Look at the packages that have been sitting there longest, not the ones added recently.
One point needs care here. Read the two passages above together and Publish: ALLOW with Upstream: ALLOW turns out to have two separate origins: a package that has sat in the repository since before around May 2022 and was never touched, and a new package that is deferring the decision to its group. Counting the packages set to Allow and Allow does not, on its own, single out the dangerous ones. Read the package setting together with the setting on its group.
Origin controls decide which path a package version can take into the repository, not how long after publication it can be installed. CodeArtifact preserves the original upstream publish times when it caches packages from external connections, and the tool or pipeline that reads those times decides whether to wait. Dependency Cooldowns by Package Manager on this site maps the waiting settings of each package manager and update bot.
4.3 Configuring Settings for Groups of Packages
When configuring settings on a per-package basis, newly added packages may be overlooked. CodeArtifact has a unit called a package group, which allows you to define settings for multiple packages collectively. Implementing a policy that approves trusted upstream sources while blocking all others is best managed at this level.With settings on both the package and the package group, you need to know which one wins. The official documentation clearly states:
The interaction between the two settings is that a setting of BLOCK always wins over
a setting of ALLOW.
Block always wins. So a Block on the package group blocks the package even when the package itself says Allow. The reverse does not hold: setting a package to Allow does not open it. The state seen in section 4.2, where an old package has both Publish and Upstream set to Allow, closes in effect once the group blocks the upstream.
The settings on a group are not shaped like the settings on a package. A package carries two, Publish and Upstream. A group carries three,
PUBLISH, EXTERNAL_UPSTREAM, and INTERNAL_UPSTREAM, and each takes one of ALLOW, BLOCK, ALLOW_SPECIFIC_REPOSITORIES, and INHERIT. The single Upstream on the package side splits into an external half and an internal half on the group side, so blocking only external ingestion leaves open the path that pulls from an upstream repository in the same domain. Covering them at the group level leaks less than fixing every package one at a time, but covering them means deciding all three.Put the package side and the group side together and the relationship looks like this.
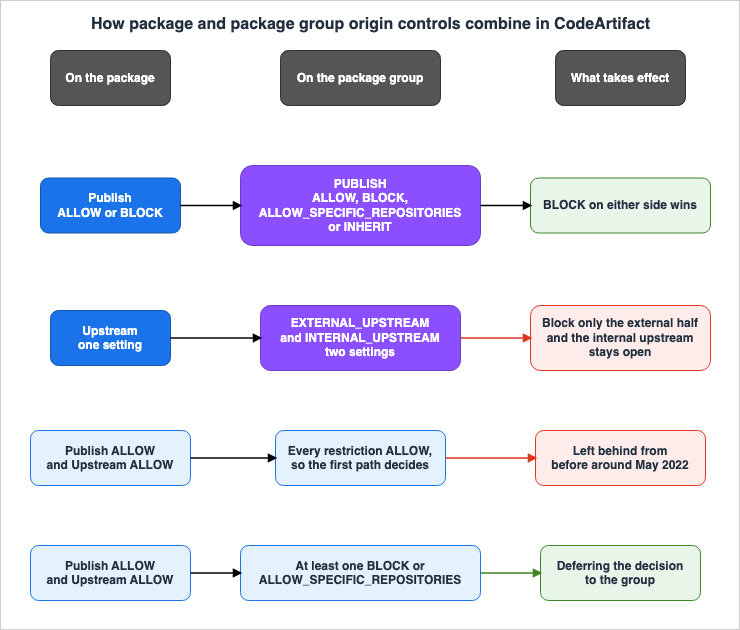
What this stage can do is close the namespace, not inspect what is inside a package. Malicious packages entering through approved channels will not be blocked by these settings. Content inspection is addressed in sections 5.3 and 9.
4.4 Container-Side ECR Pull Through Cache
For container image dependencies, such as base images, ECR's pull through cache serves the same function. It puts the upstream registry behind your private registry URI, so the only registry anyone looks at is your own.The behavior includes two time windows. For the image itself, the window is as follows:
When a customer pulls a cached image through the Amazon ECR private registry URI,
Amazon ECR checks whether it has validated the image against the upstream registry
within the last 24 hours. If the 24-hour window has expired, Amazon ECR sends a request
upstream to check for a newer version and updates the cache if one exists.
For referrers, such as signatures and SBOMs, a separate window applies.
Amazon ECR checks whether the referrer artifacts have been updated within the last
6 hours. If the 6-hour window has expired, Amazon ECR sends a request upstream to check
for newer versions and updates the cache if they exist.
The window length differs: 24 hours for the image itself and 6 hours for referrers. This referrer synchronization arrived on April 17, 2026. Before that, asking a pull through cache repository for referrers returned no upstream signature and no upstream SBOM. If you intend to admit images on the strength of an upstream signature, whether this feature exists changes the design.
Even when a window is open, a query to the upstream registry may not always succeed. The behavior in case of failure is documented.
If Amazon ECR is unable to update the image from the upstream registry for any reason
and the image is pulled, the last cached image will still be pulled.
The pull succeeds even when the update fails, and what comes back is the old cache. That is the right call for availability. For the supply chain it means a path exists on which a version fixed upstream never arrives while the same tag keeps being served, and nothing on the pull side distinguishes the two. If your operation assumes upstream updates are landing, you need a separate way to see when the cache was last validated.
There is one more collision in the design.
Turning on image tag immutability for repositories using a pull through cache rule
will prevent Amazon ECR from updating images using the same tag.
Tag immutability is the basic setting against image substitution, but on a pull through cache it also stops upstream updates. To hold both, use a tag mutability exclusion filter and leave only the cached tags mutable. ECR supports both
IMMUTABLE_WITH_EXCLUSION and MUTABLE_WITH_EXCLUSION exclusion filters, and you can specify them using the --image-tag-mutability-exclusion-filters parameter with put-image-tag-mutability.4.5 Set the Initial Configuration with a Repository Creation Template
The pull through cache creates a repository the first time something is pulled through it. Specify nothing and ECR creates the repository with mutable tags, AES256 encryption, no repository policies, no lifecycle policies, and no resource tags.A repository creation template defines that initial configuration per namespace prefix. Without one, the repositories that miss your settings are exactly the ones nobody created by hand.
Templates are not only for the pull through cache. The official documentation names three paths they apply to: the pull through cache, repository creation on push, and replication. Those are the three ways a repository appears without anyone creating it, and a template covers all three. Place no template and all three paths create repositories with the defaults.
Template settings apply only at repository creation and do nothing to an existing repository. Writing a template afterward does not fix a repository that already exists.
4.6 What This Stage Can Claim and What It Cannot
The claim you can make is that this version entered through this path and no other. The claim you cannot make is that the contents of this version are safe; that belongs to a different stage.5. Build - Provenance Describes the Environment, Not the Result
5.1 Provenance Does Not Prove Reproducibility
The purpose of build provenance is often mistaken. Provenance does not prove that the same input will always produce the same output. That is a separate characteristic, related to reproducible builds.Provenance simply states that this output originated from this input, within this environment, as stated by the build platform. EKS best practices define what provenance verification guarantees as follows:
Provenance Verification: assurance that existing assumptions of where and how an
artifact originates from are true and that the artifact or its accompanying metadata
have not been tampered with during the build or delivery processes.
The precise phrasing is that existing assumptions are true. An organization that holds no assumptions has nothing for provenance to check. Before you can use provenance data, you have to decide first which build counts as the correct one. Specifically, the receiving party needs to clearly document its policies regarding which repository, which branch, which account, and which build platform count as authoritative.
5.2 What AWS Manages and What It Does Not
This is a point worth settling against the primary source.AWS Signer, when used as a managed service, provides key and certificate lifecycle management, as well as signing operations. This includes key generation, secure storage, rotation, and signing using HSMs validated to FIPS 140-3 Level 3.
What AWS Signer does not provide is the predicate that describes the build inputs or the environment. SLSA provenance, and the assembly of in-toto Statements, are not part of the managed functionality. You create the thing that gets signed.
EKS best practices also describe this division of responsibilities, albeit in a reversed manner.
We can use AWS Signer or Sigstore Cosign, to sign container images, create attestations
for SBOMs, vulnerability scan reports and pipeline run reports.
AWS Signer is presented as a signing tool, not as a predicate generator. SBOMs, vulnerability scan reports, and pipeline run records are all materials you supply. Signer takes over from the signing onward.
Therefore, when dealing with build provenance, the configuration will look like this: the pipeline assembles an in-toto Statement, associates it with an OCI artifact, and pushes it. The receiving end then reads that predicate. The assembly of the Statement and the design of the predicate are outside of AWS's managed functionality. Adopting AWS Signer does not amount to meeting SLSA, and describing it that way does not hold up.
5.3 To Inspect Contents During the Build, Use the Amazon Inspector CI/CD Path
Amazon Inspector runs not only after an image reaches ECR but also inside the pipeline, before the push. Two components make this work.The first is the Amazon Inspector SBOM Generator, which creates SBOMs from archives, container images, directories, local systems, and compiled Go and Rust binaries. The second is the Amazon Inspector Scan API, which receives the SBOM and returns a vulnerability report.
The Scan API has a defined limit.
This action supports a maximum of 5,000 components per request and supports a maximum
response size of 10MB (compressed or uncompressed).
The 5,000 component limit is one you actually hit with dependency-heavy application images. The API reference states that exceeding this number will result in a
ValidException being returned. The name needs care here. The Errors section on that same page lists ValidationException, and that is the one your handler actually receives. Code against the Errors section, not against the field description.Whoever implements the pipeline decides whether it continues or halts when it hits that limit. If this behavior is not explicitly defined, exceeding the limit may appear as if the scan passed, even if vulnerabilities are present. Implementations that suppress errors may inadvertently allow scans to pass after a certain point, as dependencies increase.
The official documentation lists three CI/CD solutions as plugins: GitHub Actions, Jenkins, and TeamCity. CodePipeline, CodeCatalyst, and GitLab are not plugins; each has its own procedure for wiring the scan in as an action or a component of that service. In environments where neither applies, the SBOM Generator and Scan API can be combined directly.
5.4 Inheriting Base Images and Multi-Stage Builds
When using multi-stage builds, the final image does not include the build tools. While this reduces the attack surface, without a record of which intermediate stages it originated from, the final image loses its traceability and meaning. The subject of an in-toto Statement will be a digest of the final artifact, but if the predicate does not include the digest of the base image, swapping the base image does not show up in the provenance at all.Pull the base image into your own registry, sign it there, and record that digest in the provenance of the final image. Only when all three are in place does the claim made at the base image stage reach the final artifact.
5.5 What This Stage Can Claim and What It Cannot
The claim you can make is that this artifact came out of this input in this environment. The claim you cannot make is that the environment was not compromised; that is the hardening of the build platform itself, which is what SLSA Build L3 covers. In the terms of the table in section 2.3, this stage reaches the L2 focus of tampering after the build, and tampering during the build is still out of range.6. Registry - What Managed Signing Automates
6.1 When does signing happen?
Amazon ECR managed signing signs at the moment an image is pushed. The official definition reads as follows:Amazon ECR managed signing automatically signs your container images by generating
cryptographic signatures using AWS Signer when images are pushed to Amazon ECR. This
eliminates the need to install and configure client-side tools and allows you to
centrally govern signing as a registry configuration.Signing at push time has a consequence. Signatures are applied after the artifact is created. If this order is misunderstood, it could lead to the incorrect assumption that the signature guarantees the content of the artifact. What the signature fixes is the digest as it stood at the moment of the push, and whether that digest came out of a correct path depends on the claims made at the earlier stages.
6.2 Whose credentials sign the image?
This is directly related to the design. Managed signing signs with the credentials of the principal who pushed the image, not with an AWS service role.Once configured, Amazon ECR managed signing automatically signs images as they are
pushed using the identity of the entity pushing the image.So if the principal pushing the image lacks signing permission, ECR generates no signature. The API reference specifies this condition.
To successfully generate a signature, the IAM principal pushing images must have
permission to sign payloads with the AWS Signer signing profile referenced in the
signing configuration.
There are two types of permissions required. An example from the official documentation is as follows:
{
   "Version": "2012-10-17",
   "Statement": [
   {
       "Sid":"UploadSignaturePermissions",
       "Effect":"Allow",
       "Action":[
           "ecr:CompleteLayerUpload",
           "ecr:UploadLayerPart",
           "ecr:InitiateLayerUpload",
           "ecr:BatchCheckLayerAvailability",
           "ecr:PutImage"
       ],
       "Resource":"arn:aws:ecr:region:account-id:repository/repository-name"
   },
   {
       "Sid": "SignPermissions",
       "Effect": "Allow",
       "Action": [
           "signer:SignPayload"
       ],
       "Resource": "arn:aws:signer:region:account-id:/signing-profiles/signing-profile-name"
   }
   ]
}
This design carries a lot of weight. The entity that signs is the pipeline role, not AWS. Consequently, the question of who is allowed to sign becomes a matter of IAM design itself. If a developer's individual role is granted the
signer:SignPayload permission, an image that developer builds on a laptop carries the same signature as production. A signature is worth exactly as much as the narrowing of who can produce it.6.3 The Configuration Is Per Registry
Another key design consideration is the granularity of the settings. You configure managed signing as a signing configuration at the registry level, not at the repository level. A single registry can accommodate up to 10 signing rules, with each rule holding a signing profile and a repository name filter.{
"rules": [
{
"signingProfileArn": "arn:aws:signer:region:account-id:/signing-profiles/profile-name",
"repositoryFilters": [
{
"filter": "test*",
"filterType": "WILDCARD_MATCH"
}
]
}
]
}The behavior when multiple rules match is important. The official documentation states:
When a new image is pushed, Amazon ECR matches which signing rule and signing profile
can sign the image. If there are multiple matches, Amazon ECR generates multiple
signatures.
Every rule that matches produces its own signature. The rules stack rather than exclude, so check at design time whether your filters overlap.
The relevant APIs are
PutSigningConfiguration, GetSigningConfiguration, and DeleteSigningConfiguration. The signing status of individual images can be checked using DescribeImageSigningStatus.6.4 The Signing Profile Lives on the AWS Signer Side
What sets the terms of a signature is the AWS Signer signing profile. The platform to sign for, the validity period of the signature, and who is allowed to use the profile all live here. There is exactly one platform for container images.Notation-OCI-SHA384-ECDSA Notation for container registriesThe validity period of a signature is an attribute of the profile and has a long default value.
The validity period of signatures. By default, signature validity is set to 135 months
(11 years and 3 months), which is the maximum validity supported. The signature validity
period is only applicable for AWSLambda-SHA384-ECDSA and Notation-OCI-SHA384-ECDSA
signing platforms.
The default period of 135 months effectively means you do not need to consider the signature expiring. Whether to shorten this period depends on how you assess the potential impact if a key is compromised. Shortening it will increase the need for re-signing as the signature expires, while leaving it longer means relying on revocation. Refer to section 11 for factors to consider in making this decision.
Profiles can be located in separate accounts. Using
AddProfilePermission, you can grant signing and revocation permissions to principals in other accounts. A central security account can hold the profile while the pipeline in each account uses it.6.5 The First Discrepancy - Two Validity Periods on the Same Page
This article records four discrepancies in the primary sources. The first of them sits inside a single page.The passage quoted above is the section describing the CLI on the
signing-profiles page just examined. The section on the same page describing the console says this.Specify the Signature validity period in months, days, or years. The default value is
135 months (11 years and 6 months).Both sections give the same number, 135 months. Only the parenthetical differs, and the two readings are three months apart.
This article treats the CLI section as correct, on arithmetic alone: eleven years is 132 months, so 135 months can only be 11 years and 3 months. The console section's parenthetical is wrong.
This one does not change any design decision. Read either way, 135 months is long enough that expiry drops out of operational concern. It is worth recording because official documentation can fail to agree with itself inside a single page. Places that no machine check reaches, such as an arithmetic conversion inside parentheses, are where this happens. The three that follow are heavier.
6.6 The Second Discrepancy - The Name of the Permission Used on the Container Path
The AWS Security Blog and the AWS Signer API reference say different things about the action name used on the container path.The blog (published May 26, 2026) states:
The signing authorization model separates concerns: developer credentials shouldn't
have signing permissions. Only CI/CD pipeline roles should have signing permissions
through the signer:StartSigningJob API.
The API reference for
AddProfilePermission says this about the same action.signer:StartSigningJob. This action isn't supported for container image workflows.
signer:SignPayload. This action isn't supported for AWS Lambda workflows.This article will prioritize the API reference as the authoritative source. There are two reasons for this. First, the API reference directly defines the scope of each action. Second, the IAM policy example shown on the ECR managed signing page (referenced in section 6.2) also uses
signer:SignPayload, indicating consistency between these two primary sources.The principle the blog states, that developer credentials should not carry signing permissions, is correct. Only the action name is wrong. On the container image path, the action to restrict is
signer:SignPayload. Unlike section 6.5, this one lands directly on implementation: write an IAM policy that grants signer:StartSigningJob as the blog says, and you end up having granted a permission while no signature is generated.7. Registry - Where the Signature Is Stored, and What Remains
Section 6 covered when managed signing signs, whose credentials it signs with, and at what granularity it is configured. What follows is how that signature is handled inside the registry, and what is left unautomated.7.1 Signatures Are Stored as Referrers
Signatures are placed in the same repository as images, as a separate OCI artifact. This relationship is expressed through thesubject field in OCI Image 1.1, where the artifact's manifest references the digest of the image it refers to. Additionally, the artifactType field indicates the type of artifact, and OCI Distribution 1.1's referrers API lets you pass an image digest and get back the artifacts that refer to it. ECR has supported these features since June 27, 2024.The artifact type for signatures is
application/vnd.cncf.notary.signature. In the ECR API, ListImageReferrers returns associated artifacts when provided with the digest of the subject.This API has certain default behaviors that the caller should be aware of. The principal making the call requires
ecr:BatchGetImage permission, and without specifying a filter, only ACTIVE artifacts will be returned. The possible values for artifactStatus are ACTIVE, ARCHIVED, ACTIVATING, and ANY. An archived signature does not appear in the list unless you ask for it. A signature not existing and a signature simply not being visible due to the default filter are two different things.Referrers are treated the same way as regular images. They are subject to replication, and the signatures will also be replicated to the destination.
Push and deletion events are emitted as EventBridge events. In addition to the
ECR Image Action associated with the image itself, referrers have a dedicated detail type called ECR Referrer Action. To trigger downstream processing when a signature lands, watch this detail type.7.2 The Third Discrepancy - How Lifecycle Policies Treat Signatures
The third one is not only a disagreement between documents. It takes the form of a passage disappearing from one of them.The AWS Open Source Blog describes the relationship between the referrer and the lifecycle policy as follows:
To help with the lifecycle management of an image's reference artifacts, Amazon ECR
Lifecycle Policies (LCP) automatically clean up artifacts within 24 hours of a subject
image deletion. Additionally, reference artifacts that refer to an active image are
protected from deletion by LCP rules until their subject image is deleted.
In contrast, the current description in the ECR User Guide states:
When reference artifacts are present in a repository, Amazon ECR lifecycle policies
will automatically clean up those artifacts within 24 hours of the deletion of the
subject image. The artifact must also remain in its current storage class for at least
24 hours before Amazon ECR lifecycle policies can clean it up.
The second sentence has been swapped out. The blog says that an artifact referring to a live image is protected from the lifecycle policy. The user guide says nothing about that protection and instead gives a condition for deletion: the artifact must have stayed in its current storage class for 24 hours. Design from only one of them and the behavior you expect is different.
This passage in the user guide changed while this article was being written. The user guide from August 14, 2026, contained the same wording as the blog, but by August 16th, it had been updated to the version above. The blog, being from 2024, remains unchanged.
This article treats the user guide as authoritative. The reason is the date: when two documents describe the same subject differently and one of them is newer, the newer one is read as describing current behavior. So this article does not assume that the signature of a live image is protected. The one statement both documents share, that deleting the image also removes the signature within 24 hours, is safe to build on.
If you want protection as a design premise, confirm for yourself that your lifecycle policy rules do not match the artifact type of the signature. Writing so that you do not depend on what the documentation says is the only defense against this class of discrepancy.
7.3 The Constraints on Managed Signing
The official documentation lists three constraints.Cross-region signing is not supported — Signing profiles must be in the same region as
your Amazon ECR registry. You cannot use a signing profile from one region to sign
images in a registry located in a different region.
Cross-account signing is supported — Signing profiles can be in different accounts than
your Amazon ECR registry. This enables organizations to centrally manage signing
profiles while allowing developers in other accounts to use them.
Signatures cannot be signed — You cannot sign signatures themselves. Only container
images can be signed.The first constraint applies to the configuration. When operating in a multi-Region environment, you will need to create a signing profile for each Region. You cannot hold one profile in a central account and sign from it in every Region. The boundary you can cross is the account; the one you cannot is the Region.
The third point is that managed signing can only sign container images. To put a signature on an SBOM attestation, the managed path does not apply. That work goes through manual signing with the Notation CLI. The EKS best practices passage quoted in section 5.2 reads as though AWS Signer can sign attestations, and it can, but it does so on the manual signing path, not the managed one. Confusing the two can lead to the belief that one signing rule at the registry level also signs your SBOMs.
It is also important to consider the supported Regions. The ECR user guide states that managed signing is available in all AWS Regions where container image signing with AWS Signer is available. Because you need a profile in each Region, confirm first that every Region you deploy into supports it. Otherwise images flow unsigned in some Regions.
There is also a quota to consider.
Signatures stored in your repository count against the service quota for the maximum
number of images per repository. Each signature counts as 1 artifact against the images
per repository quota.
Signatures count as artifacts. The images per repository quota defaults to 100,000, and you can request an increase. Run close to that quota and turning on signing brings the ceiling nearer. As section 6.3 showed, every rule that matches produces its own signature, so overlapping filters make the count climb faster.
7.4 What Remains Even When Key Management Disappears
Managed signing removes several things: key generation and storage, the certificate lifecycle, rotation, and the client-side tooling. That removal is substantial. The work of running a signing infrastructure disappears.Three things, however, will remain. First, the IAM design that limits the principals who can sign. Second, the design of rules at the registry level and repository filters. Third, and most importantly, a mechanism to enforce verification on the admission side. The third point will be addressed in section 10.
7.5 What This Stage Can Claim and What It Cannot
The claim you can make is that a principal able to use this signing profile signed this digest. The claims you cannot make are that the contents behind that digest are correct, and that the digest came out of a correct path. Both belong to earlier stages.This stage has one property the others do not. A claim made here goes on being made whether or not anyone reads it. At the dependency stage and the build stage, producing no claim leaves a blank, and a blank is visible. Signing is different. Write one rule at the registry level and every subsequent push carries a signature, and the console shows it. The gap between a claim existing and a claim stopping something opens widest here.
8. Describing the Artifact - What an SBOM Answers and What It Does Not
8.1 An SBOM Answers Only About Composition
An SBOM is an inventory of what is inside an artifact. Being an inventory means it does not answer three questions: Does a particular component have any issues? Is that component actually used along a reachable path? And is the SBOM itself correct?The third question is often overlooked. Rewrite the contents of an unsigned SBOM and nothing gives it away. If the inventory is what you base a decision on, the inventory itself has to carry a signature.
8.2 The Amazon Inspector SBOM Goes to S3
Amazon Inspector can generate and output SBOMs for the resources it monitors, and the output destination is relevant to the design.Amazon Inspector supports exporting SBOMs in CycloneDX 1.4 and SPDX 2.3 compatible
formats. Amazon Inspector exports SBOMs as JSON files to the Amazon S3 bucket you
choose.The destination is an S3 bucket, not a referrer attached to the image. The SBOM that Amazon Inspector produces therefore does not travel with the image. Even if you replicate across registries, the SBOM will not follow, and it will not be available by calling the referrers API on the admission side.
If you want to carry the SBOM along with the artifact, you will need to manually push it as an OCI artifact with a
subject. AWS's managed features do not address this requirement. Section 7.3 adds the constraint that a signature cannot itself be signed. Put the two together and attaching an SBOM to an artifact and then signing that SBOM becomes a manual job with the Notation CLI.8.3 The Output Format and the Input Format Do Not Match
There is another discrepancy in the implementation. The SBOM output from Amazon Inspector is in CycloneDX 1.4, while the Scan API, which receives the SBOM and returns vulnerabilities, requires CycloneDX 1.5 as input.ScanSbom
Scans a provided CycloneDX 1.5 SBOM and reports on any discovered vulnerabilities.
You can generate compatible SBOMs for resources using the Amazon Inspector SBOM
generator.Passing an exported SBOM straight to ScanSbom does not work, because the versions do not match. The API reference points to the Amazon Inspector SBOM Generator as the way to produce a compatible SBOM, so what you feed the Scan API is the generator's output. The output from the export function is intended for storage and querying, serving a different purpose. The same service produces SBOMs through two exits, and the two are not interchangeable.
SPDX also includes relevant notes.
SPDX format exports from Amazon Inspector are compatible with systems using SPDX 2.3,
however they don't contain the Creative Commons Zero (CC0) field.
Build a downstream tool that requires strict SPDX 2.3 validation to pass, and it fails here.
8.4 What the Inventory Does Not List
An SBOM is not a complete inventory. Amazon Inspector's documentation lists two types of items that are not included.The first is dependencies with an indeterminate version.
Some software components and package managers use version ranges or dynamic references
instead of fixed versions for dependencies. This practice creates unresolved hashes,
where Amazon Inspector identifies a hash or jar file but cannot map it to a specific
name and version for vulnerability detection.
The SBOM carries these as hashes, but they cannot drive vulnerability matching, because nothing resolves them to a name and version. Having a row in the inventory and that row being useful for making decisions are two different things.
The second is components from ecosystems that Amazon Inspector does not have advisories for. Such a component carries this property.
"name": "amazon:inspector:sbom_scanner:info",
"value": "Component skipped: no supported rules found."
This is not an error; it is by design. If you aggregate components without distinguishing between those that have no known vulnerabilities and those that have simply not been analyzed, the latter may appear to be the former. Those aggregating the data should place components with this property in a separate category.
8.5 An Unsigned SBOM Is Just Text
Return to the third question in section 8.1. If an SBOM is to be used as a basis for admission decisions, it must be possible to verify who created it. It should be signed as an attestation, and the recipient should verify both thepredicateType and the signatory. Failing to take this small step leaves open the possibility that an attacker could provide a fabricated inventory and have it accepted without scrutiny.Everything so far concerns the side that produces the inventory. The design of a system that consumes this inventory to answer questions about what is currently running within an organization is a separate topic, as addressed in AI Bill of Materials on AWS. Even if the focus shifts to models or datasets, the distinction between what an SBOM can and cannot answer, as outlined in this section, remains valid.
9. Continuous Evaluation - What a New Vulnerability Does to an Existing Image
9.1 What Continuous Scanning Actually Does
The previous sections have discussed claims made at the point of artifact creation. However, vulnerabilities can increase even if the artifact itself remains unchanged. Newly published CVEs may apply to images already present in the registry.Continuous scanning in Amazon Inspector is what handles this axis of time. Three events trigger a re-scan.
Whenever a new container image is pushed.
Whenever Amazon Inspector adds a new common vulnerabilities and exposures (CVE) item to
its database, and that CVE is relevant to that container image (continuous scanning
only).
Whenever a container image is transitioned from archived to active in ECR.
The second trigger is the subject of this section: Findings increase even though the image has not changed. This is not an anomaly; it indicates that continuous scanning is functioning correctly.
The foundation of this mechanism, however, is a CVE database, and the packages used in supply chain attacks do not carry CVEs. The AWS Security Blog states the limitation outright.
Traditional vulnerability scanners focus on known CVEs—publicly disclosed
vulnerabilities with assigned identifiers. Supply chain attacks like Shai-Hulud involve
malicious packages that function as zero-days: they're intentionally crafted by threat
actors and actively exploited before a CVE is assigned. Traditional vulnerability
scanners that rely on CVE databases won't detect these packages until they've been
formally identified and catalogued, which can take days or weeks.
Malicious packages are assigned a different identifier, separate from CVEs. According to the blog, the behaviors detected by AWS are provided to community-maintained databases like the OpenSSF Malicious Packages Repository, where they are shared with identifiers in the
MAL-ID format. Amazon Inspector participates in this process, incorporating these assigned identifiers and reflecting them in its findings. Therefore, the guarantees provided in this section are limited to issues associated with CVEs and malicious packages that have been assigned a MAL-ID. Items lacking both will not be identified here.There is also a problem that arrives before any identifier does: some packages are harmless at the moment they are published.
A related threat model worth understanding is the sleeper package: a package that
appears benign at publication and activates malicious behavior only after a delay or
trigger condition. Static analysis alone is insufficient to catch these packages
because the malicious payload isn't present or active at install time.
A component clearing inspection at the moment you take it in does not mean the component is safe. This is the same limit as the one on claims at the dependency stage in section 4: closing the paths still says nothing about how a component admitted through an approved path will behave later. For the individual incidents named in the quotation, Major Security Vulnerabilities History and Timeline carries the history. This article deals only with the design consequences.
9.2 Conditions for Continuous Monitoring
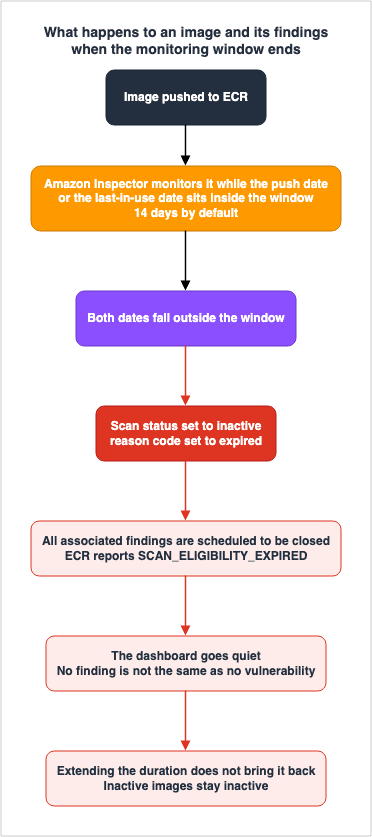
This is the area most prone to misconfiguration. Amazon Inspector does not permanently monitor all images listed in the registry.Here is how it behaves upon activation:
When you first activate Amazon ECR scanning, Amazon Inspector detects images pushed
within the last 14 days.
Here are the conditions for continued monitoring after activation:
If continuous scanning is enabled, Amazon Inspector monitors images as long as they were
pushed within 14 days (by default), the last-in-use date is within 14 days (by default),
or the images are scanned within the configured re-scan duration.
The default is 14 days. It checks two factors: the time elapsed since the push, and the time elapsed since the image was last used on the cluster. You set a number of days on the push date side, and separately on either the last-in-use date or the last pull date. You can select
LIFETIME for the push date, but LIFETIME is not available for the last-in-use date.There may also be differences based on when the account was created.
For Amazon Inspector accounts that were created prior to May 16th, 2025, the default
configuration is for re-scan to monitor images if they were pushed or pulled within the
last 90 days.
Two accounts in one AWS Organizations can end up with different defaults. If configured from a delegated administrator account, the setting will apply to the entire organization, so it is safer to specify the setting explicitly rather than relying on the default. As of November 2025, Amazon Inspector has been added as a policy type within AWS Organizations. Declare the scan type at the organizational level and any account that joins later starts with scanning enabled.
That policy decides enablement and nothing beyond it. The official documentation states that scan settings, the re-scan duration among them, stay with the delegated administrator.
Delegated administrators can always configure scan settings such as EC2 scan modes, deep
inspection paths, and ECR re-scan durations, regardless of whether the resource types are
policy-managed. Organization policies control only whether scanning is enabled, not how
it operates.
What the organization policy closes is the account with no scanning enabled, not the account still sitting on the default re-scan duration. Only the explicit setting above reaches that one.
There is also an asymmetry in behavior when extending the duration.
If you increase the push date duration, Amazon Inspector applies the change to all
actively scanned images in repositories configured for continual scanning. However,
inactive images remain inactive, even if you push them within the new duration.
Extending the duration does not bring back an image that has already dropped out of monitoring. The extension reaches only the images under monitoring right now. Decide the setting before you start operations. Noticing later that monitoring has lapsed and extending the duration then does not reopen the findings for the images that already dropped out. Changes to the settings do not apply retroactively.
9.3 When Monitoring Ends, Findings Are Closed
The official documentation clearly states what happens to images that have exceeded their allotted time.When Amazon Inspector stops monitoring an image, it sets the image scan status code to
inactive and reason code to expired. Amazon Inspector then schedules all associated
image findings to be closed.From the ECR perspective, the scan status becomes
SCAN_ELIGIBILITY_EXPIRED.This behavior has a side effect. When monitoring ends, findings for the image are closed, so the issues disappear from the dashboard. Findings disappearing is not the same as vulnerabilities being resolved. If an image continues to run for an extended period, exceeding its push date window, and last-in-use tracking is not functioning, the absence of findings can create a false impression that there are no issues. As seen in section 9.2, extending the period does not revert this state, and the longer the state persists, the harder it becomes to recover.
Set on a time axis, the run-up to an image dropping out of monitoring looks like this.
Similarly, images that have been archived in ECR also undergo the same closing process.
When an active image in ECR is transitioned to archived, Amazon Inspector automatically
closes findings and then deletes the findings after 3 days.
If an archived image is restored to an active state, a new scan will be initiated. In this case, the starting point for the re-scan period is
lastActivatedAt, not the original push date. Images restored from archive will have their window recalculated from that point forward.9.4 What the Coverage Does Not Reach
The media types handled by Amazon Inspector during ECR scans have explicit exclusions. The ECR scan page states:Amazon Inspector does not support the "application/vnd.docker.distribution.manifest.list.v2+json"
media type for the scanning of Amazon ECR repositories.What is excluded is the Docker manifest list, the index that gathers several architectures under one tag. The re-scan duration page states a different limitation on the same target.
For multi-architecture images, the last-in-use date tracking is not supported.
When using multi-architecture images, we recommend that you configure scanning based on
image pull or push events instead of the last-in-use date to ensure proper re-scanning
behavior.
Multi-architecture images are treated differently on both of these counts. Shipping arm64 and x86_64 under one tag is common enough that you will meet this in practice. Follow the official recommendation: for this setup, base the re-scan on push or pull rather than the last-in-use date.
9.5 Mapping Images to What Is Actually Running
Amazon Inspector correlates ECR images with the containers actually running in ECS and EKS. It usesecrImageInUseCount and ecrImageLastInUseAt to refine findings.There is a time lag.
For new container images or accounts, it can take up to 36 hours for data to be
available. Afterwards, this data is updated once every 24 hours.
This correlation indicates whether an image has been recently used, not whether it is currently running. Because the data refreshes once every 24 hours, it does not support a real-time judgment. Attempting to use it to assess immediately after a deployment could result in a 36-hour gap in data.
To see the mapping,
AWSInspector2ReadOnlyAccess is required on top of AWSReadOnlyAccess. With only one of them the mapping does not appear, and it looks as though no image is running. Within organizations, there may be an additional layer; if the delegated administrator account does not have ECR scanning enabled, the cluster will not even be visible. Even with the necessary permissions, correlation data will not be displayed if scanning is not enabled.9.6 What This Stage Can Claim and What It Cannot
The claim you can make is that this image has no known issue as of what is known right now. The claim you cannot make is that the image is safe; drop the tense and the statement becomes false.And the claim at this stage can only be made about what is being monitored. For images that do not meet the conditions in sections 10.2 through 9.4, no claim exists at all.
10. Admission - Where Verification Is Enforced
10.1 Signing and Verifying Are Asymmetrical
This is where the article makes its case.The asymmetry between the signer and the verifier is a point already addressed in the published article Content Provenance for AI-Generated Media in its section 7. The structure holds whether the subject is media or a container artifact: signing is usually a matter of configuration, while verification is something you build. The general case belongs to that article.
On the container artifact side, that asymmetry takes a much more concrete shape. ECR managed signing signs every subsequent push once you write one rule at the registry level. This configuration can be completed in just a few minutes. Conversely, on the admission side, verifying and rejecting signatures requires implementing an admission controller, configuring a trust store and trust policy, and then actively managing that policy. One side involves a simple configuration, while the other requires implementation and ongoing operation.
Leave that asymmetry alone and you arrive at the state section 10.5 draws. All images are signed and displayed in the console, yet the cluster readily launches images without verifying those signatures.
Admission is also not the only place a cluster enforces anything, and the other place looks nothing like this one. A
NetworkPolicy is admitted by the API server but enforced by an eBPF program on the Pod's interface, out of kernel maps the YAML never shows you. eBPF on Amazon EKS follows that second enforcement point, including the window during which a Pod that has already been admitted is not yet covered by it.10.2 The Fourth Discrepancy - How Much of EKS Is Managed
This is the fourth discrepancy, and the heaviest of them. The ECR user guide and the EKS user guide say different things about signature verification on EKS.The section in the ECR user guide that addresses signature verification states:
Managed verification with Amazon EKS

Amazon EKS provides native integration for automatic signature verification. When you
configure signature verification in your Amazon EKS clusters, the service automatically
verifies image signatures before allowing containers to run. For more information about
configuring signature verification, see Validate container image signatures during
deployment in the Amazon EKS User Guide.
And the full text of the corresponding page in the EKS user guide, linked from that section, is as follows:
Validate container image signatures during deployment

If you use AWS Signer and want to verify signed container images at the time of
deployment, you can use one of the following solutions:

Gatekeeper and Ratify – Use Gatekeeper as the admission controller and Ratify
configured with an AWS Signer plugin as a web hook for validating signatures.

Kyverno – A Kubernetes policy engine configured with an AWS Signer plugin for
validating signatures.

Note: Before verifying container image signatures, configure the Notation trust store
and trust policy, as required by your selected admission controller.
Neither the word managed nor the phrase native integration appears on the linked page. All it lists is two open source admission controllers. The relevant section in the AWS Signer developer guide also lists only these two, and begins by stating:
For AWS Signer customers wishing to verify signed container images at the time of
deployment, there are various open-source solutions such as the following.
This article considers the EKS user guide and the AWS Signer developer guide to be the authoritative sources. The rationale is that the two primary sources agree, and both provide detailed configuration steps, while the ECR documentation only provides a link and nothing further.
Therefore, the design conclusion is this: Signature verification within EKS is not a managed service. The responsibility for deploying admission controllers, ensuring their availability, updating their versions, and managing their policies remains with the user. Designing with the assumption that EKS automatically performs verification could result in clusters where no verification is actually taking place.
This discrepancy has AWS's own documentation corroborating the central claim of this article. Signing is managed and verification is not, and that gap shows up directly as the gap between one paragraph on the ECR side and a whole page on the EKS side.
10.3 The Trust Policy Determines the Decision
Simply adding an admission controller does not determine the decision. It is the Notation trust policy that decides what to allow. An example, as shown in the AWS Signer developer guide, is as follows:{
"version":"1.0",
"trustPolicies":[
{
"name":"aws-signer-tp",
"registryScopes":[
"*"
],
"signatureVerification":{
"level":"strict"
},
"trustStores":[
"signingAuthority:aws-signer-ts",
"signingAuthority:aws-us-gov-signer-ts"
],
"trustedIdentities":[
"arn:aws:signer:Region:111122223333:/signing-profiles/ecr_signing_profile",
"arn:aws:signer:Region:111122223333:/signing-profiles/ecr_signing_profile2"
]
}
]
}Four fields each handle a separate decision.
registryScopes determines which registries and repositories this policy applies to. * signifies all. Set this field too wide and a single edit to the policy reaches every registry.signatureVerification.level determines the strictness of verification. strict is a configuration that does not allow expired or revoked signatures.trustStores refers to the root of trust. signingAuthority:aws-signer-ts represents the signing root for AWS commercial Regions, while aws-us-gov-signer-ts is for AWS GovCloud (US).trustedIdentities is the most important field. The ARN of the signing profile listed here is the very basis for deciding which signatures to allow. As section 6.2 showed, the credentials of the principal that pushed the image create the signature, and the signature records which profile signed it. Therefore, if you only list the ARN of the profile used by your production pipeline, images signed by developers locally will not be allowed. Conversely, if you only create one profile and allow everyone to use it, this field will not provide any filtering.The design of signatures and the design of verification are ultimately linked by this single point. The discussion in section 6.4 about creating multiple profiles is intended to allow you to narrow down the decisions made through the trust policy in this field.
10.4 On ECS, You Block the Deployment with a Service Lifecycle Hook
ECS has nothing equivalent to an admission controller. It uses a service lifecycle hook instead. At specific points during deployment, a Lambda function is invoked. This function verifies the signature and determines whether to proceed with the deployment or halt it.The ECR user guide refers to this configuration as:
Lambda admission controller for Amazon ECSThe implementation runs Notation verification inside the Lambda function. If verification fails, the deployment stops. The implementation of that function decides both whether the check is enforced and whether a failure stops the deployment or only records it. On EKS an admission controller already exists and you write policy against it; on ECS you write the verification logic itself. The asymmetry from section 10.1 runs one level deeper on the ECS side.
10.5 With an Enforcement Point, and Without One
Even with the same image and the same signature, the outcome can vary depending on whether the admission side has an enforcement point.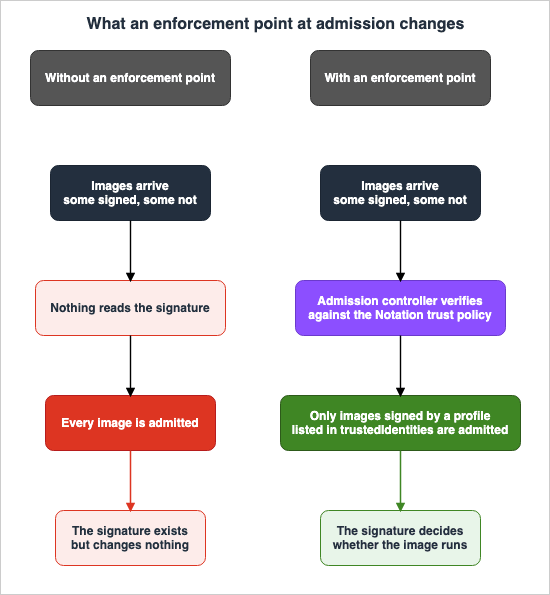
On a path with an enforcement point, an image that does not satisfy the trust policy does not start. Only here does the signature become a defense.
This comparison highlights that introducing signatures and implementing verification are separate projects. The most dangerous intermediate state is finishing the first project and reporting the work as done. Organizations that have implemented nothing are aware that they are not protected, while those that have only implemented signatures may mistakenly believe they are secure.
10.6 Admit by Digest, Not by Tag
The admission side has one more element: signatures are created against the digest, not against the tag.If the tag is mutable, there remains a possibility that the image you verified and the image that starts are different. ECR's tag immutability eliminates this possibility. You can choose to make all tags immutable by setting it to
IMMUTABLE, or you can choose IMMUTABLE_WITH_EXCLUSION to leave only certain tags mutable. As section 4.4 noted, on a pull through cache repository, making tags immutable stops upstream updates, so pair it with an exclusion filter.A mechanism to ensure that the image verified and the image started are the same is also required. The AWS open-source blog describes the behavior of Kyverno's
verifyImages rule as follows:Out of the many available Kyverno rules, we will be using Kyverno “verifyImages”,
which performs the following actions:
1. It validates signatures for matching images using Cosign.
2. It mutates image references with the digest returned by Cosign.Verifying the signature and rewriting the reference to the digest happen in the same rule. It is only through this rewriting that a match between the digest verified and the digest started is guaranteed.
The execution location is also significant. The same blog states that this rule runs in the mutating admission controller, after other mutations and before the signature is verified. Even if you are using policies that rewrite registry names, verification is performed on the rewritten references. If the order were reversed, there would still be a possibility that the image verified and the image started could differ.
This description applies to a setup that uses Cosign. A setup built on AWS Signer uses a different plugin that assumes the Notation trust store and trust policy. Regardless of the configuration, the fundamental design principle of rewriting to the digest before launching remains unchanged.
10.7 You Need a Design for Failure
Verification fails. The signature is absent, the profile is not listed intrustedIdentities, the signature has been revoked, or the referrer cannot be retrieved. Without defining how to handle each of these scenarios, a failure in the admission controller could directly lead to a complete halt of deployments across the entire cluster.Three things have to be decided. First, do you block an image you cannot verify, or let it through? Second, do you vary that per namespace or per cluster? Third, do you run a record-only period before you start enforcing?
The third is close to mandatory in practice. Existing workloads always carry some unsigned images, so enforcing from day one stops production. Run in record-only mode for a period, work through the images that do not pass, then switch enforcement on.
10.8 What This Stage Can Claim and What It Cannot
The claim you can make is that this image satisfied the trust policy at the moment it started. There are three claims you cannot make. That the claims it satisfied are true; that belongs to the stage that issued each of them. That it still satisfies the policy after it starts; verification runs only at admission. And that no unverified image is running anywhere in the cluster; that depends on whether every enforcement point is in place, and the admission controller cannot answer it.Unlike the other stages, this one exists to consume the claims made before it, not to produce one of its own. So when it is blank, the artifact carries no trace of that. The second kind of break in section 3.4, where the claims exist and nobody reads them, can happen only here.
11. Revocation and Expiry
11.1 Revocation Works at Two Levels
When a signing key leaks, revocation is what you can do. AWS Signer gives you two levels:RevokeSignature for an individual signature, and RevokeSigningProfile for a whole profile.For container images the effect is stated plainly.
Revoking the signature of a container image causes validation to fail if you attempt to
deploy the image.
The effect appears at verification time. Containers already running do not stop. Revocation takes effect at the next deployment and the next admission decision. So what happens after you revoke depends on whether the enforcement point from section 10 exists. Without an enforcement point, revoking changes nothing.
11.2 The Effective Start Time Can Only Be in the Past
Revoking a profile requires an effective start time. Two constraints apply.Revocation for a signing profile requires an effective start time in the past. The start
time cannot be in the future. The effective start time can be changed to an earlier date
and time by repeating the revocation, but cannot be revised to a later date and time.Future times cannot be specified. And once you set a time, you can only move it earlier, never later.
This asymmetry sets the order of decisions when a key is suspected of having leaked. The estimated start of a compromise usually moves earlier as the investigation proceeds. So revoke first at the time you already know, then move it earlier as you learn more. You cannot move it later, so naming an excessively early time at the outset leaves you unable to back out of a state that has swept up legitimate signatures.
11.3 Revocation Cannot Be Undone, and Expiry Fails Separately
The official documentation outlines two key characteristics regarding revocation.Revocation is an irreversible action and is recommended only for critical scenarios.
Revocation checks are valid for six months beyond the expiry of a signature. Expired
signatures will fail on expiry checks instead.First, revocation cannot be reversed. Once a signature is revoked, it cannot be restored. The only recourse is to re-sign.
Second, a revocation check stays valid until six months after the signature itself expires. Past that point the signature no longer fails the revocation check at all; it fails the expiry check instead. These are two separate checks, and each records its own reason for failure. Section 6.4 gave the default signature validity period as 135 months, so on the default a signature does not reach expiry for more than 11 years and 3 months.
That brings the decision in section 6.4 back into view. A shorter validity period means part of the range drops out by expiry, without a revocation, when a key leaks. A longer one widens the range that only revocation can reach. Shortening it, though, hands you a re-signing operation. Do not build that operation and one day every image stops being admitted.
11.4 Signatures Do Not Cross Partitions
There is another constraint that affects the configuration.Signatures are isolated to AWS partitions. Calls to GetRevocationStatus with a
cross-partition signature will return a validation exception error.It is not possible to create a configuration that verifies an image signed in a commercial Region within AWS GovCloud (US), or vice versa. While the trust policy can include both trust stores, this is to allow the same policy file to be deployed in both environments, and is not meant to enable verification across partitions.
11.5 Defining the Scope of Impact
The design for keeping the blast radius of a revocation small, meaning splitting keys and handling times, is covered in Content Provenance for AI-Generated Media in its section 8. With only one signing key, revoking it reaches every artifact, and revocation cannot target an individual artifact. Neither of those changes when the subject is a container artifact.Here is how it takes shape on the container side. Separate signing profiles by purpose. For example, create separate profiles for the production pipeline, the verification-environment pipeline, and the re-signing of images ingested from external sources. That way, revoking one profile leaves the other paths running. As section 6.3 showed, one registry holds up to 10 rules, so repository name filters are what separate the purposes. However, if filters overlap, signatures may also overlap, so a design that separates purposes and avoids duplication is essential.
Put the two arrangements side by side and the reach of one revocation looks like this.
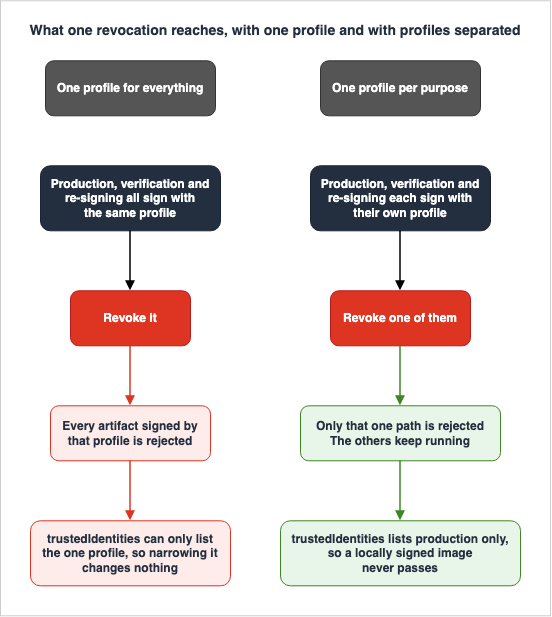
On the trust policy side, as section 10.3 describes, list only the profiles you need in
trustedIdentities. Separating profiles and narrowing trustedIdentities only mean something as a pair. Either one alone does not shrink the blast radius.12. What Is Left When a Stage Is Broken
The reason to build in depth is that when one stage is broken, the next one stops the attack. The table below sets out, stage by stage, what remains and what does not.| Stage broken | What happens | Defense that remains | What is lost |
|---|---|---|---|
| Source | The attacker's commit is merged. | None. Every later stage treats that commit as legitimate input. | Provenance and signatures. This tampering goes undetected; everything remains as a record of a seemingly valid path. |
| Dependency | An unexpected package is ingested. | The package is recorded as a component in the SBOM. If the package has a MAL-ID assigned, Amazon Inspector will detect it as malicious. | Packages without assigned identifiers and sleeper packages that look harmless when published are not surfaced at this stage. |
| Build environment | The attacker replaces the artifact. | The build environment identifier recorded in the provenance predicate. The substitution is detectable if the admission side checks that identifier. | If the attacker compromises the build environment itself, they can fabricate the provenance. |
| Signing permission | The attacker can sign with a legitimate profile. | None. The signature passes the trustedIdentities check. | Verification as a control. It returns success on the attacker's image, and the CloudTrail record of the signing operation is the only clue left. |
| Registry write | The attacker pushes an image. | Managed signing signs with the credentials of the principal who pushed the image, so a push by an attacker without signing permission carries no signature. | If the attacker also has signing authority, the image will be signed. |
| Admission enforcement point | Images start without being verified. | None. | Signature, provenance, and SBOM stop nothing if nobody reads them. |
| Runtime | The container is compromised. | Outside the scope of this article. Runtime containment is responsible for this. | The provenance of the artifact does not describe runtime behavior. |
Three rows have no remaining defense at all: source, signing permission, and the admission enforcement point.
Source is outside the scope of this article, but the other two are what this article designs. The IAM design in section 6.2 narrows signing permission. Section 10 builds the admission enforcement point. Until those two are filled, thickening any other stage does not make the chain hold.
13. The Four Artifacts, Side by Side
The four artifacts separated in section 2.4, set out with how each is generated on AWS and where its verification can be enforced. This table is the summary of the article.| Artifact | What it proves | What it does not prove | How AWS generates it | Where verification can be enforced |
|---|---|---|---|---|
| Signature | That a principal able to use this signing profile signed this digest. | That the contents are correct. That the path it came through was correct. | Managed. ECR managed signing, or the Notation CLI with AWS Signer by hand. | Admission controller trust policy. ECS service lifecycle hook. |
| Provenance | That the build platform states this artifact came out of this input in this environment. | That the statement is true. That the build environment was not compromised. | None. You assemble the in-toto Statement. | Admission controller reads and evaluates predicates. Implementation is user-side. |
| SBOM | That the generating party states this artifact contains these components. | Whether any component has a problem. That the inventory is complete. | Not managed. Amazon Inspector exports SBOMs, but the export lands in S3 and never attaches to the artifact. | Only if you attach the SBOM to the artifact and sign it. There is no standard path for this. |
| Vulnerability report | Whether the listed components carry known issues as of what is known now. | That no unknown issue exists. That an issue is reachable. | Not managed. Continuous scanning in Amazon Inspector, or the Scan API inside a pipeline. | Only if you build the path by which the admission controller reads the result. |
Read the generation column against the enforcement column and one thing stands out: the only row AWS fills with a managed mechanism is the first one, the signature. Amazon Inspector appears in two later rows, but you enable and wire it yourself, and what it produces never attaches to the artifact. Everything else you assemble. This is the full picture of the asymmetry described in section 10.1.
14. One Repository, Start to Finish
Everything so far has been split by stage. This section puts one repository in front of you and sets out what you do, in what order.Every command and every JSON document below is drawn from a primary source this article has already quoted. Nothing here is newly assembled. The only thing this section decides is the order.
Settle the admission side first. For EKS that is the admission controller, for ECS the service lifecycle hook. Until you have decided what gets rejected, nothing further down this list stops anything, for the reason section 10 gives.
Create the signing profile. There is exactly one platform for container images (section 6.4).
$ aws signer put-signing-profile --profile-name demo_signer --platform-id Notation-OCI-SHA384-ECDSAGrant the pushing role its permissions. That is the IAM policy in section 6.2, and it takes two statements: the five
ecr actions, and signer:SignPayload. Keeping individual developer roles out of that policy is what actually defends this path.Put the signing configuration on the registry. The body is the JSON in section 6.3, and only repositories the name filter matches get signed.
aws ecr --region region \
    put-signing-configuration \
    --signing-configuration file://signing-config.json
Push. This is the moment the signature is applied (section 6.1).
IMAGE_NAME="account-id.dkr.ecr.region.amazonaws.com/repository-name"
IMAGE_TAG="${IMAGE_NAME}:test-1"

docker tag ubuntu $IMAGE_TAG
docker push $IMAGE_TAG
Check that the signature landed.
aws ecr --region region \
    describe-image-signing-status \
    --repository-name repository-name \
    --image-id imageTag=test-1
Give the admission side a trust store and a trust policy. The trust policy is the JSON in section 10.3, and
trustedIdentities lists only the ARN of the profile you created two steps in.$ notation policy import mypolicy.jsonRun in record-only mode for a period, work through the images that do not pass, then switch enforcement on (section 10.7).
Laid out this way, the argument of this article takes a visible shape. From creating the profile to checking the signature, AWS commands carry the whole thing and it takes minutes. The first item and the last two carry no AWS command at all. Deciding what the admission side rejects, standing up a trust store and an admission controller, moving from record-only to enforcement. Above and below the part that fits in a command, the work that does not fit is still there.
15. Design Checklist
The list doubles as an order of adoption. You can fill it out from top to bottom, and it will remain meaningful even if you stop midway through.- First, determine the enforcement point on the admission side, then build and deploy it. For EKS, this would be the admission controller; for ECS, it would be the service lifecycle hook. As section 10.2 explains, neither one is managed, so standing it up, keeping it available, and updating it make up the largest piece of work in this list. If you do not settle this before you introduce signing, you stop in the intermediate state described in section 10.5.
- Run a record-only period first. Find the images in your existing workloads that fail verification, then switch to enforcement.
- Separate signing profiles by purpose. One for the production pipeline, one for the verification-environment pipeline, and one for re-signing images taken in from outside. This is what determines the blast radius discussed in section 11.5.
- Restrict the principals that hold
signer:SignPayload. Do not grant this to individual developer roles. As section 6.6 explains, the action used on the container image path is notStartSigningJob. - Verify that the signing configuration rules do not overlap. Overlapping rules produce multiple signatures. Watch the limit of 10 rules, and the images per repository quota of 100,000.
- Configure the Notation trust store, then list only the production profiles under
trustedIdentitiesin the trust policy. Check what the blast radius becomes whenregistryScopesis*. - Accept images by digest, not by tag. Enable tag immutability, and use exclusion filters on repositories backed by a pull through cache.
- Set the Amazon Inspector re-scan duration explicitly, from the delegated administrator account, before you start operating. Relying on the default setting can lead to inconsistent behavior based on when the account was created, and an Organizations policy does not reach the duration. As described in section 9.2, extending the period later will not bring back images that have already fallen outside the monitoring scope.
- Check whether you use multi-architecture images. If so, use push and pull events as the basis, rather than last-in-use.
- Decide whether to attach SBOMs to artifacts. If you do, you need the Notation CLI path. What Amazon Inspector exports only lands in S3.
- Decide whether to produce build provenance. If so, assembling the in-toto Statement is your own work.
- Write down the revocation procedure. Include that the effective start time can only be in the past, that it can only be moved earlier, and that revocation cannot be undone.
- Record signing operations in CloudTrail and build a path that detects anomalous signatures. If a principal holding signing permission is compromised, this is the only clue you get.
- Close the paths through which dependencies arrive. CodeArtifact origin controls and the ECR pull through cache. Check every one of the existing defaults, not a sample. As section 4.2 explains, the older the package, the more likely its default is the dangerous one, and a package set to Allow and Allow has to be read together with the setting on its group.
- Place a template on every path that creates repositories automatically. This applies to pull through cache, automatic creation during push, and replication. As described in section 4.5, these templates will not apply to repositories that have already been created.
16. Frequently Asked Questions
Does enabling ECR managed signing also sign existing images?
No. Signing happens at push time. To sign an existing image, push it again or sign it by hand with the Notation CLI.Whose credentials create the signature?
Those of the principal that pushed the image, not an AWS service role. If that principal does not holdsigner:SignPayload, no signature is generated.Can the signing profile live in a different account?
Yes. You delegate permissions to a principal in the other account withAddProfilePermission. However, you cannot cross Regions. The signing profile must be in the same Region as the ECR registry.Does EKS verify signatures automatically?
No, it does not. As section 10.2 explains, the ECR user guide uses the phrase native integration, but both the linked EKS user guide and the AWS Signer developer guide describe only setups built on open source admission controllers. Implementing and managing admission controllers is the responsibility of the user.Does verifying signatures remove the need for vulnerability scanning?
No, it does not. A signature attests to origin, not to content. Vulnerabilities get into images that came correctly out of your own build. The two answer different questions.Can an Amazon Inspector SBOM be passed directly to the Scan API?
No. The versions do not match: an Amazon Inspector export is CycloneDX 1.4, while the Scan API takes CycloneDX 1.5. Pass the output of the Amazon Inspector SBOM Generator instead.Will the signature disappear if I delete the image?
Yes. The lifecycle policy removes the associated artifacts within 24 hours of the subject image being deleted. The other direction, whether the signature of a live image is protected, is where the documentation disagrees with itself, as section 7.2 describes. Do not build on it.Why is a signature that should be there missing from the list?
Without specifying a filter,ListImageReferrers only returns active artifacts. To view archived signatures, you must explicitly specify the artifactStatus. Additionally, the principal making the call requires the ecr:BatchGetImage permission.Can you sign a signature?
No. Managed signing signs container images and nothing else, so anything that is itself a referrer, an SBOM attestation included, falls outside it. Signing those goes through the Notation CLI by hand.If I revoke, do containers that are already running stop?
No. Revocation takes effect at verification time. The image is rejected at the next deployment and the next admission decision. So if there is no enforcement point on the admission side, revoking changes nothing.What is the default validity period for a signature?
135 months, which is also the maximum AWS Signer supports. Part of the official documentation converts that to 11 years and 6 months; section 6.5 explains why 11 years and 3 months is the correct reading. Shorten the period and you take on re-signing.Will an image that Amazon Inspector stopped monitoring come back if I extend the duration?
No. As section 9.2 explains, extending the duration applies only to images that are currently monitored. An image that has already fallen out stays inactive even if you push it again inside the new duration. Decide the setting before you start operating.17. Summary
The argument of this article comes down to one sentence. Signing is the act of making a claim, and unless you separately build something that reads that claim and rejects on it, signing is not a defense.AWS significantly simplified the signing process for users in November 2025. ECR managed signing applies a signature to every subsequent push from a single rule written at the registry level. Key management and certificate lifecycle management are eliminated. The setup can be completed in just a few minutes.
The verification side has not gotten easier. For EKS, you must integrate your own admission controller. For ECS, you need to write your own Lambda functions. You are responsible for designing and managing trust policies. And as section 10.2 showed, AWS's own documentation wavers on this very point. Design from the native integration phrasing in the ECR user guide alone, and you end up with a cluster that verifies nothing.
Claims other than the signature have gaps of their own. No managed feature emits build provenance; assembling the in-toto Statement falls to you. While Amazon Inspector generates SBOMs, the output is directed to S3 and is not directly associated with the artifacts. Continuous assessment is available, but the default monitoring window is limited to 14 days. Once an image falls outside that window, it cannot be retroactively included, and there are limitations in supporting multi-architecture images.
So the order of adoption does not start with signing. Decide first what the admission side will reject, then work backward to decide who produces which claim. The checklist in section 15 is presented in that order for this very reason.
Finally, here are the four discrepancies found during verification, gathered in one place.
| # | Discrepancy | What this article treats as correct | Section |
|---|---|---|---|
| 1 | On one page, the console section converts the default validity period of 135 months to 11 years and 6 months, while the CLI section converts it to 11 years and 3 months. | The CLI section is correct. 11 years is 132 months, so 135 months equates to 11 years and 3 months. | 6.5 |
| 2 | For the IAM action used on the container path, the AWS Security Blog names signer:StartSigningJob, while the API reference says that action is not supported for container image workflows. | The API reference is correct. The action is signer:SignPayload, which also aligns with the IAM policy example for ECR. | 6.6 |
| 3 | On lifecycle policies and signatures, the AWS Open Source Blog says an artifact referring to a live image is protected, while the ECR user guide carries no such statement and gives a storage class condition instead. | The user guide is correct. It has the most recent information and does not assume protection. | 7.2 |
| 4 | On signature verification in EKS, the ECR user guide says native integration, while the EKS user guide it links to lists only two open source admission controllers. | The EKS user guide and the Signer developer guide are correct. Both documents align and include configuration steps. | 10.2 |
The first sits inside a single page, and the third appeared during the two days this article was being written. The remaining two were one click away along a link. None of them is findable if you stop at one page of the primary source.
18. References
- Amazon ECR User Guide - Managed signing
- Amazon ECR User Guide - Sign images in Amazon ECR
- Amazon ECR User Guide - Signature verification
- Amazon ECR User Guide - Sync an upstream registry with an Amazon ECR private registry
- Amazon ECR User Guide - Preventing image tags from being overwritten in Amazon ECR
- Amazon ECR User Guide - Amazon ECR service quotas
- Amazon ECR API Reference - PutSigningConfiguration
- Amazon ECR API Reference - ListImageReferrers
- Amazon EventBridge - Amazon Elastic Container Registry events
- AWS Signer Developer Guide - Create a Signer signing profile
- AWS Signer Developer Guide - Locally verify an image after signing
- AWS Signer Developer Guide - Verify an image during in Amazon EKS or Kubernetes clusters
- AWS Signer Developer Guide - Revoke signatures generated by Signer
- AWS Signer Developer Guide - Set up cross-account signing for Signer
- AWS Signer API Reference - AddProfilePermission
- Amazon EKS User Guide - Validate container image signatures during deployment
- Amazon EKS Best Practices Guide - Image security
- Amazon Inspector User Guide - Exporting SBOMs with Amazon Inspector
- Amazon Inspector User Guide - Scanning Amazon Elastic Container Registry container images with Amazon Inspector
- Amazon Inspector User Guide - Configuring the Amazon ECR re-scan duration
- Amazon Inspector User Guide - Integrating Amazon Inspector scans into your CI/CD pipeline
- Amazon Inspector User Guide - Understanding the delegated administrator account and member account in Amazon Inspector
- Amazon Inspector Scan API Reference - ScanSbom
- AWS CodeArtifact User Guide - Editing package origin controls
- AWS CodeArtifact User Guide - Package group origin controls
- AWS Security Blog - Well-architected best practices for software supply chain security
- AWS Open Source Blog - Diving into OCI Image and Distribution 1.1 Support in Amazon ECR
- AWS Open Source Blog - Supply Chain Security on Amazon EKS using AWS KMS, Kyverno, and Cosign
- AWS Containers Blog - Streamline container image signatures with Amazon ECR managed signing
- AWS What's New - Amazon ECR now supports managed container image signing
- AWS What's New - Amazon ECR Pull Through Cache Now Supports Referrer Discovery and Sync
- AWS What's New - Amazon ECR now supports OCI Image and Distribution specification version 1.1
- AWS Security Blog - Extend Amazon Inspector SBOM Generator with Plugins
- SLSA - Build Track Basics
- in-toto Attestation Framework - Statement
- Notary Project - Notation
References:
Tech Blog with curated related content
Written by Hidekazu Konishi