Workload Isolation Levels on Amazon EKS - Which Level You Stopped At, and What That Level Does Not Stop
First Published:
Last Updated:
This article separates the levels of isolation you can actually choose on an Amazon EKS cluster into four, and checks against the primary sources what each one separates and what it does not. The goal isn't to determine which level offers the strongest protection. Instead, it aims to enable readers to examine their own clusters and determine, based on their configuration, which level of isolation they currently have in place, and therefore, which types of attacks they remain vulnerable to.
Table of Contents
- 1. What the Phrase Isolated by Containers Leaves Out
- 2. Level 1 - Namespaces, RBAC, and NetworkPolicy
- 3. Level 2 - Pod Security Standards and Pod Security Admission
- 4. Level 3 - User Namespaces
- 5. Level 4 - Giving a Pod a Different Kernel
- 6. The Four Levels Side by Side
- 7. What Stops Working When You Move Up a Level
- 8. Where the Primary Sources Disagree, and Where They Have Gone Stale
- 9. Finding Out Which Level You Are On, and Deciding Where to Stop
- 10. Failure Modes and Anti-Patterns
- 11. Frequently Asked Questions
- 12. Summary
- 13. References
1. What the Phrase Isolated by Containers Leaves Out
1.1 Intended Audience
This article is written for people who operate multi-tenant EKS clusters and who, when they explain how the tenants are isolated, get asked what that isolation protects against. It assumes that NetworkPolicy and RBAC are already in place.It does not target Kubernetes beginners. Pod, namespace, DaemonSet, and admission control are used without explanation.
The underlying infrastructure is assumed to be Linux-based. Level 3 is a Linux-specific feature, and the implementation of level 4 also relies on the Linux kernel. The assumptions differ when using Windows nodes. The EKS best practices guide states that Windows containers are isolated on a per-container basis using Job objects and system namespace filters, and that there is no way to run Windows containers without these filters. Furthermore, certain aspects of Linux security contexts are not applicable in this environment.
1.2 What This Article Does Not Cover
To keep this on the levels, the adjacent subjects are handed to published articles.This article will not cover how to write NetworkPolicies, nor the path that these policies take to reach the kernel and become effective verdicts. Information on the three components of VPC CNI, PolicyEndpoints, the direction of TC hooks, and the window of time before policies take effect is available in eBPF on Amazon EKS. This article will not delve into that path; it only addresses the choice between keeping the kernel shared and stopping the sharing.
It will also not cover the IP design of VPC CNI, Security Groups for Pods, or the distinction between standard and ClusterNetworkPolicy. This information can be found in Amazon EKS Networking Deep Dive.
Comparisons of admission control and policy engines will also not be covered. Details on what is returned when IAM, Cedar, Rego, or Kyverno do not match are available in Policy Engines Compared. This article focuses on what the kernel stops after code that a policy failed to stop has started running.
This article does not address credential isolation. Which AWS permissions a Pod runs under belongs to Amazon EKS Pod Identity and IRSA Decision Guide.
The concept of allocation units will also not be covered. Details on gang scheduling and Dynamic Resource Allocation are available in Gang Scheduling and Dynamic Resource Allocation on Amazon EKS. This article focuses on units of isolation, not allocation units.
Nor will it cover what happens inside a single device. How one GPU becomes several claimable units, and what each way of splitting it leaves shared, belongs to Sharing One GPU on Amazon EKS. That article stops at the boundary this one starts from: it asks what a split leaves shared inside the device, and this article asks what is left shared once the Pod is on the node.
Detection mechanisms are outside the scope of this article. Information on how to detect breaches is available in Amazon GuardDuty Extended Threat Detection Architecture and Detection Engineering on AWS.
Furthermore, this article will not address spending boundaries. Where to bound the amount an agent may spend belongs to Agentic Payments on AWS. This article focuses solely on execution boundaries.
Finally, this article will not cover tenancy models themselves. Details on the selection of silos and pools, onboarding, and metering are available in AWS SaaS Multi-Tenant Architecture Guide. This article is limited to the kernel boundary.
And this article will only address the nature of the boundaries as described in the publicly available primary source material; it will not cover attack procedures, container escape reproduction steps, or Proof of Concept (PoC) demonstrations.
1.3 The Only Thing AWS Calls a Strong Boundary
Before the levels, here is what the EKS best practices guide states at the top of its tenant isolation page.Kubernetes is a single tenant orchestrator, i.e. a single instance of the control plane is
shared among all the tenants within a cluster.On the same page, it describes what can be achieved with namespaces and RBAC as "the semblance of multi-tenancy," and continues:
Nevertheless, the cluster is the only construct that provides a strong security boundary.According to AWS itself, a strong boundary is a cluster. It's not namespaces, RBAC, or NetworkPolicy. The reason is explained on the same page: anyone who gains access to a node can extract all Secrets, ConfigMaps, and Volumes mounted on that node.
None of the four levels in this article overturns that sentence. Moving up a level does not produce a boundary stronger than a cluster. What moves is a different axis: how far you can cut an attacker's reach while still sharing a node. Without that distinction stated upfront, the whole article turns into promotional material claiming that moving up a level makes you safe.
1.4 Verification Date and Primary Sources
The technical statements in this article were verified against primary sources on September 3, 2026. The canonical source differs by level, so which one was consulted is stated here.For the EKS defaults, the supported versions, what you can configure, and the Fargate and Auto Mode constraints, the canonical sources are the Amazon EKS Best Practices Guide, the Amazon EKS User Guide, and the Amazon EKS API Reference.
For the three profiles of Pod Security Standards, the three modes of Pod Security Admission, the meaning of
hostUsers, and the meaning of RuntimeClass, the canonical source is the official documentation on kubernetes.io.For what gVisor and Kata Containers support, the canonical source is each project's own documentation. AWS documentation covers these two technologies only minimally; therefore, the absence of information in AWS documentation is not interpreted as an indication that they are not supported by AWS.
Every version number carries the name of what it belongs to. Kubernetes 1.36 is the upstream version, and this article checked separately when EKS picked it up.
1.5 What the Published Articles Already Own
Two of the adjacent published articles touch this one across a wide surface, so the boundaries are stated first.Agent Sandboxing and Blast-Radius Isolation on AWS discusses the unit at which a containment boundary is drawn. The granularity of managed execution environments such as AWS Lambda microVMs, Lambda's tenant isolation mode, and the Amazon Bedrock AgentCore Runtime is the scope of that article. This article drops one step below it and covers only the levels you can choose inside an EKS cluster.
Amazon GuardDuty Extended Threat Detection Architecture explicitly states that it does not address design considerations specific to containers.
Container runtime detection in depth. GuardDuty emits attack sequence findings for Amazon EKS
and Amazon ECS. They appear in the tables below because omitting them would misrepresent the
finding type list, but the container-specific design questions — cluster topology, admission
control, task-level isolation — are out of scope here.
This article addresses the task-level isolation mentioned in that declaration.
2. Level 1 - Namespaces, RBAC, and NetworkPolicy
The first level builds a logical boundary out of nothing but the components Kubernetes ships with. The EKS best practices guide refers to this as "soft multi-tenancy" and lists the tools used to achieve it.2.1 What This Level Separates
Namespaces logically divide a cluster. All objects necessary for implementing multi-tenancy, such as Quotas, NetworkPolicies, and ServiceAccounts, belong to a namespace.RBAC (Role-Based Access Control) determines who can perform what actions on which objects. Using Roles and RoleBindings, you can prevent one team from reading or writing to another team's resources.
Quotas and LimitRanges restrict the total amount of CPU and memory that a single tenant can consume. The guide also positions this as a mitigation against denial-of-service attacks.
NetworkPolicies restrict communication between Pods. By default, every Pod in the cluster can talk to every other Pod, so you need to define policies to change this default behavior. The guide recommends starting with a rule that denies communication between Pods and a rule that lets every Pod query DNS, then loosening from there.
2.2 What This Level Leaves Open by Default
Level 1 is a set of tools for creating boundaries, not a state that is closed by default. The guide names two places that stay open.One is the list of namespaces.
Soft multi-tenancy implemented with Namespaces does not allow you to provide tenants with a
filtered list of Namespaces because Namespaces are a globally scoped Type. If a tenant has the
ability to view a particular Namespace, it can view all Namespaces within the cluster.
Because namespaces are a type that applies to the entire cluster, granting a tenant the ability to view namespaces lets them see every namespace in the cluster. This is where the granularity RBAC can reach runs out.
The other is the names of the services in the cluster.
With soft-multi-tenancy, tenants retain the ability to query CoreDNS for all services that run
within the cluster by default.
By default, any Pod can enumerate every service in the cluster over DNS. The guide suggests considering the CoreDNS Firewall or Policy plugins if that matters to you.
Moving up a level solves neither of these two. Neither level 3 nor level 4 changes how the namespace list looks or how CoreDNS answers. What has to be closed at level 1 gets closed at level 1, and that principle surfaces here.
2.3 Permission Boundaries from the Node's Perspective
Level 1 has one more layer that is not visible from inside a Pod: the permissions the node's kubelet holds over the Kubernetes API.The EKS best practices guide states that every worker node uses an authorization mode called Node Authorization, and that under it the kubelet can read the Secrets, ConfigMaps, PersistentVolumeClaims, and PersistentVolumes bound to the Pods on that node. It then states that EKS uses the NodeRestriction admission controller to limit what a node can modify to itself and to the Pods bound to it, and continues.
Nevertheless, an attacker who manages to get access to the host will still be able to glean
sensitive information about the environment from the Kubernetes API that could allow them to
move laterally within the cluster.
The guide's point is that someone who gains access to the host can still glean information about the environment from the Kubernetes API. Nothing level 1 provides sits on that path.
2.4 The Kernel Remains Shared
One sentence in the guide states the property of this level most precisely.None of these controls, however, prevent pods from different tenants from sharing a node.Namespaces, RBAC, Quotas, and NetworkPolicies do not prevent Pods from different tenants from being scheduled on the same node. When Pods are on the same node, they share the same Linux kernel.
To isolate nodes, you can use node selectors, anti-affinity, taints, and tolerations to direct tenants to dedicated nodes. The guide refers to these as "sole tenant nodes," noting that in environments with many tenants, this approach can become complex and costly.
The guide also discusses how to support node isolation from the admission controller perspective. It describes a method for applying node affinities and tolerations to namespaces using mutation, a process that can be implemented through policy management tools. The guide recommends using both mutation and validation to ensure that intended changes are actually applied.
What matters here is that separating nodes is not the same as moving up a level. Separating nodes reduces the number of kernels being shared; it does not stop the sharing. If one Pod inside a tenant is compromised, the other Pods on that node are still on the same kernel.
2.5 Writing a NetworkPolicy Does Not Stop Anything Yet
One more thing that is easy to miss at this level is that the time a policy is written and the time it actually takes effect may differ. In the default mode of the VPC CNI, a new Pod remains in an open state while the policy is being delivered to the kernel.eBPF on Amazon EKS comprehensively addresses the duration of this window, what strict mode requires, and what it does not, as well as where in the kernel the enforcement happens. This article simply acknowledges the existence of this window as a characteristic of level 1.
2.6 What Level 1 Does Not Stop
If one thing has to be named, what level 1 does not stop is reach that travels through the shared kernel.Once arbitrary code is running inside a container, that process can issue system calls to the node's kernel. If the kernel has a flaw, namespaces, RBAC, and NetworkPolicy do not sit anywhere on that path. RBAC is a mechanism for controlling requests to the Kubernetes API server, and NetworkPolicy controls packets; neither of these mechanisms controls system calls.
And the other Pods on that node, sharing that same kernel, sit on the same attack surface.
3. Level 2 - Pod Security Standards and Pod Security Admission
The second level puts constraints on the Pod specification itself. It defines what is permitted with three profiles, and applies them in three modes.3.1 Why This Level Is Needed
None of the tools for level 1 examine what a Pod requests. Whether a Pod is configured withprivileged: true or mounts the host's file system, it can be created normally within a namespace.The EKS best practices guide lists the Linux capabilities that processes within containers have by default.
CAP_AUDIT_WRITE, CAP_CHOWN, CAP_DAC_OVERRIDE, CAP_FOWNER, CAP_FSETID, CAP_KILL, CAP_MKNOD,
CAP_NET_BIND_SERVICE, CAP_NET_RAW, CAP_SETGID, CAP_SETUID, CAP_SETFCAP, CAP_SETPCAP,
CAP_SYS_CHROOT
About Pods that run as privileged, the guide states this.
Pods that are run as privileged, inherit all of the Linux capabilities associated with root on
the host. This should be avoided if possible.
Level 2 evaluates these requests during the admission process.
The mechanism that previously fulfilled this role has been replaced. Pod Security Policy was deprecated in Kubernetes 1.21 and removed in 1.25. The best practices guide states that there are two options to fill this gap: implementing policy-as-code from outside of Kubernetes, and Pod Security Standards, which are built into Kubernetes. This article will focus on the latter. The former, the comparison of policy engines, belongs to Policy Engines Compared.
Section 8 covers the pages in the AWS documentation that still recommend the removed mechanism.
3.2 Three Profiles
Pod Security Standards define three profiles. Here's a direct excerpt from the best practices guide:Privileged: Unrestricted (unsecure) policy, providing the widest possible level of permissions.
This policy allows for known privilege escalations. It is the absence of a policy. This is good
for applications such as logging agents, CNIs, storage drivers, and other system wide
applications that need privileged access.Baseline: Minimally restrictive policy which prevents known privilege escalations. Allows the
default (minimally specified) Pod configuration. The baseline policy prohibits use of
hostNetwork, hostPID, hostIPC, hostPath, hostPort, the inability to add Linux capabilities,
along with several other restrictions.Restricted: Heavily restricted policy, following current Pod hardening best practices. This
policy inherits from the baseline and adds further restrictions such as the inability to run as
root or a root-group. Restricted policies may impact an application's ability to function. They
are primarily targeted at running security critical applications.The sentence saying that privileged is the absence of a policy is what describes this profile best.
3.3 Three Modes
Pod Security Admission operates in three modes. There are three profiles and three modes, and they are different things. A profile decides what is allowed; a mode decides what happens when something violates it.enforce rejects a Pod that violates the profile. audit only annotates the event in the audit log, and the Pod is still created. warn only returns a warning to the API server client, and the Pod is still created.These three modes are not mutually exclusive. You can configure all three within a single namespace, and each can be associated with a different profile. The best practices guide suggests setting
enforce to baseline and warn to restricted, so that the impact of moving from baseline to restricted shows up before the move.3.4 enforce Applies Only to Pods
This mode contains one potential pitfall that readers may easily encounter. Here is what kubernetes.io says.To help catch violations early, both the audit and warning modes are applied to the workload
resources. However, enforce mode is not applied to workload resources, only to the resulting
pod objects.The
enforce setting does not apply to workload resources like Deployments. It only applies to the Pod objects created from them.The best practices guide shows what follows from that. Apply a Deployment whose podSpec violates the profile and the Deployment succeeds. Only the Pods are not created. Furthermore, this failure is not immediately obvious unless you examine the events associated with the Deployment.
message: 'pods "test-688f68dc87-tw587" is forbidden: violates PodSecurity "restricted:latest":
  allowPrivilegeEscalation != false (container "test" must set
  securityContext.allowPrivilegeEscalation=false), unrestricted capabilities (container "test"
  must set securityContext.capabilities.drop=["ALL"]), runAsNonRoot != true (pod or container
  "test" must set securityContext.runAsNonRoot=true), seccompProfile (pod or container "test"
  must set securityContext.seccompProfile.type to "RuntimeDefault" or "Localhost")'
The guide recommends using all three modes to improve this experience. Since
audit and warn apply to workload resources, you will receive warnings as soon as you apply a Deployment.3.5 The EKS Default - Starting from a State Where Nothing Is Enforced
This is the core of this level.On an EKS cluster, Pod Security Admission is enabled. The default profile, however, is
privileged in all three modes. The AWS Containers blog states that EKS uses the upstream default values from Kubernetes 1.23, and reproduces that configuration.defaults:
enforce: "privileged"
enforce-version: "latest"
audit: "privileged"
audit-version: "latest"
warn: "privileged"
warn-version: "latest"
exemptions:
# Array of authenticated usernames to exempt.
usernames: []
# Array of runtime class names to exempt.
runtimeClasses: []
# Array of namespaces to exempt.
namespaces: []The same blog summarizes the implications of this setting in two lines.
No PSA exemptions are configured at Kubernetes API server startup.
The Privileged PSS profile is configured by default for all PSA modes, and set to latest
versions.
AWS re:Post clarifies that this is not limited to Kubernetes 1.23.
By default, Kubernetes versions 1.23 and later activates all Pod Security Admission modes for
the Privileged Pod Security Standards profile at the cluster level. Pod Security Admission
allows deployments or Pods with the Privileged Pod Security Standards profile across all
namespaces.
It states that this applies to versions 1.23 and later.
As quoted in Section 3.2,
privileged is the absence of a policy. On a cluster whose namespaces carry no labels, Pod Security Admission is running and enforcing nothing. Being enabled and being effective are two different things. This state is not the result of a misconfiguration; it is the state that exists when no configuration is applied.3.6 Opting In Happens Through the Namespace Label
The only way to override the default settings is to apply labels to namespaces. kubernetes.io defines the format of the labels.pod-security.kubernetes.io/<MODE>: <LEVEL>
pod-security.kubernetes.io/<MODE>-version: <VERSION>MODE can be one of enforce, audit, or warn. LEVEL can be one of privileged, baseline, or restricted. VERSION must be a minor version of Kubernetes, or latest.This is how it looks when written in a manifest.
apiVersion: v1
kind: Namespace
metadata:
  name: policy-test
  labels:
    pod-security.kubernetes.io/audit: restricted
    pod-security.kubernetes.io/enforce: restricted
    pod-security.kubernetes.io/warn: restricted
For an existing namespace, the command AWS re:Post gives works as it is.
kubectl label --overwrite ns test-namespace pod-security.kubernetes.io/enforce=baselineWhat happens when a namespace that already has Pods moves to a stricter profile is defined too. Changing to
enforce does not delete the existing Pods. It returns a warning.Warning: existing pods in namespace "policy-test" violate the new PodSecurity enforce level
"restricted:latest"Therefore, applying the label does not immediately bring the system into compliance. Pods that are still violating the policy will continue to run until the next time a Pod is recreated.
3.7 What You Cannot Change on EKS
If the default isprivileged, the natural next thought is to change the cluster-wide default to baseline. Pod Security Admission has settings for exactly that: the default profiles, and three kinds of exemption. The best practices guide lists the exemptions.Usernames: requests from users with an exempt authenticated (or impersonated) username are
ignored.
RuntimeClassNames: pods and workload resources specifying an exempt runtime class name are
ignored.
Namespaces: pods and workload resources in an exempt namespace are ignored.And it describes where these settings are located.
These exemptions are applied statically in the PSA admission controller configuration as part
of the API server configuration.
The guide says you supply these settings statically, as part of the API server configuration. Since AWS manages the EKS API server, whether these settings can be provided depends on what configuration items EKS exposes.
EKS accepts certain control plane parameters as cluster settings. The items exposed for kube-apiserver are defined in the API reference's
KubeApiServerConfigRequest.eventTtl
The duration that Kubernetes events are retained. Valid values are single-unit durations
such as 30m or 1h.
serviceNodePortRange
The port range for NodePort services.There are two such items. The admission configuration is not included within this list. Whether you create a cluster using
CreateCluster or update it using UpdateClusterConfig, kubeApiServerConfig only accepts these two items, and the corresponding KubeApiServerConfigResponse also returns only these two. The user guide presents a closed list, and does not state that you can configure anything else. The Amazon EKS Control Plane Configuration covers what that closed list holds, how far each setting reaches, and what blocks the way back.Therefore, in EKS, you cannot provide cluster-wide defaults or static exemptions for Pod Security Admission using the publicly available configuration options. This isn't because AWS is prohibiting it; rather, it's because these options are not included in the list of exposed configuration items. AWS states that it accepts requests for additional parameters on the AWS Containers Roadmap.
There is one practical consequence. The only way to make level 2 bite on EKS is to put the namespace label on every namespace, and to build something that keeps putting it on every namespace created afterwards. The widespread use of configurations that modify namespace creation requests through a policy engine to add labels is a direct result of this constraint. The AWS Containers blog shows a pairing that uses Kyverno to add the
enforce label to a namespace creation request and then validates that the value is either baseline or restricted. The comparison of the policy engines themselves belongs to Policy Engines Compared.It is worth looking at what the setting you cannot supply would have bought you. Of the three kinds of exemption,
runtimeClasses takes Pods that use a named RuntimeClass out of the scope of Pod Security Admission. That is the opening through which the runtime you use at level 4 would sit outside the profile you set at level 2. EKS closes that opening, so the same profile lands on a level 4 Pod as well. The principle in Section 9.5, that an upper level is not a reason to relax a lower one, holds here by construction.It's important to note that Pod Security Admission has two separate implementations: one built into the API server, and another as a validating webhook. The best practices guide shows the latter, where you supply the default values and the exemptions as a ConfigMap. However, this does not alter the configuration of the built-in admission controller; it simply adds another webhook. What happens when that added webhook does not answer is a design question on the admission side, and it belongs to Policy Engines Compared.
3.8 What Level 2 Does Not Stop
If one thing has to be named, what level 2 does not stop is the system calls issued inside what you allowed.The restricted profile requires that a Pod not run as root, that privilege escalation not be allowed, that all capabilities be dropped, and that a seccomp profile be set. Every one of these is a constraint on the Pod specification, and none of them touches the path along which the kernel handles a system call issued by a process inside the container.
A Pod that satisfies the constraints still issues system calls to the node's kernel, inside the range it was allowed. That kernel is shared with Pods belonging to other tenants. Level 2 narrows the attack surface; it doesn't replace the surface with a different one.
4. Level 3 - User Namespaces
The third level decouples the root user inside the container from the UID on the host.4.1 Setting hostUsers to false Turns User Namespaces On
It's important to state this upfront: when the hostUsers field in the Pod specification is set to false, the Pod will have its own user namespace. The default value is true, which puts the Pod on the host's user namespace. That is the state with user namespaces off.Because the field is named
hostUsers and the value that turns the feature on is false, the polarity reads backwards. The value you set and the name of the feature it enables point in opposite directions. The Kubernetes API reference states both directions explicitly.hostUsers boolean
Use the host's user namespace. Optional: Default to true. If set to true or not present, the pod
will be run in the host user namespace, useful for when the pod needs a feature only available to
the host user namespace, such as loading a kernel module with CAP_SYS_MODULE. When set to false,
a new userns is created for the pod. Setting false is useful for mitigating container breakout
vulnerabilities even allowing users to run their containers as root without actually having root
privileges on the host.The default is
true, meaning it uses the host's user namespace if not explicitly configured. Setting it to false creates a new user namespace. This is the minimal manifest kubernetes.io shows.apiVersion: v1
kind: Pod
metadata:
name: userns
spec:
hostUsers: false
containers:
- name: shell
command: ["sleep", "infinity"]
image: debian4.2 What Changes
kubernetes.io describes what this setting changes as follows:A process running as root in a container can run as a different (non-root) user in the host; in
other words, the process has full privileges for operations inside the user namespace, but is
unprivileged for operations outside of the namespace.Inside the container the process is still root; seen from the host it is an unprivileged user. It holds full privileges for operations inside the namespace and none for operations outside it.
The kubelet handles the assignment. kubernetes.io states that the kubelet guarantees that no two Pods on the same node use the same mapping. Therefore, the UID that a container running as root in one Pod has on the host will be different from that of a neighboring Pod.
The valid range for UIDs and GIDs is, by default, 0 to 65535. A file whose UID falls outside that range appears to belong to the overflow ID, and running as user 65534 still does not make that file modifiable.
Furthermore,
runAsUser, runAsGroup, and fsGroup all still refer to the user inside the container. Even with this change, the way you write Pod specifications remains unchanged. kubernetes.io states that this design lets a Pod that uses user namespaces and a Pod that does not share the same volume without trouble.Regarding volumes, another change was also introduced in version 1.36. The EKS release notes state that SELinux volume labeling now defaults to a faster method, and add this warning.
Sharing a volume between privileged and unprivileged Pods on the same node may cause issues.This warning concerns potential issues that can arise when a privileged Pod and a non-privileged Pod share a volume on the same node. The work of incorporating level 3 also involves moving Pods to the non-privileged side, so this warning applies to those as well. If you are running SELinux in enforcing mode, the release notes recommend auditing the
seLinuxChangePolicy and volume labels beforehand.4.3 How Much This Level Actually Stops
kubernetes.io describes the kind of vulnerability this feature has kept out of reach.You can use this feature to reduce the damage a compromised container can do to the host or
other pods in the same node.The same page states that there are several high or critical vulnerabilities that could not be exploited when the user namespace is enabled, citing CVE-2021-25741 as an example. That vulnerability let a Pod read arbitrary files on the host, and the explanation is that when the UIDs of the Pod and the host do not overlap, the Pod's UID does not match the owner of the file, so what it can do is limited.
AWS's description is slightly stronger. The EKS version-specific release notes state the following as a change in version 1.36:
User Namespaces (Stable): User Namespaces provides defense-in-depth by mapping a container's
root user to a non-privileged user on the host, ensuring that a container breakout grants no
administrative power over the node.
That wording guarantees that a container breakout grants no administrative power over the node. It is AWS's summary. The upstream documentation is more careful, saying that the feature reduces the damage and is expected to mitigate some future vulnerabilities as well. Reading the two side by side is the safe option.
4.4 Availability and Version
This feature reached Stable in Kubernetes v1.36. kubernetes.io puts it this way.This is a stable feature in Kubernetes, and has been since version v1.36. It was first available
in the v1.28 release. You can no longer disable or opt out of this feature or behavior (it is
locked); if you explicitly set a value for the associated feature gate UserNamespacesSupport,
Kubernetes ignores it but does not report any error.The feature gate is already locked, and any attempts to explicitly set a value will be ignored.
Amazon EKS and Amazon EKS Distro both announced support for Kubernetes 1.36 in June 2026. The Amazon EKS announcement lists what 1.36 introduces: the promotion of User Namespaces to general availability, Mutating Admission Policies for CEL-based resource mutation, In-Place Pod-Level Resources Vertical Scaling, and Resource Health Status reporting.
The upstream version and the date EKS picked it up have to be checked separately. Writing about the state of EKS from the upstream release notes alone misses the EKS-side differences.
4.5 Prerequisites
This level carries a kind of prerequisite the levels above it did not have. Unless what is on the node meets the conditions, adding a line to the Pod specification does nothing.kubernetes.io lists the requirements in four layers.
A Linux kernel version of 6.3 or later is required. This is because that version introduced support for idmap mounts with tmpfs.
The node's file system must also support idmap mounts. kubernetes.io lists btrfs, ext4, xfs, fat, tmpfs, and overlayfs as the file systems that support it on Linux 6.3 and later. The file systems used for the Pod's volumes must also meet the same requirement.
The CRI runtime must be containerd 2.0 or later, or CRI-O 1.25 or later.
The OCI runtime must be runc 1.2 or later, or crun 1.9 or later. Version 1.13 or later of crun is recommended.
And the feature is Linux only.
Checking these on an EKS node, the containerd requirement is already met if you use the AMIs EKS ships. The release notes for EKS version 1.34 state that containerd was updated to version 2.1.
Containerd updated to 2.1 in Version 1.34 for launch.The release notes for version 1.35 also mention future deadlines.
Containerd 1.x End of Support: Kubernetes 1.35 is the last release supporting containerd 1.x.
You must switch to containerd 2.0 or later before upgrading to the next Kubernetes version.
The kernel and file system requirements depend on the AMI used for the node. If you are using a custom AMI, the versions of containerd and runc will also need to meet these requirements. This is a requirement that must be verified directly on the node, and cannot be determined from documentation alone.
4.6 What Level 3 Does Not Stop
If one thing has to be named, what level 3 does not stop is a flaw in the kernel itself.The user namespace is a mechanism that allows the root user within a container to behave as a different UID on the host. However, the path the kernel takes when processing system calls from that process remains unchanged. It's the same kernel, running the same code, being called in the same way.
So this level is no defense against a vulnerability whose nature does not depend on the UID mapping, such as one that comes out of the implementation of a kernel subsystem. The results kubernetes.io cites are all of the kind that turn on whether the UIDs overlap.
Furthermore, the kernel on each node is still shared across all tenants.
5. Level 4 - Giving a Pod a Different Kernel
The fourth level replaces the container runtime the Pod uses. This is where the sharing of the kernel stops.5.1 RuntimeClass Is a Mechanism for Mixing
The first thing to correct at this level is that a RuntimeClass is not something you pick once for the whole cluster. Here is how kubernetes.io states the motivation.You can set a different RuntimeClass between different Pods to provide a balance of performance
versus security. For example, if part of your workload deserves a high level of information
security assurance, you might choose to schedule those Pods so that they run in a container
runtime that uses hardware virtualization. You'd then benefit from the extra isolation of the
alternative runtime, at the expense of some additional overhead.The key point is that you can configure a different
RuntimeClass for each Pod. It is defined as a mechanism for balancing performance against security one Pod at a time.Configuration simply requires adding a single line to the Pod specification.
apiVersion: v1
kind: Pod
metadata:
  name: mypod
spec:
  runtimeClassName: myclass
A Pod that does not name one runs on the default handler. kubernetes.io states that this is the same behavior as when the RuntimeClass feature is disabled. In other words, it's perfectly normal for a single cluster to contain Pods running with the default runtime alongside Pods running with a different runtime.
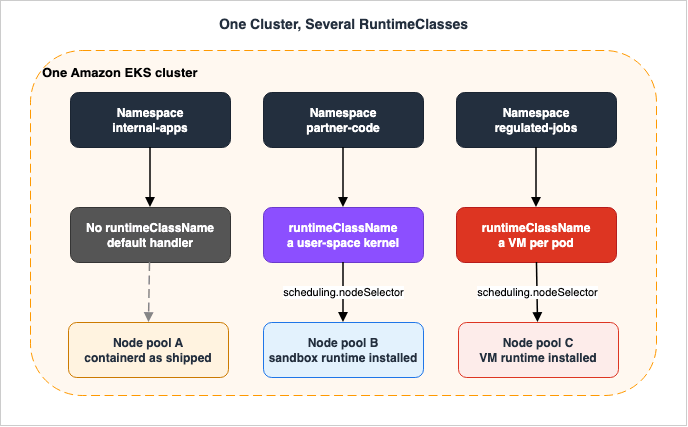
5.2 A RuntimeClass on Its Own Provides No Isolation
A RuntimeClass object only holds a name and a handler. The handler names a configuration on the CRI side, and the contents of that configuration decide what actually happens.apiVersion: node.k8s.io/v1
kind: RuntimeClass
metadata:
name: myclass
handler: myconfigurationFor containerd, the corresponding configuration is located in
/etc/containerd/config.toml under [plugins."io.containerd.grpc.v1.cri".containerd.runtimes.${HANDLER_NAME}]. For CRI-O, it's in /etc/crio/crio.conf under [crio.runtime.runtimes.${HANDLER_NAME}].This is a critical point in practice for level 4. Simply creating a
RuntimeClass does nothing on its own. The node must have the corresponding runtime installed. Installing it requires the necessary permissions to modify the node's configuration.The
RuntimeClass includes a scheduling field where you can specify node selectors and tolerations. kubernetes.io states that a RuntimeClass with no scheduling is treated as supported on every node. If you only want to run the runtime on a subset of nodes, you must configure this setting, otherwise Pods may be scheduled onto nodes where the runtime is not installed.5.3 Two Shapes - A User-Space Kernel and a Virtual Machine per Pod
The implementations that give a Pod a separate kernel take two shapes.One approach involves implementing the kernel in user space. gVisor follows this model. The gVisor security model states this.
gVisor was created in order to provide additional defense against the exploitation of kernel
bugs by untrusted userspace code.
The application's direct interactions with the host System API are intercepted by the Sentry,
which implements the System API instead.Instead of applications directly calling host system calls, a component called Sentry receives those calls and implements them. The same page states that the System API the Sentry itself can reach is minimized to a safer, restricted set.
A replaceable layer called the platform is what catches the system calls. The gVisor platform guide splits the recommendation by where you run it.
In general, when running on bare-metal (not inside a VM), the KVM platform will provide the best
performance. The systrap platform is a better choice when running inside a VM, or on a machine
without virtualization support.
It states that systrap is a good choice when running within a virtual machine. Systrap uses seccomp's
SECCOMP_RET_TRAP to intercept system calls and became the default platform, replacing ptrace, in mid-2023. Since standard EC2 instances run within virtual machines, this approach applies. This contrasts with the next approach described below.The other approach involves launching lightweight virtual machines for each Pod. Kata Containers follows this model. An AWS Containers blog post summarizes the characteristics of this approach:
In Kata Containers each container is effectively booted with a different guest operating
system, as opposed to traditional containers where the Linux Kernel is shared among the
workloads and container isolation is achieved by using namespaces and control groups (cgroups).
Kata supports multiple hypervisors, including Firecracker, which AWS uses with AWS Lambda. The choice of hypervisor shows up in the
RuntimeClass. kata-deploy names each RuntimeClass after its shim: kata-fc for Firecracker, kata-clh for Cloud Hypervisor, and kata-qemu for QEMU. You can install several shims in one cluster and pick between them per Pod.The key difference between these two approaches lies in what constitutes the boundary. gVisor replaces the kernel implementation with a user-space process, while Kata launches a separate kernel for each Pod. Either way, the Pod has left the state of calling the same code paths on the same host kernel as every other tenant.
The requirements for the node stem directly from this difference. Because Kata launches virtual machines, it requires an environment where a hypervisor can run underneath. gVisor is a user-space process, so it runs inside a virtual machine as it is. Section 7.4 covers how that difference plays out on EC2.
5.4 This Is Not a Choice Between One and the Other
This article will not conduct a comparison to determine which is superior, gVisor or Kata. From the perspective of this article's subject matter, the comparison itself misstates the core question.As described in Section 5.1,
RuntimeClass is a mechanism for mixing different runtimes. The shape the mechanism expects is to send only the namespaces that run untrusted code to a user-space kernel, only the workloads that need a virtual machine boundary for a regulatory reason to Kata, and leave everything else on the default runtime.In practice this mechanism carries other kinds of runtime too. The AWS Containers blog, for example, details how to create
RuntimeClass entries for Spin and WasmEdge within an EKS cluster to run WebAssembly workloads. Several RuntimeClass objects standing side by side in one cluster is not a shape reserved for isolation.5.5 Managed Compute Takes This Choice Away
Getting to level 4 requires permission to install a runtime on the node. So who owns the nodes decides whether level 4 is available to you at all.AWS owns the nodes in EKS Auto Mode. As stated in the user guide:
EC2 Instances created by EKS Auto Mode are different from other EC2 Instances, they are managed
instances. These managed instances are owned by EKS and are more restricted. You can't directly
access or install software on instances managed by EKS Auto Mode.
Software cannot be installed. Therefore, it is not possible to introduce gVisor or Kata on Auto Mode nodes. The AWS whitepaper also states that the operating system used on Auto Mode nodes is a variant of Bottlerocket, and that the nodes are designed to not remain active for more than 21 days.
In the case of AWS Fargate, the situation is slightly different. Fargate includes a boundary equivalent to level 4 from the outset. This is stated in the first line of the Fargate considerations section in the user guide.
Each Pod that runs on Fargate has its own compute boundary. They don't share the underlying
kernel, CPU resources, memory resources, or elastic network interface with another Pod.
It explicitly states that the kernel is not shared. Fargate is also specifically mentioned in the EKS best practices guide as a means of providing sandboxed pods.
To isolate tenants in this type of environment, you will likely need to implement strict network
policies as well as pod sandboxing. Sandboxing is where you run the containers of a pod inside a
micro VM like Firecracker or in a user-space kernel. Today, you can create sandboxed pods with
EKS Fargate.
However, with Fargate, you lose certain capabilities in exchange for the strength of its boundary. Section 7 goes through what you lose. Regarding Fargate's position, the user guide states in the migration page:
Amazon EKS with AWS Fargate remains an option for customers who want to run EKS, but Amazon EKS
Auto Mode is the recommended approach moving forward.
While it remains a viable option, the recommended approach is Auto Mode. The user guide also lists topology spread constraints and pod anti-affinity as alternatives for Auto Mode, allowing only one pod per node, which it states can achieve the same isolation model as Fargate. This is a node-based configuration, not a kernel-based one. It shares the same characteristics as the sole tenant node described in Section 2.4.
In short, the moment you decide who owns the nodes, the levels available to you are already decided. Self-managed nodes and managed node groups let you build level 4 yourself. Auto Mode does not. Fargate arrives with level 4 already in place, and with no room to configure it.
5.6 What Level 4 Does Not Stop
If one thing has to be named, what level 4 does not stop is whatever is shared outside the boundary, the hardware included.The gVisor documentation summarizes this point in two sentences.
gVisor does not provide protection against hardware side channels.A sandbox is not a substitute for a secure architecture.gVisor does not cover hardware side channels, and a sandbox is not a replacement for a secure design.
Level 4 replaces the kernel implementation, but it doesn't replace the underlying hardware, the network layer, or the AWS credentials held by the Pod. A level 4 Pod still sits in the same VPC, uses the same IAM role, and reads the same secrets.
It does not stop spending either. The kernel boundary decides what a Pod can execute; it does not decide what, or how much, a Pod can buy. The boundary on the spending side belongs to Agentic Payments on AWS. The structure is the same: there are places to set limits, and there are things that those limits don't prevent.
6. The Four Levels Side by Side
Here are the four levels described so far, arranged by what they separate and what they do not.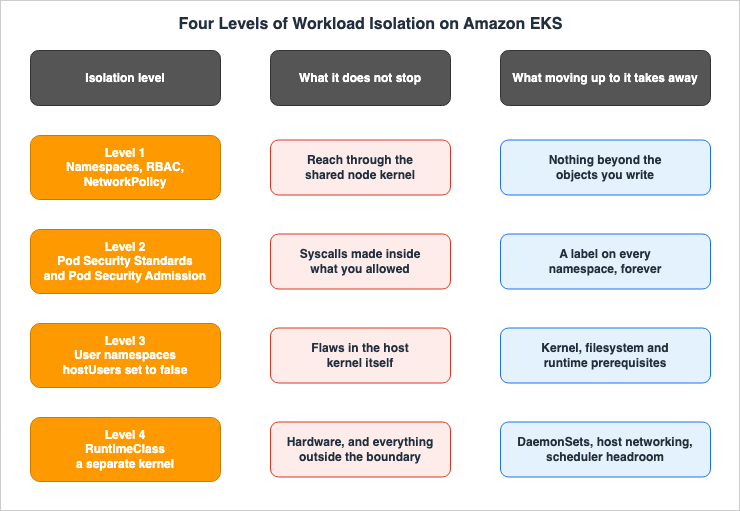
| Level | What the boundary is | Where it is enforced | What this level does not stop |
|---|---|---|---|
| Level 1 Namespaces, RBAC, NetworkPolicy | A logical partition | The API server and the node's network path | Reach that travels through the shared kernel |
| Level 2 Pod Security Standards and Pod Security Admission | A constraint on the Pod specification | Admission at the API server | System calls issued inside what you allowed |
| Level 3 User namespaces | The mapping of UIDs and GIDs | The node's kernel | A flaw in the kernel itself |
| Level 4 A separate runtime through RuntimeClass | The kernel implementation itself | The node's container runtime | Hardware, and whatever is shared outside the boundary |
The figure adds a third column the table does not carry: what moving up to each level takes away. Level 1 costs nothing beyond the objects you write. Level 2 costs a label on every namespace and a mechanism that keeps putting it there. Level 3 costs prerequisites on the node. Level 4 costs DaemonSets, host networking, and headroom in the scheduler. Section 7 goes through those one at a time.
Two things are worth noting when reading this table.
The first is that the levels are not mutually exclusive. A Pod at level 4 is still subject to level 1 and level 2. Levels stack rather than sit side by side as alternatives, and adding an upper one is not a reason to drop a lower one. A configuration that does not apply a level 2 profile to a level 4 Pod is itself in the default state described in Section 3.5.
The second is that the rightmost column is the body of the claim. The statement that you went all the way to level 4 carries exactly as much information as the statement that tenants are isolated by containers from Section 1, unless the rightmost column is stated with it.
7. What Stops Working When You Move Up a Level
Moving up a level always costs something. Only what the primary sources state explicitly is listed here. No figure measured for this article appears.7.1 GPUs
The GPU is the most misunderstood part of level 4. The reading that GPUs stop working once you run in a sandbox is not accurate. It depends on the implementation.On Fargate you cannot. The user guide's considerations say it in one line.
GPUs aren't currently available on Fargate.gVisor can. It uses a mechanism called nvproxy, through which an application inside the sandbox interacts with the host's NVIDIA driver. The gVisor documentation states that it supports workloads including CUDA, PyTorch, generative models, Vulkan, NVENC, and NVDEC. However, it is not enabled by default and requires passing the
--nvproxy flag to runsc.The supported range also has conditions. gVisor sorts driver versions into three categories, and by default it refuses to start unless the driver is an officially supported version. The way this supported range is determined is unique.
The range of officially supported driver versions directly aligns with those available within
GKE. As GKE incorporates newer drivers, nvproxy will extend support accordingly. Conversely, to
manage versioning complexity, nvproxy will shrink the window as drivers are removed from GKE.
The range of supported drivers follows the range another cloud's managed Kubernetes carries. If you are using it on an EKS node, you will need to verify whether your driver falls within this range. The command
runsc nvproxy list-supported-drivers can be used for this verification.The gVisor documentation also states what protection you give up by passing the GPU through.
However, gVisor is much less effective at mitigating vulnerabilities within the NVIDIA GPU
drivers themselves, because gVisor passes through calls to be handled by the kernel module.
gVisor does not mitigate a flaw in the driver itself well, because it passes the calls through to the kernel module. The same page emphasizes that, regardless of whether you are using gVisor, it is crucial to update the driver promptly.
Kata ships a separate shim for GPUs. What that shim asks for appears in Section 7.5.
7.2 What Does Not Work Under gVisor
The gVisor documentation lists the gaps in its implementation explicitly. The ones that bear on a level 4 decision are these.io_uring is disabled by default. When enabled, its implementation is limited to basic I/O
operations. Similar for nftables rules support.Usage of KVM from within the sandbox is not supported.Block device filesystems like fat32, ext3, ext4 are not natively supported inside the gVisor
kernel. As such, it is not possible to mount block devices from within the sandbox.While in-sandbox cgroups (CPU, memory) exist and can be used for resource accounting, resource
limits are not enforced within the sandbox.The same page also says that most of the unimplemented system calls are alternatives to ones gVisor does support, and that language runtimes and libraries pick the variant they can use on their own, so the workload runs anyway. Reading the list of supported system calls is therefore not a reliable indicator of compatibility. It is more practical to first determine how you will notice when something did not work.
7.3 Pod Fields You Lose Under Fargate and Kata
Once you move to level 4, part of the Pod specification stops being available. These are the constraints the user guide lists for Fargate that bear on isolation.Daemonsets aren't supported on Fargate. If your application requires a daemon, reconfigure that
daemon to run as a sidecar container in your Pods.
Privileged containers aren't supported on Fargate.
Pods running on Fargate can't specify HostPort or HostNetwork in the Pod manifest.DaemonSets are not supported. The guide says to reconfigure the daemon as a sidecar container if the application needs one. Privileged containers are also not supported. Furthermore,
HostPort and HostNetwork cannot be specified in the Pod manifest.Kata carries constraints of the same kind. These are the ones in the Kata documentation that bear on Kubernetes.
Host network (nerdctl/docker run --net=host or Kubernetes HostNetwork) is not supported. It is
not possible to directly access the host networking configuration from within the VM.
The same documentation also states that
volumeMounts.subPath is currently not supported.The inability to use DaemonSets extends beyond isolation concerns. Many log collection, monitoring, and security agent deployments rely on DaemonSets. On Fargate a DaemonSet cannot run at all, and a Pod that has been given its own kernel is not something a DaemonSet on the host can see into. Detection Engineering on AWS covers what stops being visible, not this article.
7.4 Nested Virtualization - The Premise Changed in 2026
Kata launches a virtual machine, so it needs an environment where a hypervisor can run underneath it. This requirement is stated in a single sentence at the beginning of the official installation instructions.Kata Containers requires nested virtualization or bare metal.How this is achieved on EC2 changed in 2026. Previously, only bare metal instances could be used, but now nested virtualization can be enabled even on virtual instances. The EC2 user guide lists the supported instances.
Nested virtualization is currently supported on C8i, M8i, R8i, C8id, R8id, M8id, C8i-flex,
R8i-flex, M8i-flex, X8i, C7i, R7i, M7i, C7i-flex, M7i-flex, and I7i instances.
Currently, KVM and Hyper-V are the supported L1 hypervisors.Enabling this feature is done through CPU options, either specified at instance launch or modified for stopped instances.
aws ec2 run-instances \
    --image-id ami-0abcdef1234567890 \
    --instance-type r8i.4xlarge \
    --cpu-options "NestedVirtualization=enabled" \
    --key-name my-key-pair
The same page also recommends evaluating bare metal instances for workloads with demanding performance and latency requirements, particularly when utilizing hardware virtualization extensions. It's not that bare metal is no longer needed; rather, more options are now available.
That change lowered the practical barrier for level 4. Trying Kata used to mean standing up a bare metal node group for that purpose alone. Section 8 covers the documents that still carry the old premise.
7.5 What the Scheduler Subtracts from Every Pod Changes
Level 4 also reaches the resource arithmetic for a Pod. ARuntimeClass carries an overhead field, and the scheduler adds what is written there on top of the Pod's requests. Here is what kubernetes.io says.A pod's overhead is considered in addition to the sum of container resource requests when
scheduling a Pod.the kubelet will include the Pod overhead when sizing the Pod cgroup, and when carrying out Pod
eviction ranking.The same page also states that this value is included in the ResourceQuota aggregation.
Each implementation fixes this value at the time it ships. The Kata
kata-deploy helm chart carries a default per shim. For Firecracker and Cloud Hypervisor, the values are 130Mi and 250m; for QEMU, they are 320Mi and 250m; for shims used with SEV-SNP and TDX, they are 2048Mi and 1.0; and for shims used with NVIDIA GPUs, they are 10240Mi and 1.0.These are declared values written into the distribution, not measurements taken by this site. The point is not the size of any one of them. It is the structure: which
RuntimeClass you send a workload to changes what the scheduler subtracts from every Pod by two orders of magnitude. The same chart explains in a comment why the QEMU value is the larger one, and gives three reasons: on some architectures the VMM's own host-side footprint is large, under sandbox_cgroup_only the VMM runs inside the Pod cgroup, and the combination lets a value that is too small get the VMM OOM-killed on a Pod with a small memory limit.The
overhead value can also be disabled. However, if disabled, the scheduler will attempt to schedule Pods onto nodes without knowing the actual resources being consumed.7.6 AppArmor Has Been Deprecated
Stepping slightly aside from the levels, one of the defenses you write into a Pod specification has had a deadline put on it. The EKS 1.34 release notes say so.AppArmor is deprecated in Kubernetes 1.34.
We recommend migrating to alternative container security solutions like seccomp or Pod Security
Standards.AWS suggests seccomp and Pod Security Standards as alternatives. In other words, level 2. If the ground an AppArmor profile used to cover moves to level 2, the default described in Section 3.5 bites directly.
8. Where the Primary Sources Disagree, and Where They Have Gone Stale
Going to the primary sources for this article turned up places where AWS documents contradict each other, and places that have stayed published while going stale. A reader who opens the same documents sees the same thing, so what was found is recorded here.8.1 A Page That Still Recommends a Removed Mechanism
Pod Security Policies were removed in Kubernetes 1.25. The EKS best practices guide accurately reflects this change.Since PSPs have been removed as of Kubernetes v1.25, cluster administrators and operators must
replace those security controls.An AWS whitepaper, meanwhile, still carries a page that explains Pod Security Policies as the way to enforce security policies through an admission controller, and recommends changing the default.
Every EKS cluster comes with a built-in admission controller capable of enforcing Pod Security
Policies (PSPs).
By default, EKS provides an unrestricted Pod Security Policy.A current EKS cluster does not have that admission controller. Taking the procedure without looking at the page's date and target version means trying to configure something that is not there.
8.2 The Sandboxing Section Points Somewhere Old
The tenant isolation section of the EKS best practices guide, which describes sandboxing as a mitigation strategy, states:Sandboxing is a technique by which each container is run in its own isolated virtual machine.
Technologies that perform pod sandboxing include Firecracker.That section names one implementation, Firecracker. gVisor, Kata, and
RuntimeClass do not appear in it. Furthermore, the link provided for additional information leads to a post from 2020, published on an external website, that discusses the effort to make Firecracker a supported runtime for EKS.This is what it looks like when a page that states a specification and a page that states what other implementations cover have different lifespans. The former is still correct as written; the latter is still old as written. The AWS documentation cannot be read as a comprehensive list when choosing a level 4 implementation.
8.3 The Supported Range for Nested Virtualization Differs Between Documents
The EC2 User Guide quoted in Section 7.4 lists 16 instance families. The AWS SDK reference, describing the samenestedVirtualization parameter, says this.Nested virtualization is supported only on 8th generation Intel-based instance types (c8i,
m8i, r8i, and their flex variants).That reads as three families and their flex variants, and nothing else. Reading the What's New announcements in order shows why the two differ: support started in February 2026 on C8i, M8i, and R8i, and expanded in June 2026 to C7i, R7i, M7i, C8id, R8id, M8id, C7i-flex, M7i-flex, I7i, C8i-flex, R8i-flex, M8i-flex, and X8i. The SDK reference has stayed at the first announcement.
The general rule is that the feature's own user guide decides the supported range, and that an API or SDK reference does not settle it. Reference documentation defines parameter syntax but does not bear the responsibility of tracking supported functionality.
8.4 A Walkthrough Whose Premise Has Gone Stale
The AWS Containers blog features an article detailing how to run Kata Containers on EKS. Published in May 2024, the article's explanation of Kata Containers and the use ofRuntimeClass remains accurate even when read today. However, one of its initial statements is no longer valid.In fact, standard EC2 instances don't allow nested virtualization, thus the need to use bare
metal.As described in Section 7.4, nested virtualization is now available on standard EC2 instances as of February 2026. The article uses bare metal instances because that was the only option at the time.
The URL for the
RuntimeClass manifest included in the same article now returns a 404 error. This is because Kata Containers has transitioned its distribution method to a Helm chart. The default overhead value referenced in Section 7.5 is now configured within that Helm chart.8.5 How to Read This Section
What the four have in common is that none of them is wrong, and all of them were correct when written. What goes stale is the document that describes the state of something else.Statements defining specifications tend to remain valid for a longer period. For example, the statement that setting
hostUsers to false enables the user namespace is unlikely to change anytime soon. On the other hand, descriptions of which implementations support what, what is possible, and what is not, become outdated as the underlying systems evolve. Choosing a level depends mostly on the latter kind. That is why this article states a verification date in Section 1.4.9. Finding Out Which Level You Are On, and Deciding Where to Stop
There is an answer to which level is strongest, and it is level 4. That is not a useful question. The useful question is which level your cluster has stopped at, and whether you can accept what that level does not stop.9.1 Checking Whether You Are at Level 2
Whether you are at level 2 shows in the namespace labels. A namespace with no label is stillprivileged, as described in Section 3.5.kubectl get namespaces -L pod-security.kubernetes.io/enforce \
-L pod-security.kubernetes.io/audit -L pod-security.kubernetes.io/warnA row with all three columns empty is a namespace nothing constrains right now. What has to be counted here is not how many namespaces carry a label, but how many do not.
Whether a newly created namespace picks up a label is a separate thing to check. Labeling every namespace that exists today does nothing for the next one someone creates.
9.2 Checking Whether You Are at Level 3
hostUsers is a field on the Pod specification, so a running Pod carries it.kubectl get pods -A -o custom-columns=NS:.metadata.namespace,NAME:.metadata.name,HOSTUSERS:.spec.hostUsersPods that display
false are those that have their own user namespace. Blank values and true both indicate that the Pod is using the host's user namespace.If what you wrote in the Pod specification is not reflected, one of the prerequisites in Section 4.5 is not met. The kernel version and the container runtime version on the node are the first places to look.
9.3 Checking Whether You Are at Level 4
Whether aRuntimeClass exists in the cluster and whether any Pod uses one are two separate things to look at.kubectl get runtimeclass
kubectl get pods -A -o custom-columns=NS:.metadata.namespace,NAME:.metadata.name,RC:.spec.runtimeClassNameA
RuntimeClass can exist while no Pod names one, and in that case level 4 is not in use. As described in Section 5.2, creating a RuntimeClass and having the runtime installed on a node are two different things.With those three answers in hand, the next four questions are the ones that decide where to stop.
9.4 Four Questions That Decide
The first question is who wrote the code sitting on the same node. If your own teams wrote all of it, stopping at level 2 still holds up as an explanation. If code a customer brought in, or arbitrary code a user submitted, is running there, level 1 and level 2 do nothing against that surface. This is the case where the sentence in Section 1.3 bites.The second question is who owns the node. As stated in Section 5.5, that answer settles in advance whether level 4 is open to you. Choose Auto Mode and you cannot build level 4 yourself.
The third question is whether you can accept what moving up costs. DaemonSets,
hostNetwork, GPUs, io_uring, and the resources charged against every Pod are the candidates. Each item in Section 7 is a checklist entry as written.The fourth question is whether you can explain what the current level does not stop. Say the rightmost column of the table in Section 6 in your own words. If you cannot, writing that down works better than moving up a level.
9.5 Levels Stack, and They Do Not Replace Each Other
A cluster that has level 4 still needs level 1 and level 2.RuntimeClass does not restrict network reachability, and it does not judge the privileges a Pod asks for. In the other direction, a cluster that stopped at level 2 and never added level 3 can be a defensible decision. Not being able to supply nodes that meet the prerequisites is a reason.What to avoid is relaxing a lower level because an upper one is in place. Taking level 4 Pods out of the scope of level 2 is exactly the shape that
runtimeClasses under exemptions offers, as quoted in Section 3.7. On EKS you cannot supply that setting, so the shape is hard to reach. Implementing the equivalent in a policy engine opens the same hole.10. Failure Modes and Anti-Patterns
10.1 Design Failures
Using the statement that tenants are isolated by containers to mean that the kernel is separated. As described in Section 1.3 and Section 2.4, level 1 and level 2 both leave the node's kernel shared.Reading Pod Security Admission being enabled as Pod Security Standards being in effect. As detailed in Section 3.5, the EKS default is
privileged in all three modes, and nothing is constrained until a namespace carries a label.Treating level 4 as a reason to skip level 1 and level 2. As noted in Section 9.5, levels stack.
Choosing either gVisor or Kata to be used across the entire cluster. As described in Section 5.1,
RuntimeClass is a mechanism for specifying different runtimes on a per-Pod basis.Confusing the separation of nodes with the separation of kernels. Both sole tenant nodes and topology spread constraints are actions that reduce the number of shared kernels.
10.2 Implementation Failures
Reading the truth value ofhostUsers incorrectly. As described in Section 4.1, the user namespace becomes active when hostUsers is set to false.Assuming that simply creating a
RuntimeClass automatically places it in level 4. As stated in Section 5.2, the corresponding runtime configuration must be set on the node side.Installing the runtime on only some of the nodes and leaving
scheduling out of the RuntimeClass. kubernetes.io states that a RuntimeClass with no scheduling is treated as supported on every node.Applying the
enforce label, seeing the Deployment succeed, and stopping there. As described in Section 3.4, enforce does not affect Deployments. To determine if Pods have been created, you need to check the Deployment's status.Applying a label to a namespace that already contains existing Pods, and assuming that this immediately synchronizes the state. As described in Section 3.6, changing to
enforce will not delete existing Pods.Deploying
hostUsers: false globally without verifying the prerequisites for level 3. As mentioned in Section 4.5, of the four layers, the kernel and the file system depend on the node's AMI.10.3 Operational Failures
Taking a procedure without checking the date and target version of the primary source. All four items in Section 8 are this type.Moving a Pod to level 4 without considering that it leaves the field of view of the DaemonSets on that node. As described in Section 7.3, DaemonSets are not supported on Fargate.
Disabling
overhead to increase density. As stated in Section 7.5, the scheduler will end up over-packing Pods without knowing the actual resource consumption.Configuring gVisor to use GPUs without checking the driver compatibility window. As noted in Section 7.1, the supported range may be reduced.
Recording a move up a level as having become safe. If the rightmost column of Section 6 stays blank, that record gives the next reader nothing to decide with.
11. Frequently Asked Questions
11.1 Is Pod Security Admission enabled on an EKS cluster?
Yes. As described in Section 3.5, though, the default profile isprivileged in all three modes. privileged is the absence of a policy in the best practices guide's own definition, so in practice nothing is constrained until a namespace carries a label.11.2 Can you change the cluster-wide default to baseline?
No, not through any configuration option EKS exposes. As described in Section 3.7, that setting is supplied as the admission configuration of the API server, and the only kube-apiserver settings EKS exposes areeventTtl and serviceNodePortRange. The route that works is the namespace label.11.3 Does setting hostUsers to true enable the user namespace?
No, it is the opposite. hostUsers: false is what gives a Pod its own user namespace. hostUsers: true is the default, and it keeps the Pod on the host's user namespace.11.4 Do user namespaces make level 4 unnecessary?
No. As described in Section 4.6, user namespaces are a mechanism that allows you to change how a container's root user behaves on the host, but the path through which the kernel processes system calls remains the same. Level 4 replaces that very path.11.5 Which should you choose: gVisor or Kata?
This article does not provide a comparison. As described in Section 5.1 and Section 5.4,RuntimeClass is a mechanism for choosing different runtimes on a per-Pod basis, and it is not intended to require a cluster-wide selection between the two. The decision you need to make is which workloads should be moved outside of the default runtime.11.6 Can you use GPUs under gVisor?
Yes, gVisor can utilize GPUs. As described in Section 7.1, it includes a mechanism called nvproxy, which supports CUDA workloads. However, there are limitations regarding the supported driver versions, and that window follows the range of drivers GKE carries. And the gVisor documentation states that its effectiveness against a flaw in the driver itself is limited.11.7 Do you need a bare metal instance to use Kata?
Not any more. As stated in Section 7.4, EC2 has supported nested virtualization on virtual instances since 2026, and the user guide lists the supported instance types. Bare metal is still what the same page recommends evaluating when performance or latency requirements are strict.11.8 Can gVisor or Kata be used with EKS Auto Mode?
No, they cannot. As stated in Section 5.5, the nodes in Auto Mode are managed instances, and the user guide explicitly states that software cannot be installed on them.11.9 Does EKS Fargate amount to level 4?
Yes, in the sense that the kernel is not shared. As stated in Section 5.5, the user guide explicitly states that Fargate Pods do not share a kernel with other Pods, and the best practices guide also lists Fargate as a means of using sandboxed pods. However, as noted in Section 7.3, it does not support DaemonSets, privileged containers, orHostPort and HostNetwork, and Section 7.1 adds that GPUs are not available on Fargate either.11.10 If a cluster has stopped at level 2, is level 3 the next step?
Not necessarily. If the answer to the first question outlined in Section 9.4 is that any code the user inputs will execute, then level 3 may not be sufficient. As described in Section 4.6, level 3 does not stop a flaw in the kernel itself.11.11 How long will what this article says stay true?
As stated in Section 8.5, the parts that state a specification and the parts that state a supported range have different lifespans. The definitions of the profiles and the modes, the meaning ofhostUsers, and the role of RuntimeClass last. The supported versions, the supported instances, the supported drivers, and the Fargate constraints all go stale the moment what they point at moves. The verification date is in Section 1.4.12. Summary
Isolation comes in levels. There are four of them.Level 1 creates logical partitions using namespaces, RBAC, and NetworkPolicy, while maintaining a shared kernel on the nodes.
Level 2 enforces constraints on Pod specifications using Pod Security Standards and Pod Security Admission. Currently, EKS defaults to all three modes being privileged, so nothing is constrained until a namespace carries a label. And EKS does not expose a way to change that cluster-wide default.
Level 3 uses user namespaces to separate the container's root user from the host's UID. Setting
hostUsers to false is what turns it on. The feature became stable in Kubernetes 1.36, and EKS supports 1.36. The prerequisites for it sit on the node.Level 4 uses
RuntimeClass to replace the kernel implementation itself. This can involve implementing the kernel in user space, or launching a virtual machine for each Pod. It's designed to mix different runtimes on a Pod-by-Pod basis, rather than enforcing a cluster-wide setting. Who owns the node decides what is available.And every one of the four levels has something it does not stop. Reach that travels through the shared kernel, the system calls inside what you allowed, a flaw in the kernel itself, and whatever is shared outside the boundary. Being able to name those four is what explains the level you chose.
This article does not conclude that moving up a level makes you safe. AWS itself writes that the cluster is the only construct that provides a strong security boundary. What the four levels move is a different axis, one that sits short of that sentence: how far the sharing can be cut back.
13. References
- Tenant Isolation - Amazon EKS Best Practices Guide
- Pod Security - Amazon EKS Best Practices Guide
- Review release notes for Kubernetes versions on standard support - Amazon EKS User Guide
- Simplify compute management with AWS Fargate - Amazon EKS User Guide
- Learn about Amazon EKS Auto Mode Managed instances - Amazon EKS User Guide
- Migrate from EKS Fargate to EKS Auto Mode - Amazon EKS User Guide
- KubeApiServerConfigRequest - Amazon EKS API Reference
- UpdateClusterConfig - Amazon EKS API Reference
- Running Heterogeneous workloads - Amazon EKS Best Practices Guide
- Use nested virtualization to run hypervisors in Amazon EC2 instances - Amazon EC2 User Guide
- CpuOptionsRequest - AWS SDK for Ruby V3 API Reference
- Use admission controllers to enforce security policies - Security Practices for Multi-Tenant SaaS Applications using Amazon EKS
- Amazon EKS and Amazon EKS Distro now supports Kubernetes version 1.36 - AWS What's New
- Amazon EC2 supports nested virtualization on virtual Amazon EC2 instances - AWS What's New
- Nested virtualization is now available on additional Intel platforms and US Gov Cloud regions - AWS What's New
- Implementing Pod Security Standards in Amazon EKS - AWS Containers Blog
- Managing Pod Security on Amazon EKS with Kyverno - AWS Containers Blog
- Enhancing Kubernetes workload isolation and security using Kata Containers - AWS Containers Blog
- How to Run WebAssembly on Amazon EKS - AWS Containers Blog
- FAQs: Pod Security Standards and Pod Security Admission in Amazon EKS Pods - AWS re:Post
- Pod Security Standards - Kubernetes Documentation
- Pod Security Admission - Kubernetes Documentation
- User Namespaces - Kubernetes Documentation
- Runtime Class - Kubernetes Documentation
- Pod Overhead - Kubernetes Documentation
- Pod - Kubernetes API Reference
- Use a User Namespace With a Pod - Kubernetes Documentation
- Security Model - gVisor Documentation
- Platform Guide - gVisor Documentation
- Applications - gVisor Documentation
- GPU Support - gVisor Documentation
- Installing Kata Containers - Kata Containers Documentation
- Limitations - Kata Containers Documentation
- Kata Containers architecture - Kata Containers Documentation
- kata-deploy Helm chart RuntimeClass template - Kata Containers repository
- Agent Sandboxing and Blast-Radius Isolation on AWS - Choosing the Unit of Each Containment Boundary and What Each One Does Not Stop
- Policy Engines Compared - What IAM, Cedar, Rego, and Kyverno Do When Nothing Matches, When an Input Is Missing, and When the Engine Never Answers
- eBPF on Amazon EKS - What Loads Into Your Nodes, When a Network Policy Starts Enforcing, and Where the Coverage Stops
- Amazon EKS Networking Deep Dive - VPC CNI, IP Address Management, Security Groups for Pods, and Pod Connectivity
- Amazon EKS Control Plane Configuration - What You Can Set, What Blocks the Way Back, and How Far Each Setting Reaches
- Gang Scheduling and Dynamic Resource Allocation on Amazon EKS - Why One Half of the Vocabulary Is Still Alpha, and What Decides Which Device Allocation Path You Get
- Amazon EKS Pod Identity and IRSA Decision Guide - Workload Identity Design, Trade-offs, and Migration Paths
- AWS SaaS Multi-Tenant Architecture Guide - Tenant Isolation, Pool and Silo Models, Onboarding, and Metering
- Amazon GuardDuty Extended Threat Detection Architecture - Attack Sequences, Runtime Monitoring, and Response Automation
- Agentic Payments on AWS - Where the Spending Limit Is Enforced, and What It Does Not Stop
- Detection Engineering on AWS - What a Custom Source Must Satisfy Before a Detection Can Be Written, and What the Detection Still Does Not See
References:
Tech Blog with curated related content
Written by Hidekazu Konishi