Host a Static Website using AWS Amplify Hosting in the AWS Amplify Console
First Published:
Last Updated:
In this article, I will explain the procedure to actually build a serverless static website hosting environment using AWS Amplify Hosting in the AWS Amplify Console, which was introduced as one of the ways to host static websites implementing PWA in that article.
Example of building static website hosting with AWS Amplify Hosting in the AWS Amplify Console
With AWS Amplify Hosting in the AWS Amplify Console, you can specify the source to be built and deployed using methods such as Git provider repositories like GitHub, BitBucket, GitLab, AWS CodeCommit, or manual deployments like Amazon S3, Any URL (specifying the URL of the artifact), Drag and Drop (uploading from local).In this article, I would like to go through the steps for using GitHub as an example of using a Git provider repository, and for Amazon S3, Any URL, and Drag and Drop as examples of manual deployment without using a repository.
The architecture of AWS Amplify Hosting in the AWS Amplify Console introduced in this article is as shown in the following figure.
* AWS Amplify Hosting deploys a managed hosting environment consisting of Amazon S3 and Amazon CloudFront managed by AWS, which is invisible from the AWS Management Console.
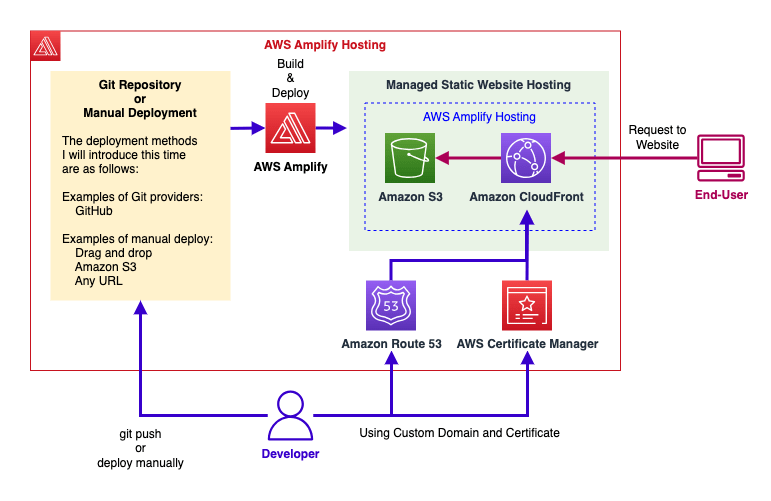
In the example of using a Git provider repository, I also explain about issuing certificates by AWS managed AWS Certificate Manager and setting up Basic Authentication Style Access Control, in addition to creating CI/CD and hosting environments.
The GitHub and AWS accounts I will use from here on are all from my personal environment, so if you are trying this yourself, please replace them with the appropriate information in your own environment.
Let's take a look at the build procedures in the order of GitHub, Amazon S3, Any URL, and Drag and Drop.
Using a Git Provider Repository: GitHub
First, I will explain the procedure for using GitHub as a Git provider's repository through a simple demo.Creating a repository and branch on GitHub
First, create a repository and branch on GitHub. In this example, I will use the main branch of a private repository named "amplify-hosting-demo".* The use of Git and GitHub is omitted here. For how to use Git and GitHub, please refer to the following GitHub documentation.
Get started with GitHub documentation - GitHub Docs
Push a file to a branch of the GitHub repository
Next, create a demo file "index.html" and push it to the branch of the repository you created on GitHub.[ho2k_com@ho2k-com Github]$ git clone git@github.com:uio8/amplify-hosting-demo.git [ho2k_com@ho2k-com Github]$ cd amplify-hosting-demo/ [ho2k_com@ho2k-com amplify-hosting-demo]$ vi index.html [ho2k_com@ho2k-com amplify-hosting-demo]$ cat index.html <!DOCTYPE html> <html> <head> <meta http-equiv="refresh" content="10; URL=https://hidekazu-konishi.com/"> <title>AWS Amplify Hosting Demo</title> </head> <body> Welcome! <br> I'm sure that <br> Amplify will amplify something in the 2020s. <br> Let's use Amplify to see what it is. <br> </body> </html> [ho2k_com@ho2k-com amplify-hosting-demo]$ git add . [ho2k_com@ho2k-com amplify-hosting-demo]$ git commit -m "first commit." [ho2k_com@ho2k-com amplify-hosting-demo]$ git push
Navigating to the AWS Amplify Console
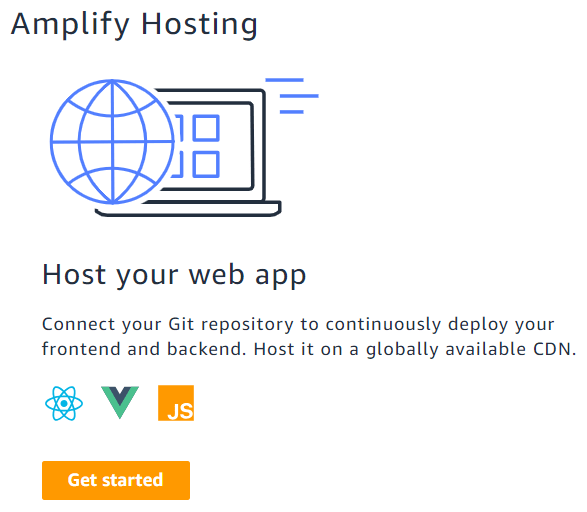
Log into the AWS Management Console and navigate to the AWS Amplify Console. If necessary, select the region you will use from the region menu at the top right of the screen.If you have not yet created any apps in the AWS Amplify Console, you will see a screen that says "Fastest, easiest way to develop mobile and web apps that scale." Press the "Get started" button on this screen, and then press the "Get started" button in the area titled "Host your web app" at the very bottom right of the screen.
If you have already created an app, select "Host web app" from "New App" at the top right of the screen.

↓
Setting up Authentication for GitHub Repository Use with AWS Amplify Hosting
Once you've moved to the "Get started with Amplify Hosting" screen, select the "GitHub" that I will use this time, and then click "Continue".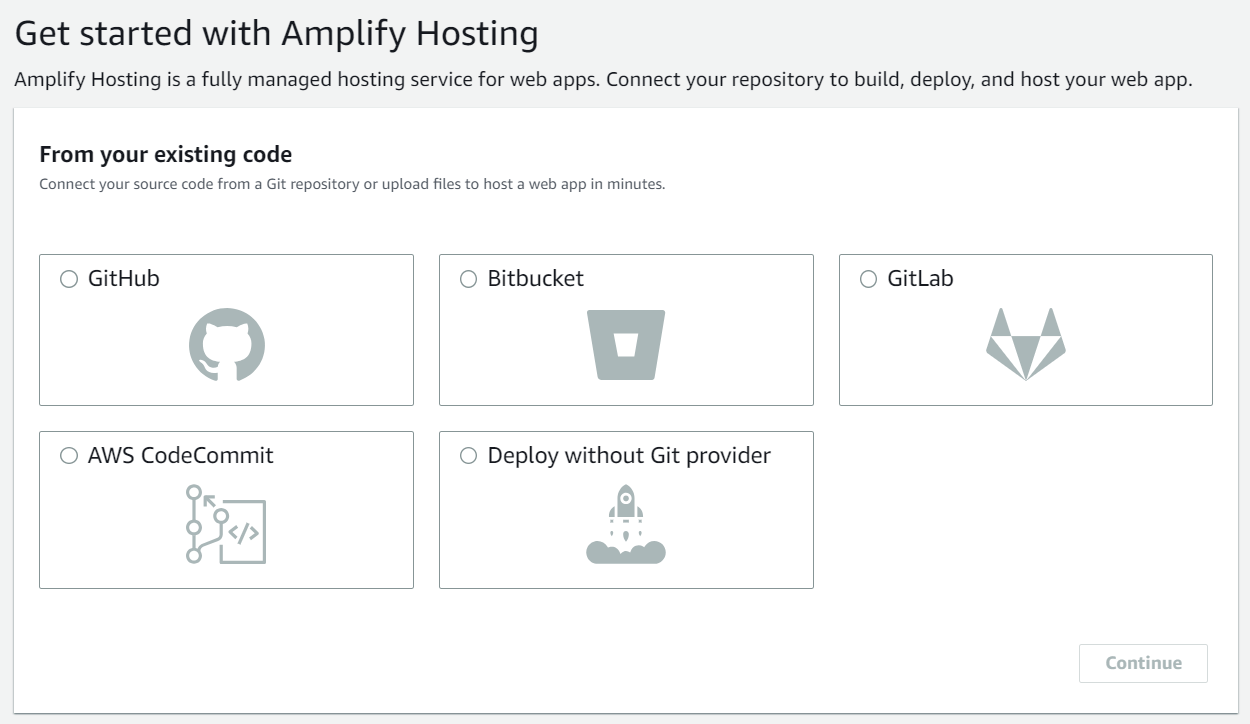
↓
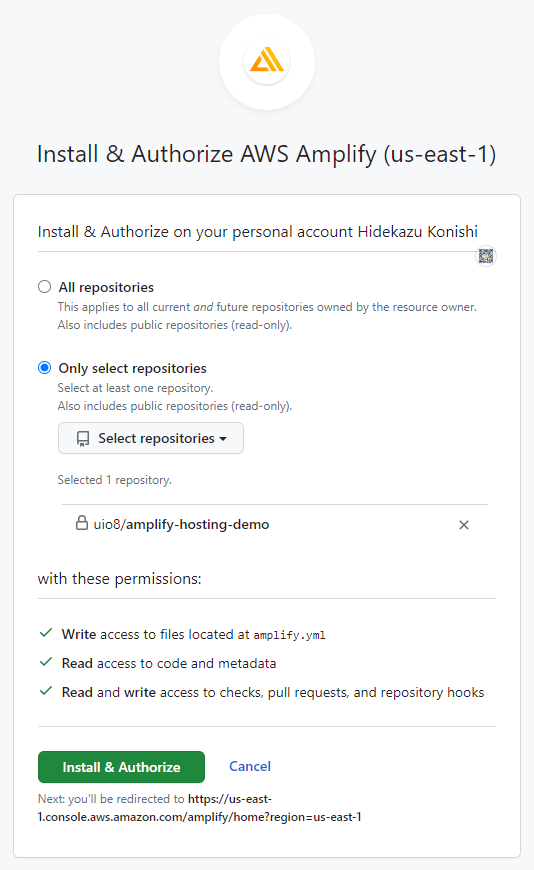
On the next screen, sign in to the GitHub account where you created the repository and authenticate AWS Amplify.
↓
Setting up Deployment Using a GitHub Repository with AWS Amplify Hosting
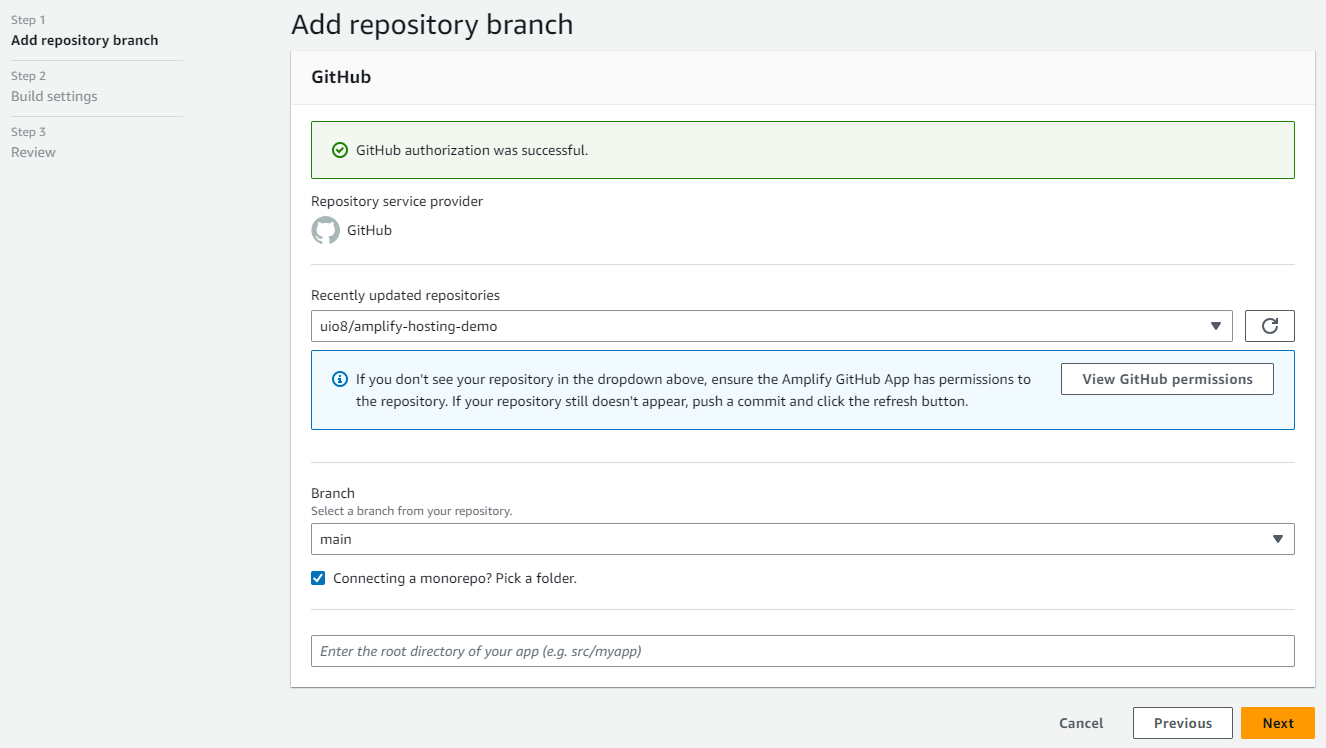
Upon successful authentication, you will be redirected to the "Add repository branch" page.Select the "Repository" (in this case, amplify-hosting-demo) and "Branch" (here, main) you want to target for building and deploying in the AWS Amplify Console, and then proceed to "Next."
↓
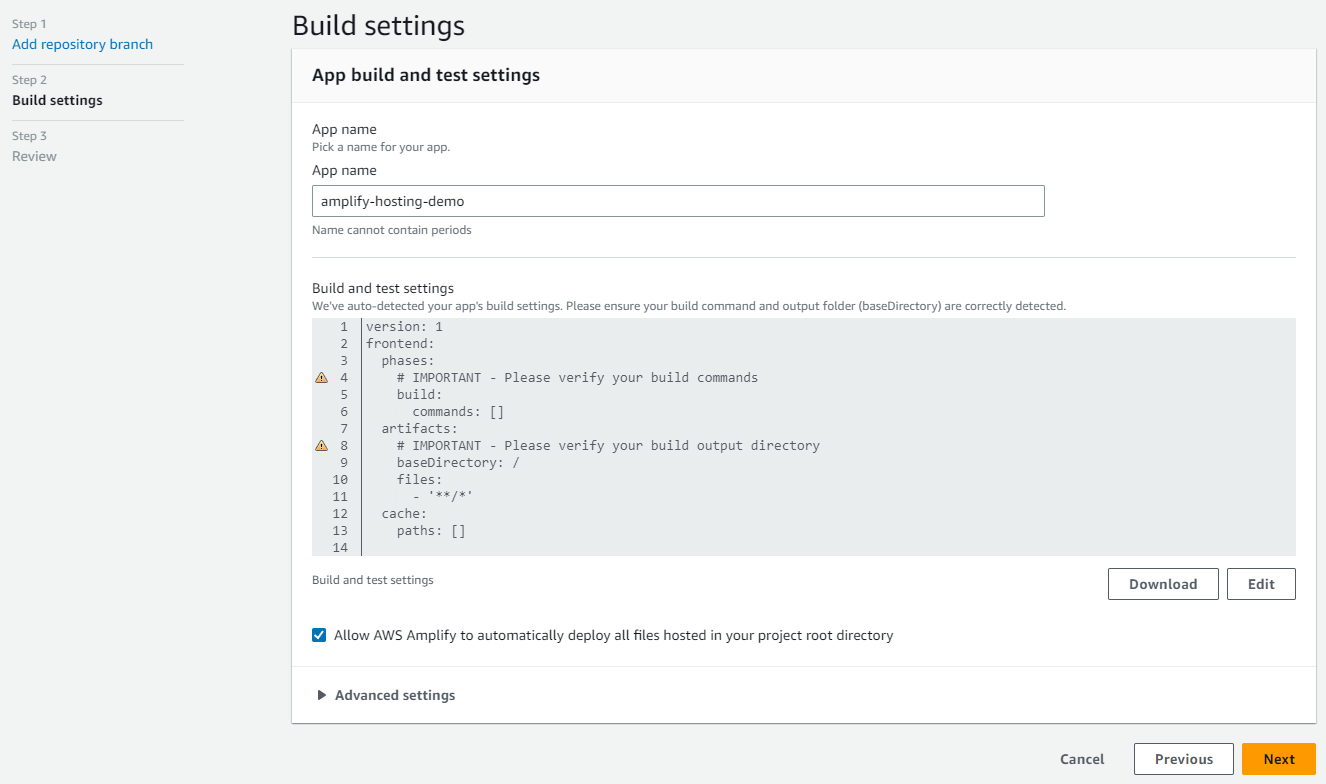
On the "Build settings" screen, you can set up the build with a YAML format configuration file.Here, use the automatically detected build settings as they are, check "Allow AWS Amplify to automatically deploy all files hosted in your project root directory", and proceed by clicking "Next".
↓
On the "Review" screen, check the settings and click "Save and deploy".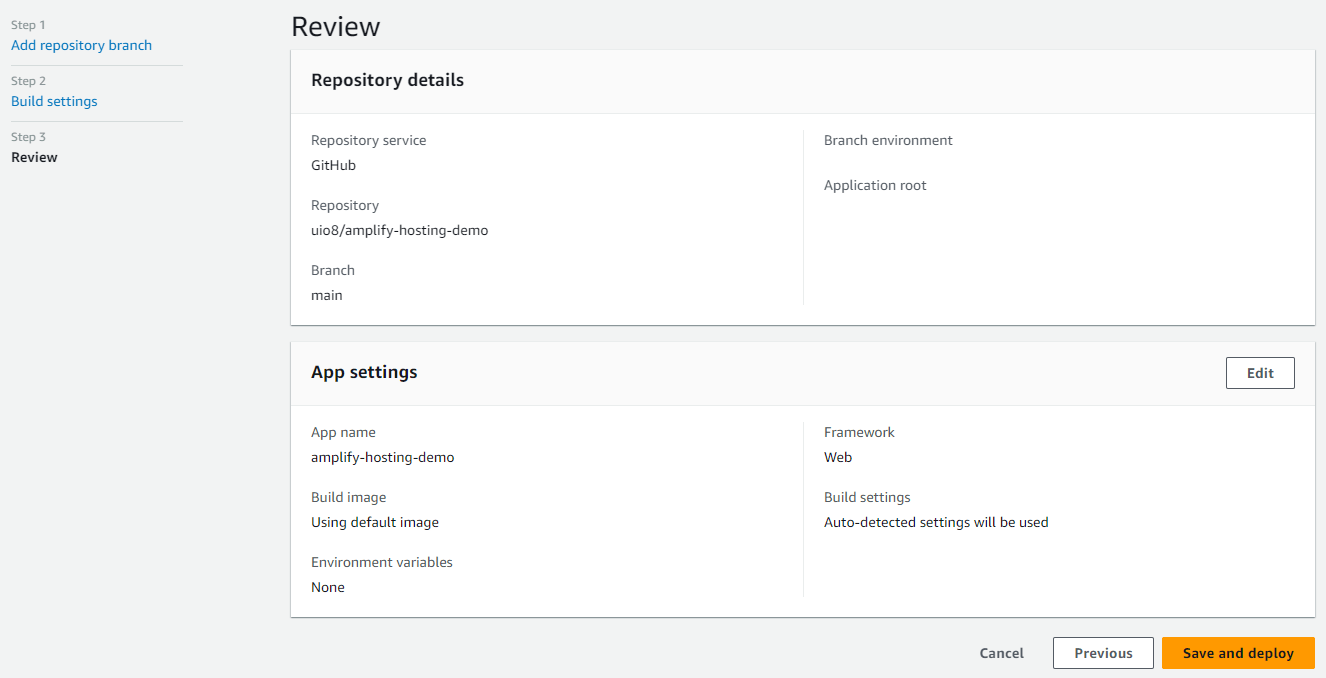
↓
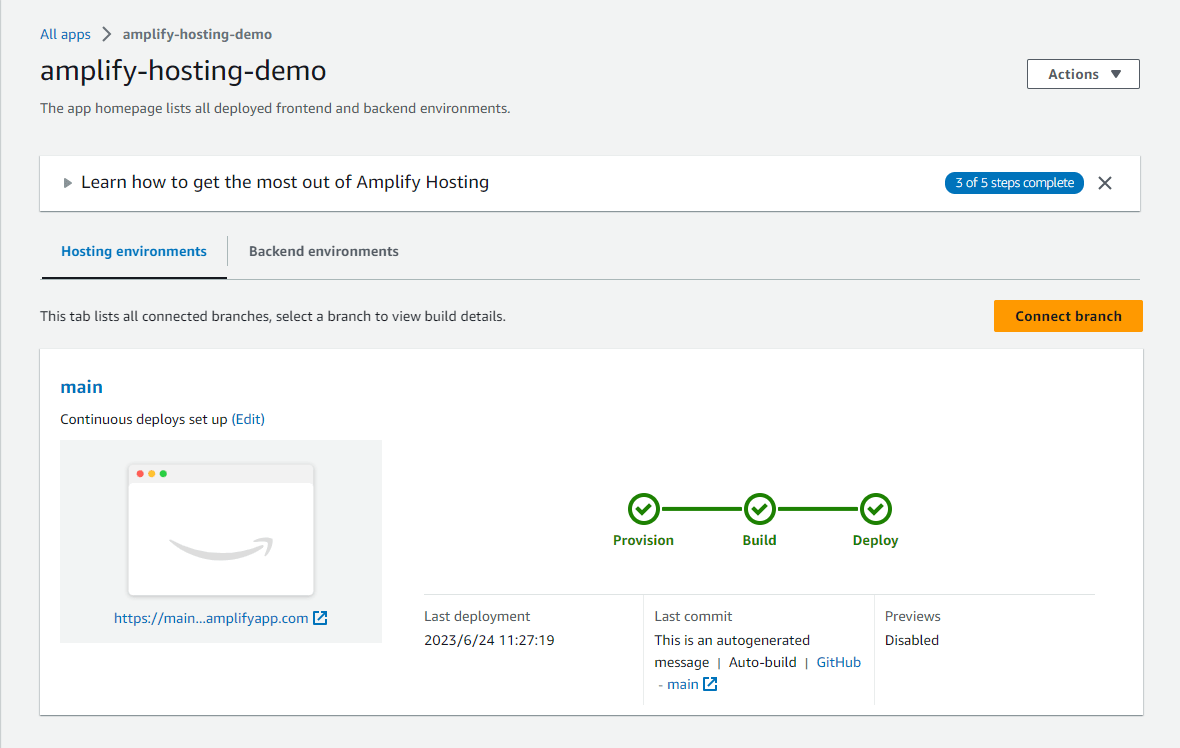
The deployment progress to the hosting environment is displayed in the "Hosting environments" tab of the app management screen, and when all the checkmarks are in place, the deployment is complete.Even though it was only one page, build processing was performed, so it took about 2 minutes from provisioning to verification completion in this case.
If you use a Git provider such as GitHub, you can create an environment for each branch of the repository.
↓
By going to the URL of the created app displayed on the app management screen, you can confirm that the content pushed to GitHub is displayed.
Even if you directly push to the Git repository branch set up in AWS Amplify Hosting (in this example, the main branch), Build and Deploy will be executed, but even in the case where you develop on a separate branch according to a proper flow and create a pull request, Build and Deploy of AWS Amplify Hosting are executed at the timing when you merge into the branch of the Git repository set up in AWS Amplify Hosting.
In addition, as mentioned earlier, if you are using a Git provider repository, you can create an environment (environment) for each branch, so you can easily prepare an environment for static website hosting according to stages and purposes such as development, staging, and production with simple operations.
Using Custom Domain with AWS Amplify Hosting
With AWS Amplify Hosting, it's easy to associate your custom domains managed by Amazon Route 53.It's also possible to link to domains registered with a 3rd party provider.
This time, I will associate the subdomain '
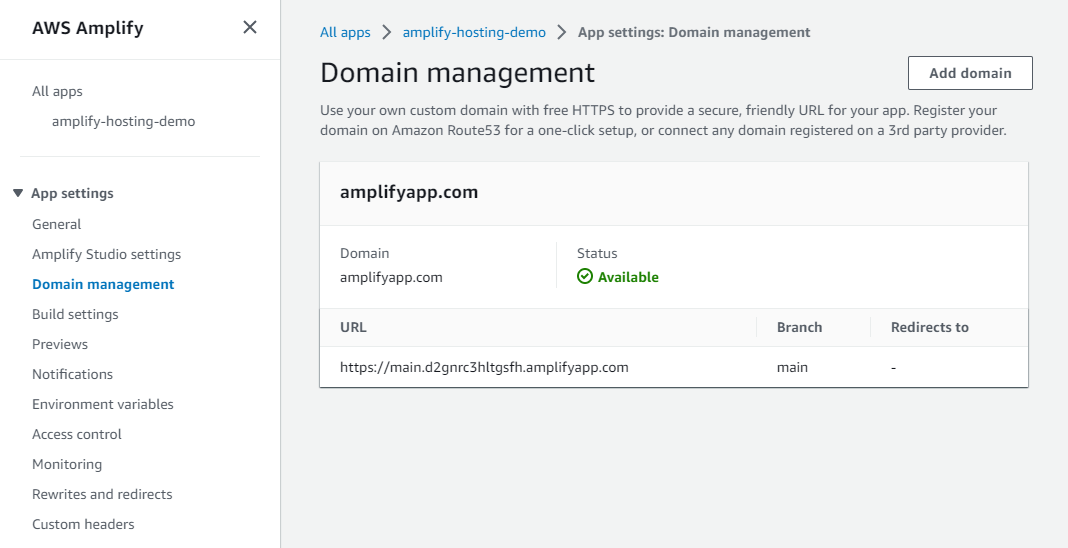
amplify-hosting-demo.h-o2k.com' with the AWS Amplify Hosting environment, with the domain 'h-o2k.com' already added to the Amazon Route 53 Host Zone.First, press the 'Add domain' button on the AWS Amplify Console's 'Domain management' screen.
↓
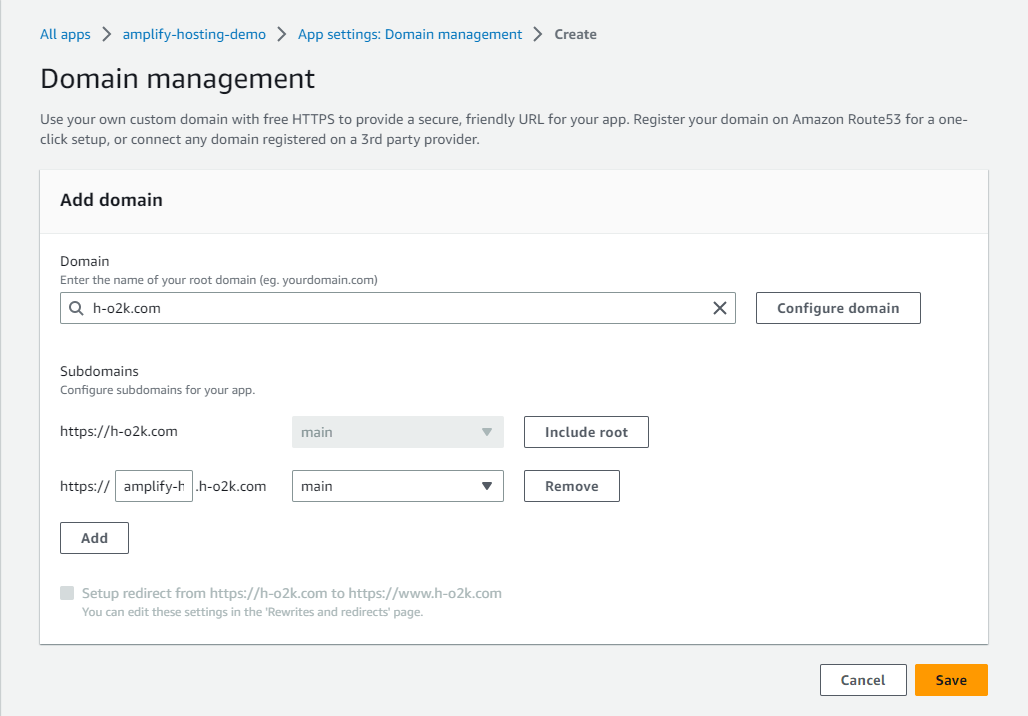
In the 'Add domain' screen, search for the domain managed by Amazon Route 53 and set up the Zone Apex(* 1) and subdomain.
In this screen, you can associate not only the subdomain but also the Zone Apex with the environment (branch), and you can add settings such as redirecting from the Zone Apex to the subdomain with the hostname 'www'.However, in this example, I want to associate only the subdomain, so press 'Exclude root' to exclude the Zone Apex, add only the subdomain '
amplify-hosting-demo.h-o2k.com' and press 'Save'.* 1) Zone Apex is the domain name itself that does not include the hostname (such as www) used in the subdomain. It is also called Naked Domain, Root Domain.
↓
The SSL Certificate configuration and Domain activation process will begin.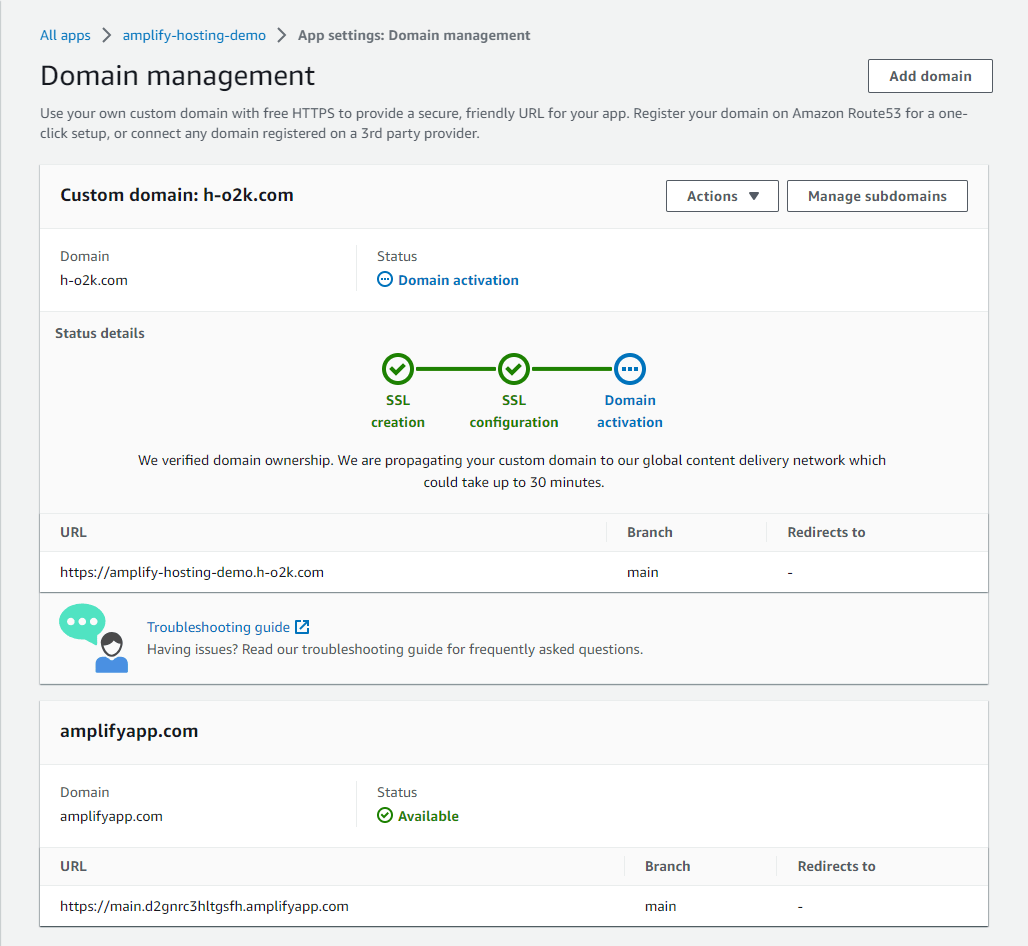
↓
The SSL Certificate configuration and Domain activation processes took about 20 minutes. Once these settings are complete, the SSL certificate issued by AWS Certificate Manager will be associated with Amazon CloudFront inside the fully managed AWS Amplify Hosting, and the Amazon CloudFront's Distribution domain name will be added to Amazon Route 53's Host Zone as a CNAME record, enabling display via custom domain.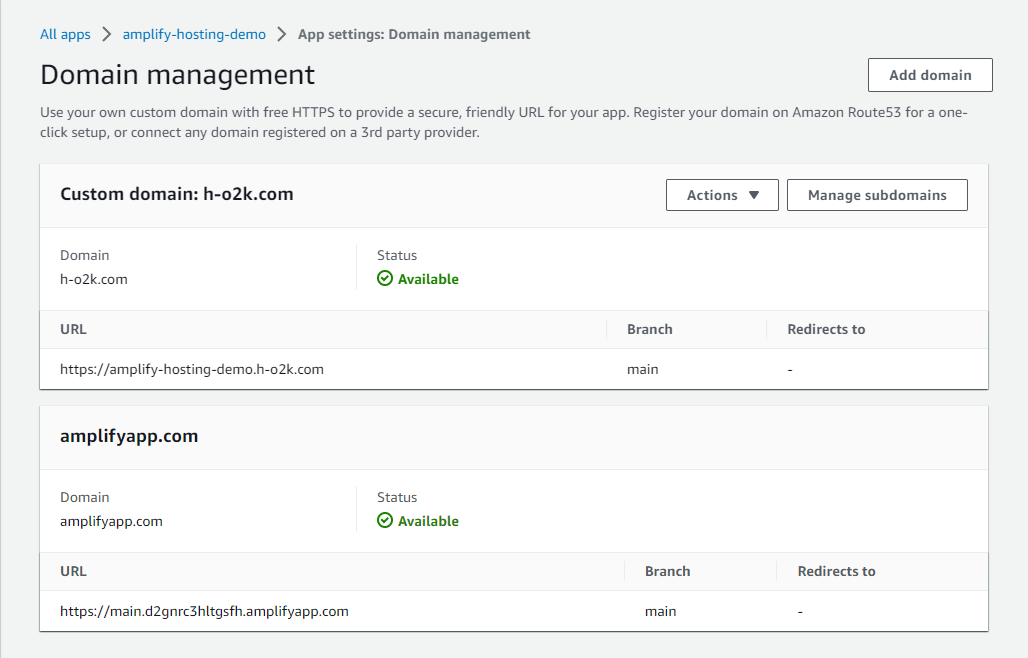
Implementing Basic Authentication Style Access Control with AWS Amplify Hosting
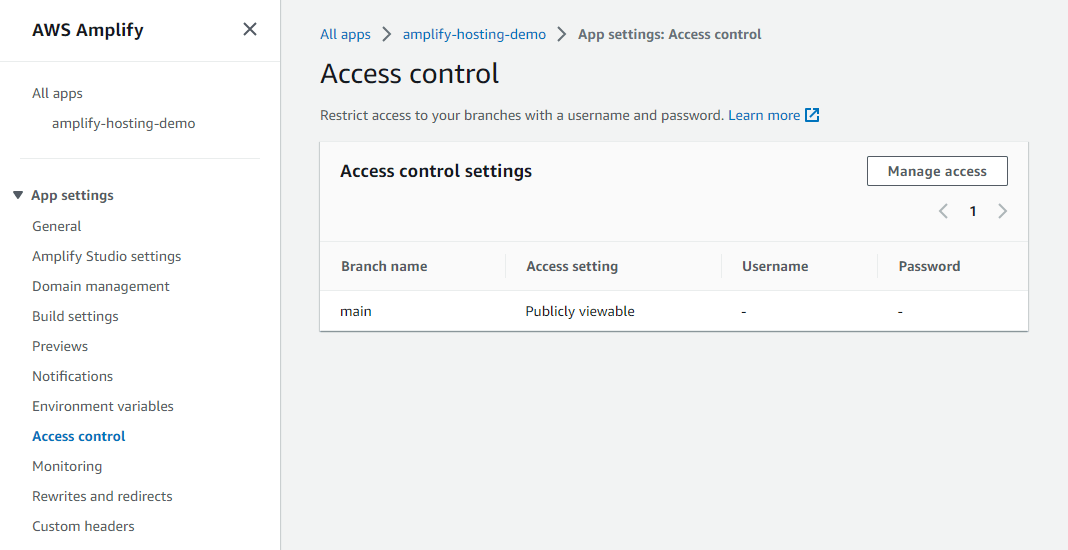
Setting up access control in Basic Authentication Style with AWS Amplify Hosting is quite simple, so I will introduce this method here.First, press the "Manage access" button on the "Access control" screen of the Amplify Console.
↓
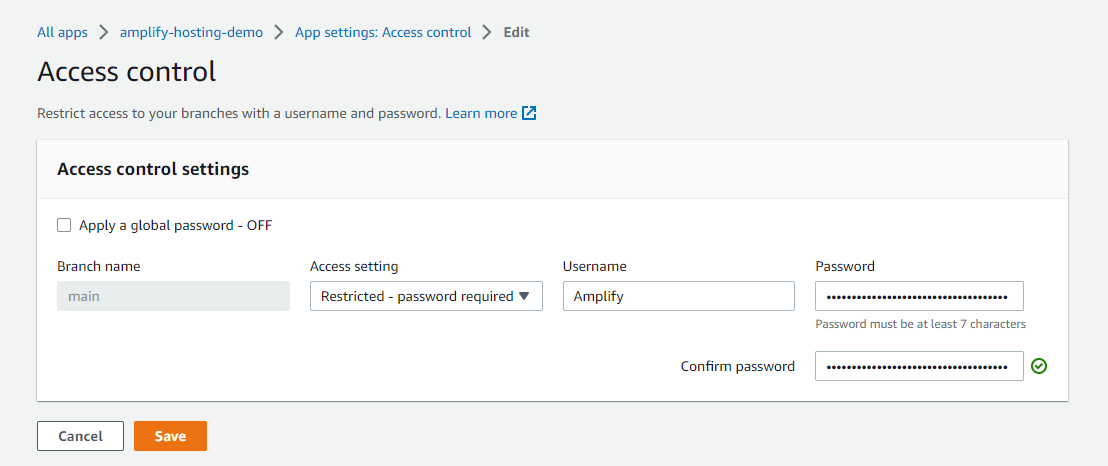
On the "Access control settings" screen, you can choose to turn ON the "Apply a global password" to apply Basic Authentication Style authentication across the entire environment, or turn it OFF and set it for each environment (branch). In this example, I will turn it OFF and set authentication for each branch.In this example, on the "Access control settings" for the "main" branch, I select "Restricted - password required", set the "Username" as "Amplify" and the "Password" as "will Amplify something in the 2020s."
* There are no restrictions mentioned on the AWS Amplify Console except that the Password must be 7 characters or more, but as far as I have tried, the Username can be alphanumeric characters and symbols excluding the colon, the Password can be alphanumeric characters and symbols, and up to 1499 characters can be entered for the Username and Password combined.
↓
If there is no issue with the input, the settings will be reflected.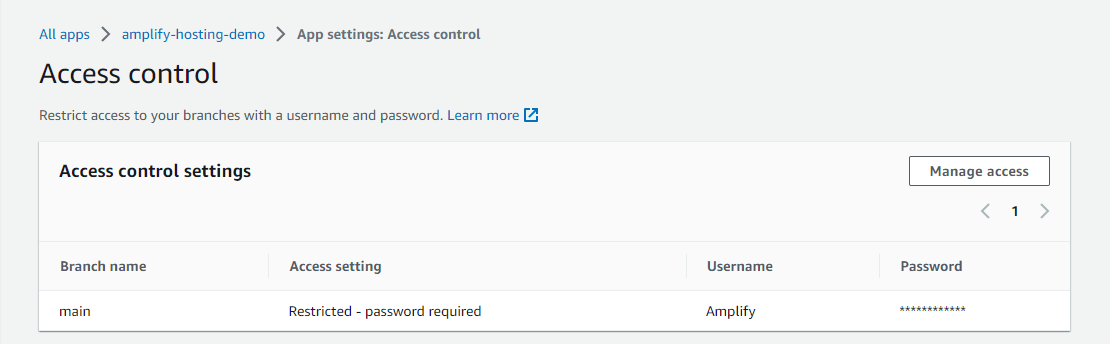
↓
After setting the access control, if you access the domain again, you will be asked for your Username and Password in Basic Authentication Style, and you can log in with the Username and Password you set.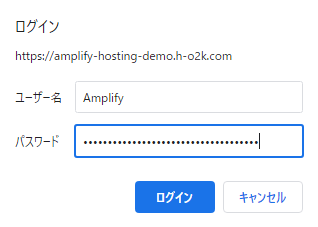
Checking Access logs of AWS Amplify Hosting in AWS Amplify Console
Let's move on to checking the Access logs of AWS Amplify Hosting in the AWS Amplify Console.You can easily search and verify the Access logs of AWS Amplify Hosting from the 'Access logs' tab in the 'Monitoring' screen of AWS Amplify Console.
In addition, logs containing detailed items can be downloaded as a CSV file format log file by pressing the 'Download' button.
However, please note that it may take up to an hour for the latest logs to be displayed, and that the storage period for Access logs is up to two weeks.

In addition to displaying and downloading Access logs of AWS Amplify Hosting in AWS Amplify Console, you can also download them using AWS CLI, AWS SDK and other APIs.
Next, I'll describe a simple shell script example using AWS CLI to obtain the Access logs of AWS Amplify Console for a date specified in local time (JST in this example). (However, please note that the time recorded in the log is UTC.)
#!/bin/bash
#amplify_generate-access-logs_by_jst.sh
#Retrieves the access logs of Amplify Console for the specified date in Japan Standard Time (JST).
#Usage: bash ./amplify_generate-access-logs_by_jst.sh 20210718
#Written with the assumption of using a GNU bash.

TARGET_DATE="${1}"
LOG_DIR="**Directory path where logs are saved**"
REGION="**AWS Region**" # Identifier for AWS region (e.g., us-east-1)
APP_ID="**Application ID**" # For example, the part after "/" in "App ARN" on the "General" screen
DOMAIN_NAME="**Domain name**" # For example, the environment's default domain or a custom domain like h-o2k.com

#If the input is not in date format, set it to the current date
if [ `date -d ${TARGET_DATE} > /dev/null 2>&1; echo $?` -ne 0 ] ; then
  TARGET_DATE=`date '+%Y%m%d'`
fi

#Here, in order to convert the date specified in JST back to UTC, the timestamp is set 9 hours earlier.
START_TIMESTAMP=`date -d "${TARGET_DATE} 9 hours ago" +%s`
END_TIMESTAMP=`date -d "${TARGET_DATE} 23:59:59 9 hours ago" +%s`
mkdir -p ${LOG_DIR}
LOG_FILE=${LOG_DIR}/amplify_log_${REGION}_${APP_ID}_${DOMAIN_NAME}_${TARGET_DATE}.log

#For AWS CLI, please refer to https://docs.aws.amazon.com/cli/latest/reference/amplify/generate-access-logs.html
echo "aws amplify generate-access-logs \
--region ${REGION} \
--app-id ${APP_ID} \
--domain-name ${DOMAIN_NAME} \
--start-time ${START_TIMESTAMP} \
--end-time ${END_TIMESTAMP} \
--query logUrl | xargs curl > ${LOG_FILE}"
aws amplify generate-access-logs \
--region ${REGION} \
--app-id ${APP_ID} \
--domain-name ${DOMAIN_NAME} \
--start-time ${START_TIMESTAMP} \
--end-time ${END_TIMESTAMP} \
--query logUrl | xargs curl > ${LOG_FILE}
On the other hand, as of the time of writing this article, AWS Amplify Hosting's access logs do not seem to have been integrated with automatic saving to Amazon S3 or Amazon CloudWatch Logs. Therefore, if you want to store access logs for a long period, you need to schedule and regularly run processes like AWS Lambda functions using AWS CLI or AWS SDK to store them in Amazon S3 or Amazon CloudWatch Logs.That concludes the introduction to operating AWS Amplify Hosting in the AWS Amplify Console using a GitHub repository.
Manual Deploy without using a Git provider: Amazon S3
Next, let's introduce the procedure for Manual Deploy using Amazon S3, as an example where a Git provider's repository is not used.When using Amazon S3 as the deployment source for AWS Amplify Hosting, you need to specify a zip file located in an Amazon S3 bucket.
Therefore, first, create the code to be deployed and zip compress it at the hierarchy where the file (index.html in this case) to be placed in the document root is located.
In other words, just like AWS Lambda, the point to note is not to compress the upper directory containing index.html by mistake.
(In Windows, avoid compressing the upper folder, and select all or multiple deployment target files to compress.)
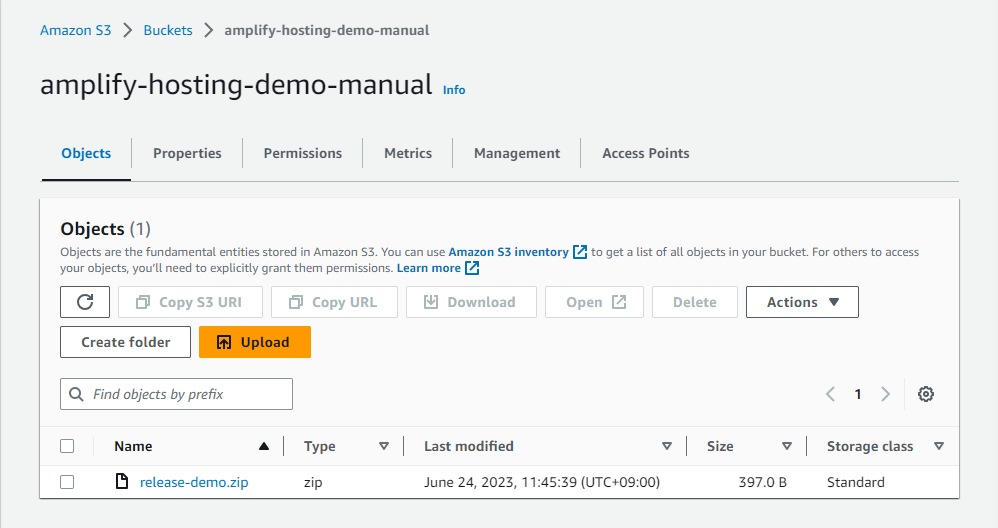
[ho2k_com@ho2k-com tmp]$ mkdir amplify-hosting-demo-manual
[ho2k_com@ho2k-com tmp]$ cd amplify-hosting-demo-manual
[ho2k_com@ho2k-com amplify-hosting-demo-manual]$ vi index.html
[ho2k_com@ho2k-com amplify-hosting-demo-manual]$ cat index.html
<!DOCTYPE html>
<html>
<head>
<meta http-equiv="refresh" content="10; URL=https://hidekazu-konishi.com/">
<title>AWS Amplify Hosting Demo(Manual Deploy)</title>
</head>
<body>
Welcome! <br>
I'm sure that <br>
Amplify will amplify something in the 2020s. <br>
Let's use Amplify to see what it is. <br>
</body>
</html>
[ho2k_com@ho2k-com amplify-hosting-demo-manual]$ zip release-demo.zip *
Next, I will create an Amazon S3 bucket where this zip file will be saved and upload the zip file. Here, I create an Amazon S3 bucket called 'amplify-hosting-demo-manual' on the Amazon S3 console (https://s3.console.aws.amazon.com/) and upload the zip file 'release-demo.zip'.
↓
Then, when using a file in the Amazon S3 bucket as the deployment source for AWS Amplify Hosting in the AWS Amplify Console, you need to enable Amazon S3 ACLs (if you do not enable ACLs, the deployment will fail).To enable Amazon S3 ACLs, navigate as follows:
Amazon S3 bucket console → 'Permissions' tab → 'Object Ownership' → 'Edit'
Then, in the 'Edit Object Ownership' screen, select 'ACLs enabled', 'Object writer', 'I acknowledge that ACLs will be restored.' and press 'Save changes'.

↓
Then, return to the AWS Amplify Console(https://console.aws.amazon.com/amplify/), select 'New app' → 'Host web app', and in the 'Get started with Amplify Hosting' screen, select 'Deploy without Git provider' and press 'Continue'.↓
In the 'Manual deploy' screen, enter any application name (here, 'amplify-hosting-demo-manual'), any environment name (here, 'dev') in 'App name' and 'Environment name' respectively, select 'Amazon S3' for 'Method', and specify the S3 bucket and the uploaded zip file. Pressing the 'Save and deploy' button will start the deployment.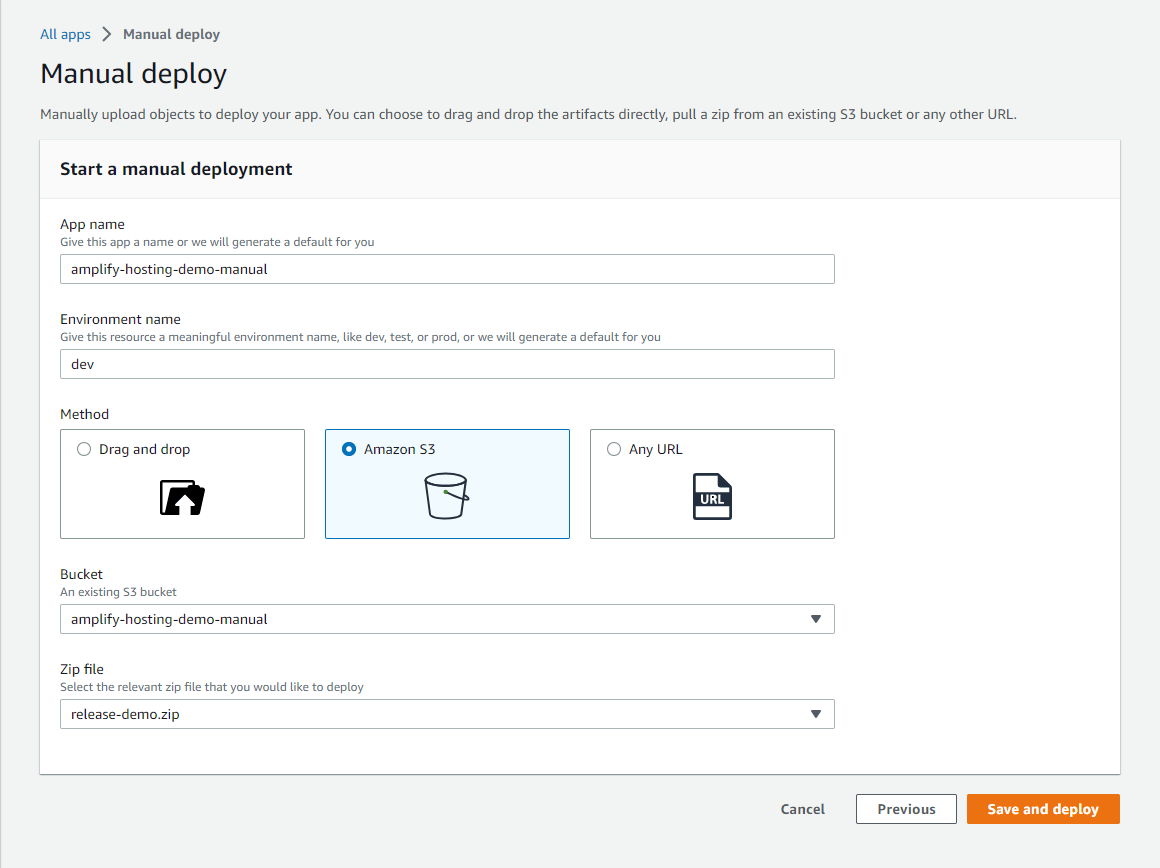
↓
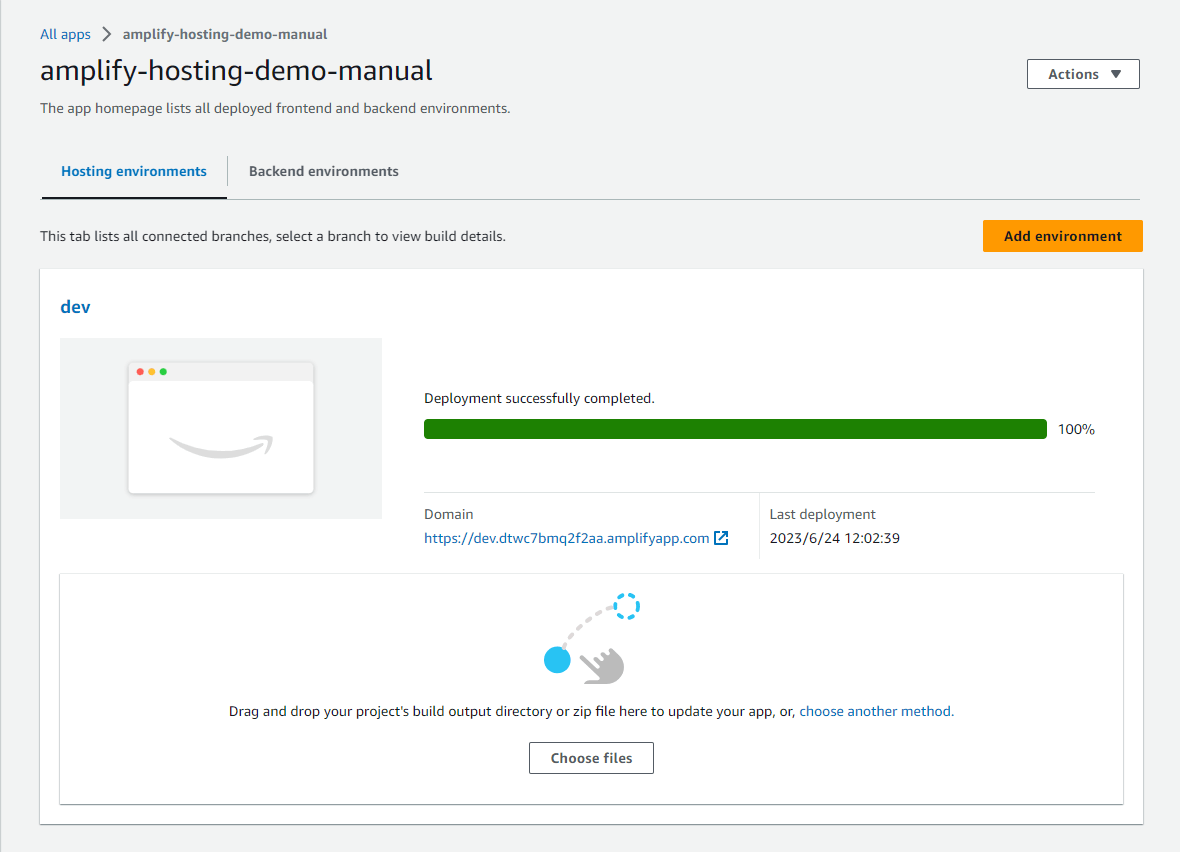
With manual deployment, there is no build process that was present when using a repository from a Git provider like GitHub, so deployment can be done in just a few seconds.In other words, if you use manual deployment, you need to build your own if necessary.
* ↓In this screen displayed after the initial deployment by Manual Deploy, files selected or dragged and dropped are deployed immediately without a confirmation screen. Be careful when using it.
↓
Once you've completed the initial deployment via Manual Deploy, using either Amazon S3, Any URL, or Drag and Drop (local upload), you can select any of these methods for subsequent deployments from the screen you transition to via the 'choose another method.' link, and perform a Manual Deploy.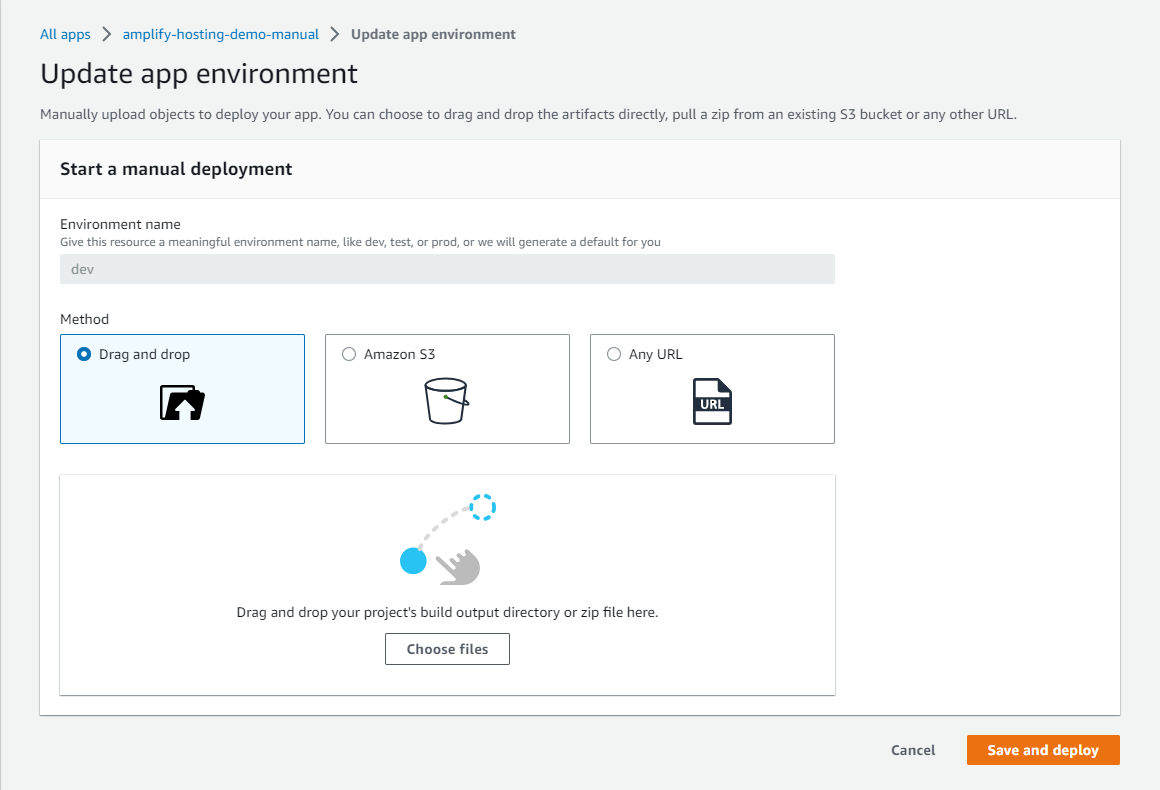
* In addition to the points explained in the above steps, I will summarize the main points to note when using Manual Deploy.
- You cannot include a build process (if a build is necessary, you need to build it yourself and zip it).
- You cannot switch to a method using a repository like GitHub in the middle (you need to create a new app).
- Deployment is not executed by pushing files like the method using a repository (for example, automatic deployment does not occur even if the object saved in the Amazon S3 bucket is updated).
Manual Deploy without using a Git provider: Any URL
As mentioned earlier, once you perform the initial deployment using either Amazon S3, Any URL, or Drag and Drop (local upload) with Manual Deploy, you can choose any of these methods for subsequent deployments, and the process and post-deployment screens are the same.Therefore, while I will omit the details, I will explain the main points about Manual Deploy using 'Any URL'.
Here, I will try the case of uploading the zip file 'release-demo.zip' created in the aforementioned 'Manual Deploy without using a Git provider: Amazon S3' to another public website and deploying from the public website's URL.
* It goes without saying, but any file on a public website or published S3 bucket can be viewed by anyone if they know the URL. The method of specifying a URL to deploy is best limited to cases where the source code is open source or there are no issues with it being public.
In Manual Deploy (Amazon S3, Any URL, Drag and Drop), the initial deployment screen transition is common with the aforementioned 'Manual Deploy without using a Git provider: Amazon S3', and the deployment setting items from the second time onwards are the same (only whether to create a new app is different). Therefore, I will introduce deployment by Any URL with the app 'amplify-hosting-demo-manual' created in 'Manual Deploy without using a Git provider: Amazon S3'.
When you select the app name in the AWS Amplify Console, you will be taken to the 'Hosting environments' screen. Clicking the 'choose another method.' link will take you to the 'Update app environment' screen.
Here, select 'Any URL' for 'Method' and specify the URL where the zip file is uploaded. When you press the 'Save and deploy' button, the build and deployment will start.

Manual Deploy without using a Git provider: Drag and Drop
Finally, I will introduce the procedure when using Drag and Drop (local upload) in Manual Deploy.Here, I will try the case of uploading the zip file 'release-demo.zip' from local, which was created in the aforementioned 'Manual Deploy without using a Git provider: Amazon S3', and deploying it.
Like the aforementioned 'Any URL', I will introduce the deployment by Drag and Drop in the app 'amplify-hosting-demo-manual' created in 'Manual Deploy without using a Git provider: Amazon S3'.
When you select the app name in the AWS Amplify Console, you will be taken to the 'Hosting environments' screen. Clicking the 'choose another method.' link will take you to the 'Update app environment' screen.
Here, select 'Drag and Drop' for 'Method' and either Drag and Drop the zip file you want to deploy to the area where it says 'Drag and Drop your project's build output directory or zip file here.' or select it with 'Choose files'. When you press the 'Save and deploy' button, the build and deployment will start.
References:
Tech Blog with curated related content
Summary
This time, I have focused on the use of AWS Amplify Hosting in the AWS Amplify Console, and I have found that we can build an environment for Static Website Hosting with very few steps.In addition, not only when serious version control and build processes are required in repositories such as GitHub, but also as an option when repository integration is not necessary, methods for quickly manually deploying without a build process, such as Amazon S3, Any URL, and Drag and Drop (local upload), are available.
Using AWS Amplify Hosting in the AWS Amplify Console makes it easier to build a typical serverless architecture, including CI/CD, and I have the impression that it has made it easier to focus more on front-end and back-end application development than before.
I feel that AWS Amplify Hosting has been Amplifying the Developer Experience and the opportunity to utilize AWS Serverless Services as its name implies through this convenience and simplicity.
I will continue to write articles on AWS Amplify when the opportunity arises.
* The relationship and differences between AWS Amplify Hosting and AWS Amplify CLI Focusing on Static Website Hosting are summarized in the following article if you are interested.
AWS Amplify Features Focusing on Static Website Hosting - Relationship and Differences between AWS Amplify Hosting and AWS Amplify CLI
Written by Hidekazu Konishi