How to create a PWA(Progressive Web Apps) compatible website on AWS and use Lighthouse Report Viewer
First Published:
Last Updated:
I learned about PWA implementation by deploying minimal content on a static website using Amazon S3, Amazon CloudFront, AWS Certificate Manager, and Amazon Route53.
I also used the Lighthouse Report Viewer, a tool that can test for quality in PWA and other categories, to try to pass the PWA criteria, and to try to get a score of 100 every few times in categories such as Performance, Accessibility, Best Practices, and SEO.
In the following sections, I mainly describe the overview and advantages of PWA, the reasons for using AWS, the minimum things I implemented to support PWA, how to use Lighthouse Report Viewer, and the considerations I took into account to achieve high scores in Lighthouse.
* The source code in this article and other articles by this author was created as part of independent research activities and is not guaranteed to work. If you use it, please do so at your own risk. Please note that the source code may be modified without prior notice.
What is PWA (Progressive Web Apps)?
In a nutshell, PWA (Progressive Web Apps) is a system that allows a website displayed in a browser to be used like a native app (iOS app, Android app, etc.).Once a website is PWA-enabled, the website can be added in an app-like format to any OS (iOS, Android, Windows, macOS, etc.) that supports PWA-enabled browsers.
A PWA-enabled website does not operate only as a PWA, but also as a regular website that can still be viewed in a browser.
For example, on Android's Chrome, which supports PWA, you can view PWA-enabled websites and add the website as an app from the "Install App" option menu, and you can also receive push notifications.
It is also possible to launch a website as a stand-alone application on an iPhone with the latest iOS installed by displaying a PWA-enabled website in Safari and adding the website as an application from the "Add to Home Screen" option menu.
Furthermore, PWA-compatible websites can now be used in an app-like interface on PCs with the latest operating systems installed, such as Windows 10/11 and macOS, if a PWA-compatible browser is used.
Please refer to the following reference material on how to install PWA in Google Chrome.
PWA Installation Reference: Use Progressive Web Apps - Computer - Google Chrome Help
However, at the time of writing this article, the support for PWA varies considerably among various operating systems and browsers, so it is necessary to investigate the situation on a case-by-case basis to determine whether it meets the requirements you are trying to achieve.
Advantages of making it compatible with PWA
I believe that PWAs may be positioned between websites and mobile native apps.Therefore, I will list the advantages of making websites PWA-compatible that I have found, as well as the advantages of PWA from the perspective of mobile native apps, as a reference.
The benefits of making a website compatible with PWA include the following:
- Icons can be added to the OS screen like apps
- The website can be used as a single stand-alone application instead of a browser
- Can be launched offline by setting content to be locally cached
- Push notifications can be used if supported by the OS and browser
- Common development language and less OS dependence
- Can be provided from the website from front end to back end
There is no need to register on an app store, download all major features, or install and update the app.
By clearing the cache, you can always provide the latest version of features directly from the website.
Reasons to use AWS for implementing PWA
PWAs can host basically static content, and any type of web server is acceptable as long as it can run a PWA.Nevertheless, here are some reasons why I use a combination of AWS Amazon S3, Amazon CloudFront, AWS Certificate Manager, and Amazon Route53 in my PWA implementation environment.
- High availability storage in Amazon S3
It can store content to be delivered in storage designed to provide 99.999999999% robustness and 99.99% availability over a one-year period.
- Amazon CloudFront global edge location and caching capabilities
Cache-based content is delivered from edge locations located globally, which can be expected to improve the speed of website display from various regions.
- AWS Certificate Manager managed free public certificates
Free SSL/TLS certificates with no renewal management can be issued for custom domains and associated with AWS services such as Amazon CloudFront.
- Versatility of Amazon Route53
It can register Amazon CloudFront records against the domain's Zone Apex, and has a full range of features such as health checks and routing.
- AWS Amplify Hosting allows for rapid construction of S3+CloudFront+Certificate Manager+Route53 combinations
If you want to skip the process of configuring the above AWS services individually, you can easily create these combinations from your browser by using AWS Amplify Hosting in the AWS Amplify Console.
- Cost Optimization
AWS services are pay-as-you-go based on the amount used, such as the amount of content stored or the amount of requests, and the combination of the above AWS services can be operated at a relatively low cost because there is no virtual server startup cost.
Especially for websites like this example, where the amount of content and requests is relatively small, these advanced features can be used for a few dollars/month.
- Plenty of options to add functionality to your website
Even if you want to expand a website prepared with minimal content and add functionality, AWS has a variety of services to build a backend that is highly compatible with the above services.
- Extensive technical documentation for adding functionality to your website
In addition to the documentation and support provided by AWS, AWS is a rich source of information that can provide tips for utilizing the service, including the output of AWS engineers and their community.
Since Amazon CloudFront allows you to specify non-AWS servers for the backend, one option would be to try Amazon CloudFront as a way to improve page display speed.
Minimum implemented to be PWA compliant
Here is an example of what I implemented to make a website PWA compliant.Since the objective of this project is to learn how to implement PWA and pass the check with Lighthouse Report Viewer within the scope of independent study, the main contents of the target website consisted of only index.html and a minimum number of images.
The rest of the content is mainly JavaScript required for PWA support and icon images required for adding applications to each operating system such as Android and iOS.
List of PWA-related files deployed on the website
The following is a list of PWA-related files as seen from the root directory of the website where I will try PWA support.Most of the icon images are of different sizes and for different purposes for each OS, but manifest.json and sw.js are central to the PWA implementation.
In this project, I have not deeply researched the sizes that each device and each OS adopts for icons, so I have prepared more types of image sizes that would be applicable if I had enough of these.
Also, for learning purposes, I have left some descriptions to accommodate older browsers and operating systems, so some of them may be useless. Therefore, if you have done your research on this point and have decided on the target OS and browser, there is actually no need to prepare images by size in such detail.
Descriptions of each file are described below.
[ho2k_com@ho2k-com hidekazu-konishi.com]$ tree
.
├── [Unnecessary parts have been omitted, and the order has been changed for easier viewing.]
├── android-chrome-36x36.png
├── android-chrome-48x48.png
├── android-chrome-72x72.png
├── android-chrome-96x96.png
├── android-chrome-128x128.png
├── android-chrome-144x144.png
├── android-chrome-152x152.png
├── android-chrome-192x192.png
├── android-chrome-256x256.png
├── android-chrome-384x384.png
├── android-chrome-512x512.png
├── android-chrome-maskable-48x48.png
├── android-chrome-maskable-72x72.png
├── android-chrome-maskable-96x96.png
├── android-chrome-maskable-128x128.png
├── android-chrome-maskable-192x192.png
├── android-chrome-maskable-384x384.png
├── android-chrome-maskable-512x512.png
├── apple-touch-icon-57x57-precomposed.png
├── apple-touch-icon-57x57.png
├── apple-touch-icon-60x60-precomposed.png
├── apple-touch-icon-60x60.png
├── apple-touch-icon-72x72-precomposed.png
├── apple-touch-icon-72x72.png
├── apple-touch-icon-76x76-precomposed.png
├── apple-touch-icon-76x76.png
├── apple-touch-icon-114x114-precomposed.png
├── apple-touch-icon-114x114.png
├── apple-touch-icon-120x120-precomposed.png
├── apple-touch-icon-120x120.png
├── apple-touch-icon-144x144-precomposed.png
├── apple-touch-icon-144x144.png
├── apple-touch-icon-152x152-precomposed.png
├── apple-touch-icon-152x152.png
├── apple-touch-icon-180x180-precomposed.png
├── apple-touch-icon-180x180.png
├── icon-16x16.png
├── icon-24x24.png
├── icon-32x32.png
├── icon-36x36.png
├── icon-48x48.png
├── icon-72x72.png
├── icon-96x96.png
├── icon-128x128.png
├── icon-144x144.png
├── icon-152x152.png
├── icon-160x160.png
├── icon-192x192.png
├── icon-196x196.png
├── icon-256x256.png
├── icon-384x384.png
├── icon-512x512.png
├── favicon.ico
├── index.html
├── index.js
├── manifest.json
└── sw.js
Description of each file: android-chrome-XxX.png
Of the list of related files, those in the android-chrome-XxX.png file name format were created primarily as icons for Android and Chrome.Since Android and Chrome are products of Google, which is actively promoting PWAs, detailed icon settings are required in the PWA settings.
In manifest.json, which corresponds to the PWA configuration file, it is recommended to specify size-specific icon images for Android and Chrome, such as android-chrome-XxX.png and android-chrome-maskable-XxX.png described next. (This is also necessary to meet the PWA criteria for the Lighthouse Report Viewer described below.)
Description of each file: android-chrome-maskable-XxX.png
The file name format of android-chrome-maskable-XxX.png in the related file list is also an icon mainly for Android and Chrome, but it has a different use than android-chrome-XxX.png.android-chrome-maskable-XxX.png is an image that corresponds to the PWA maskable icon.
A maskable icon is an icon image whose design fits into a circular area called a safe zone.
The safe zone is a circular area with a radius of 40% from the center of the square when one side of the square image is 100%.
Safe Zone Reference Material: W3C - Web Application Manifest - Icon masks and safe zone
In other words, the android-chrome-maskable-XxX.png, which is used in this example, is an icon image created for each size that fits the design within this safe zone.
Creating a maskable icon is quite difficult if you make it yourself without any know-how, but it is easy if you use the following website, Maskable.app.
Steps to create a maskable icon using Maskable.app
-
Browser to https://maskable.app/editor.
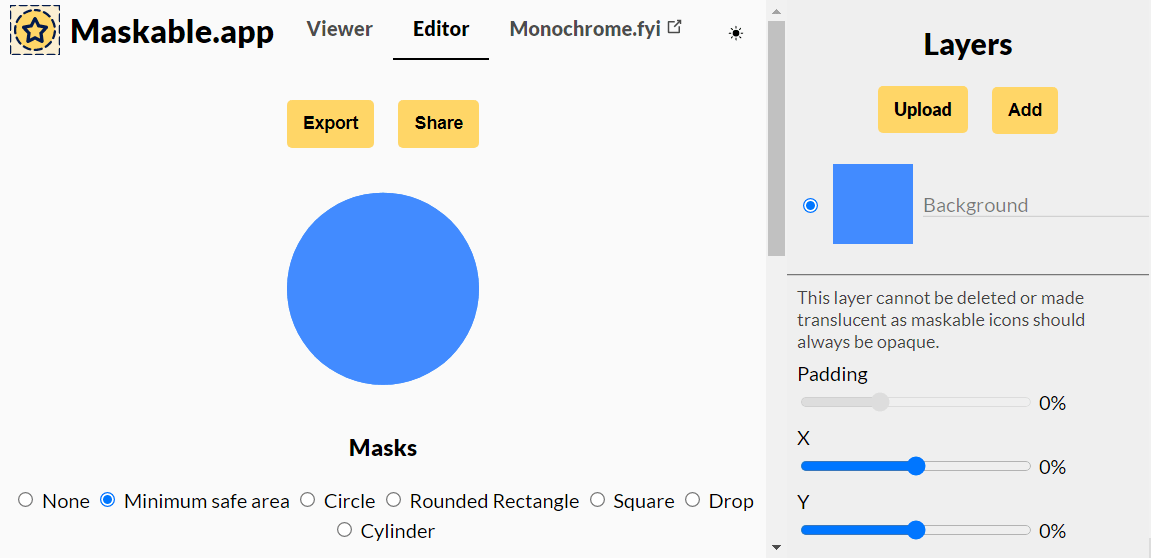
Screen of Maskable.app - Upload the target image from "Upload" under "Layers" in the upper right corner.
- Select "Minimum safe area" under "Masks" at the bottom center of the screen where the uploaded image is displayed.
- Adjust Padding, background color, etc. in the right side menu to make the design fit in the area.
-
Download the created image by specifying the size from "Export" at the top center of the screen where the uploaded image is displayed.
Description of each file: apple-touch-icon-XxX.png
The file name "apple-touch-icon-XxX.png" in the list of related files is mainly used for icon images for Apple products such as iPhone, iPad, etc.It will be used as the icon image when the website is "added to the home screen".
Description of each file: apple-touch-icon-XxX-precomposed.png
Of the list of related files, those with the filename format apple-touch-icon-XxX-precomposed.png specify non-glossy images for icons on older iOS.This is basically unnecessary nowadays, but since it is for learning purposes, it is included here for the record that such specifications were also available.
Description of each file: icon-XxX.png
These icon images are for general-purpose use on operating systems and browsers that use icons other than those listed above.Description of each file: favicon.ico
favicon.ico is a conventionally used icon image for browsers.The favicon.ico I used is a multi-icon with 8 different sizes from the aforementioned icon-48x48.png to icon-192x192.png.
Description of each file: manifest.json
manifest.json is the file that serves as the application configuration, which is essential when deploying PWA.This explanation is based on manifest.json used in this example.
For other details on manifest.json, please refer to the following reference documents.
manifest.json reference material: W3C - Web Application Manifest - Web Application Manifest
First, the following is a description of each key used in this example.
name: App Name
short_name: App Abbreviation
description: App Description
start_url: Specify the path that will be the start screen of the application
display: Display format of the app (standalone: standalone app format, browser: as browser display, etc.)
orientation: Specify screen orientation (any: any orientation supported, etc.)
background_color: Specify the background color of the application (#FFFFFFF, etc.)
theme_color: Specify the theme color of the app (#FFFFFFF, etc.)
icons: List of images to be used as app icons
  src: Specify the path to the icon image (/android-chrome-152x152.png, etc.)
  sizes: Specify size of icon image (152x152, etc.)
  type: Specify icon image format (image/png, etc.)
  purpose: Specify that the icon image must fit in the safe zone (maskable), etc.
The following is an example of the settings for each key used in this example.
The key point is to prepare all the above keys and to set android-chrome-XxX.png and android-chrome-maskable-XxX.png in the icons array by size.
{
  "name":"App Name",
  "short_name":"App Abbreviation",
  "description":"App Description",
  "start_url":"/",
  "id":"/",
  "display":"standalone",
  "orientation":"any",
  "background_color":"#ffffff",
  "theme_color":"#ffffff",
  "icons": [
    {
      "src": "/android-chrome-36x36.png",
      "sizes": "36x36",
      "type": "image/png"
    },
    {
      "src": "/android-chrome-48x48.png",
      "sizes": "48x48",
      "type": "image/png"
    },
    {
      "src": "/android-chrome-72x72.png",
      "sizes": "72x72",
      "type": "image/png"
    },
    {
      "src": "/android-chrome-96x96.png",
      "sizes": "96x96",
      "type": "image/png"
    },
    {
      "src": "/android-chrome-128x128.png",
      "sizes": "128x128",
      "type": "image/png"
    },
    {
      "src": "/android-chrome-144x144.png",
      "sizes": "144x144",
      "type": "image/png"
    },
    {
      "src": "/android-chrome-152x152.png",
      "sizes": "152x152",
      "type": "image/png"
    },
    {
      "src": "/android-chrome-192x192.png",
      "sizes": "192x192",
      "type": "image/png"
    },
    {
      "src": "/android-chrome-256x256.png",
      "sizes": "256x256",
      "type": "image/png"
    },
    {
      "src": "/android-chrome-384x384.png",
      "sizes": "384x384",
      "type": "image/png"
    },
    {
      "src": "/android-chrome-512x512.png",
      "sizes": "512x512",
      "type": "image/png"
    },
    {
      "src": "/android-chrome-maskable-48x48.png",
      "sizes": "48x48",
      "type": "image/png",
      "purpose": "maskable"
    },
    {
      "src": "/android-chrome-maskable-72x72.png",
      "sizes": "72x72",
      "type": "image/png",
      "purpose": "maskable"
    },
    {
      "src": "/android-chrome-maskable-96x96.png",
      "sizes": "96x96",
      "type": "image/png",
      "purpose": "maskable"
    },
    {
      "src": "/android-chrome-maskable-128x128.png",
      "sizes": "128x128",
      "type": "image/png",
      "purpose": "maskable"
    },
    {
      "src": "/android-chrome-maskable-192x192.png",
      "sizes": "192x192",
      "type": "image/png",
      "purpose": "maskable"
    },
    {
      "src": "/android-chrome-maskable-384x384.png",
      "sizes": "384x384",
      "type": "image/png",
      "purpose": "maskable"
    },
    {
      "src": "/android-chrome-maskable-512x512.png",
      "sizes": "512x512",
      "type": "image/png",
      "purpose": "maskable"
    }
  ]
}
Description of each file: sw.js
sw.js is a JavaScript that executes Service Worker in PWA.A Service Worker is a script that performs background processing and push notifications when a browser runs a website as a PWA.
Service Worker events include install, activate, prefecth, massage, sync, and push, and scripts are used to describe what is to be processed at the timing of each event.
The following references are helpful for this Service Worker event and lifecycle.
Service Worker Reference Materials:
Service worker overview - Chrome Developers
Using Service Workers - Web APIs | MDN
In particular, it has recently become necessary for the Lighthouse Report Viewer, described below, to be able to work offline by providing install and fetch events in order to meet PWA standards.
(The warning started appearing in the Developer Tools around Google Chrome 89.)
Therefore, this implementation includes a network-first strategy with cache fallback, carefully handling static assets and network requests while providing offline capabilities. The Service Worker efficiently manages caching and resource delivery, ensuring optimal performance and reliability for the website.
'use strict';

// Cache name for version control
const CACHE_NAME = '[Cache Name]';

// Resources to pre-cache
const STATIC_ASSETS = [
    "File path to cache(1)",
    "File path to cache(2)",
    //...
    "File path to cache(X)"
];

// Install event - cache static assets
self.addEventListener('install', event => {
    event.waitUntil(
        caches.open(CACHE_NAME)
            .then(cache => cache.addAll(STATIC_ASSETS))
            .catch(error => console.error('Cache addAll failed:', error))
    );
});

// Fetch event - network-first strategy with improved error handling
self.addEventListener('fetch', event => {
    // Ignore non-GET requests
    if (event.request.method !== 'GET') return;

    event.respondWith(
        networkFirst(event.request)
    );
});

// Network-first function with cache fallback
async function networkFirst(request) {
    try {
        // Check if the request is for a video or streaming media
        const isRangeRequest = request.headers.has('range');
        if (isRangeRequest) {
            // Don't cache range requests (like video streams)
            return fetch(request);
        }

        // Attempt network request
        const response = await fetch(request);

        // Only cache successful responses
        if (response.ok && response.type === 'basic') {
            try {
                const cache = await caches.open(CACHE_NAME);
                await cache.put(request, response.clone());
            } catch (error) {
                console.error('Cache put failed:', error);
            }
        }

        return response;
    } catch (error) {
        // Network failed, try cache
        const cachedResponse = await caches.match(request);
        if (cachedResponse) {
            return cachedResponse;
        }

        // If cache fails, throw the original error
        throw error;
    }
}

// Clean up old caches
self.addEventListener('activate', event => {
    event.waitUntil(
        caches.keys()
            .then(cacheNames => {
                return Promise.all(
                    cacheNames.map(cacheName => {
                        if (cacheName !== CACHE_NAME) {
                            return caches.delete(cacheName);
                        }
                    })
                );
            })
    );
});
Description of each file: index.js
index.js is JavaScript that is loaded from index.html to register sw.js, a Service Worker.In this case, I have simply included only the Service Worker registration process.
if ('serviceWorker' in navigator) {
  window.addEventListener('load', function() {
    navigator.serviceWorker.register('/sw.js').then(function(registration) {
      //Once Service Worker (sw.js) is registered, nothing special is done.
    }, function(err) {
      //If Service Worker (sw.js) registration fails, log it to the browser.
      console.log('ServiceWorker registration failed: ', err);
    });
  });
}
Description of each file: index.html
index.html is the main content of the website, with the icon as the website, manifest.json and index.js required for the PWA set within the HTML head tag.The following is a description of the relevant parts of this example.
<head>
<!--Unnecessary parts have been omitted, and the order has been changed for easier viewing.-->
<link rel="apple-touch-icon" sizes="57x57" href="/apple-touch-icon-57x57.png">
<link rel="apple-touch-icon" sizes="60x60" href="/apple-touch-icon-60x60.png">
<link rel="apple-touch-icon" sizes="72x72" href="/apple-touch-icon-72x72.png">
<link rel="apple-touch-icon" sizes="76x76" href="/apple-touch-icon-76x76.png">
<link rel="apple-touch-icon" sizes="114x114" href="/apple-touch-icon-114x114.png">
<link rel="apple-touch-icon" sizes="120x120" href="/apple-touch-icon-120x120.png">
<link rel="apple-touch-icon" sizes="144x144" href="/apple-touch-icon-144x144.png">
<link rel="apple-touch-icon" sizes="152x152" href="/apple-touch-icon-152x152.png">
<link rel="apple-touch-icon" sizes="180x180" href="/apple-touch-icon-180x180.png">
<link rel="icon" type="image/png" sizes="36x36" href="/android-chrome-36x36.png">
<link rel="icon" type="image/png" sizes="48x48" href="/android-chrome-48x48.png">
<link rel="icon" type="image/png" sizes="72x72" href="/android-chrome-72x72.png">
<link rel="icon" type="image/png" sizes="96x96" href="/android-chrome-96x96.png">
<link rel="icon" type="image/png" sizes="128x128" href="/android-chrome-128x128.png">
<link rel="icon" type="image/png" sizes="144x144" href="/android-chrome-144x144.png">
<link rel="icon" type="image/png" sizes="152x152" href="/android-chrome-152x152.png">
<link rel="icon" type="image/png" sizes="192x192" href="/android-chrome-192x192.png">
<link rel="icon" type="image/png" sizes="256x256" href="/android-chrome-256x256.png">
<link rel="icon" type="image/png" sizes="384x384" href="/android-chrome-384x384.png">
<link rel="icon" type="image/png" sizes="512x512" href="/android-chrome-512x512.png">
<link rel="icon" type="image/png" sizes="16x16" href="/icon-16x16.png">
<link rel="icon" type="image/png" sizes="24x24" href="/icon-24x24.png">
<link rel="icon" type="image/png" sizes="32x32" href="/icon-32x32.png">
<link rel="icon" type="image/png" sizes="36x36" href="/icon-36x36.png">
<link rel="icon" type="image/png" sizes="48x48" href="/icon-48x48.png">
<link rel="icon" type="image/png" sizes="72x72" href="/icon-72x72.png">
<link rel="icon" type="image/png" sizes="96x96" href="/icon-96x96.png">
<link rel="icon" type="image/png" sizes="128x128" href="/icon-128x128.png">
<link rel="icon" type="image/png" sizes="144x144" href="/icon-144x144.png">
<link rel="icon" type="image/png" sizes="152x152" href="/icon-152x152.png">
<link rel="icon" type="image/png" sizes="160x160" href="/icon-160x160.png">
<link rel="icon" type="image/png" sizes="192x192" href="/icon-192x192.png">
<link rel="icon" type="image/png" sizes="196x196" href="/icon-196x196.png">
<link rel="icon" type="image/png" sizes="256x256" href="/icon-256x256.png">
<link rel="icon" type="image/png" sizes="384x384" href="/icon-384x384.png">
<link rel="icon" type="image/png" sizes="512x512" href="/icon-512x512.png">
<link rel="manifest" href="/manifest.json">
<script src="/index.js"></script>
</head>
How to use Lighthouse Report Viewer
Here is how to use the Lighthouse Report Viewer provided by Google.The Lighthouse Report Viewer is a site performance measurement tool that evaluates a website's performance on a 100-point scale in the categories of Performance, Accessibility, Best Practices, and SEO, and also checks whether the website meets PWA criteria.
However, the Lighthouse Report Viewer rating has nothing to do with whether a website publishes useful content.
Therefore, to truly increase the value of a website, it is necessary to be aware of both site performance and useful content dissemination.
With that in mind, let's take a look at how to use the Lighthouse Report Viewer to evaluate site performance.
How to launch Lighthouse from Google Chrome or other developer tools
Chromium-based browsers such as Google Chrome for PC, Microsoft Edge, and Vivaldi can use developer tools similar to Google Chrome.This is the way to use the Lighthouse Report Viewer run function in this developer tool.
In particular, the Beta version of Google Chrome and other previously released versions of Google Chrome may be able to use new versions of Lighthouse that are scheduled to be introduced in the future, so it is a good idea to give it a try if you need a new standard for evaluation (in fact, I often run Lighthouse on the Beta version of Google Chrome).
How to start Lighthouse from the Developer Tools
-
Open the website to be evaluated in the aforementioned browser.
- Shortcut command "Ctrl+Shift+I" to open the Developer Tools.
-
Open the "Lighthouse" tab in the Developer Tools menu.
(If it is not displayed, click ">>" to expand the menu and open the "Lighthouse" tab)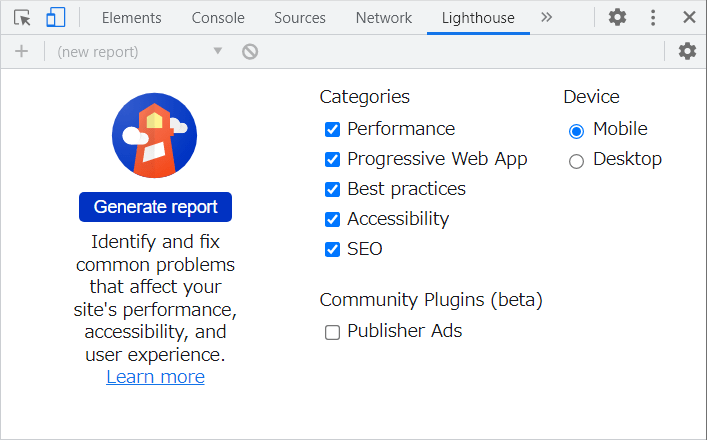
Lighthouse tab in Google Chrome's Developer Tools menu - Clicking "Generate report" will run the Lighthouse Report Viewer for the currently open website.
- Wait a moment for the results to appear.
How to use Lighthouse by installing an extension to Google Chrome, etc
Any Chromium-based browser such as Google Chrome for PC, Microsoft Edge, or Vivaldi can install the Lighthouse extension as well as Google Chrome.This is done by viewing the website to be evaluated in a browser and running the Lighthouse Report Viewer from the Lighthouse extension.
However, a different version of Lighthouse Report Viewer may be run than the aforementioned developer tool.
If you want to verify with a newer version of Lighthouse Report Viewer, you may prefer to use the Developer Tools in the aforementioned Google Chrome Beta version.
Instructions for launching Lighthouse from an extension
-
Open the "Lighthouse - Chrome Web Store" page in a browser that supports Chrome extensions and go to "Add to Chrome" to install the Lighthouse extension.
- Open the website to be evaluated in your browser.
-
Click on the installed Lighthouse from the list of extensions, such as the right side of the browser address bar.
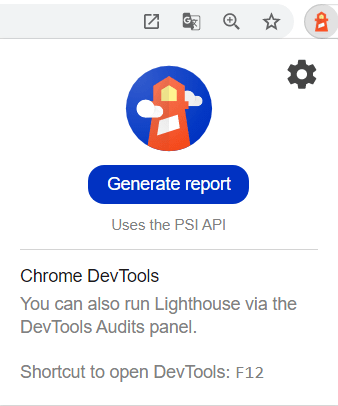
Lighthouse extension for Google Chrome - Clicking "Generate report" will run the Lighthouse Report Viewer for the currently open website.
- Wait a moment for the results to appear.
How to start the Lighthouse Report Viewer by typing directly into the URL
This method directly uses the URL that the aforementioned Lighthouse extension sends the request to.There is no need to install an extension, and it can be performed on browsers and smartphones that do not support Lighthouse extensions, such as Safari.
How to start Lighthouse from the Lighthouse Report Viewer URL
-
Enter the URL of the website to be evaluated in the [URL to be verified] section of the following URL and display it in your browser.
https://googlechrome.github.io/lighthouse/viewer/?psiurl=[URL to be verified]
- Wait a moment for the results to appear.
How to run Lighthouse using online free tools
In addition to the methods described above, there is also a way to run the Lighthouse Report Viewer using online free tools that do not require browser extensions or software installation.This method is particularly effective in environments where extension installation is restricted or when you want to efficiently measure multiple sites. It also makes it easy to measure website performance from smartphones and tablets.
Steps to launch Lighthouse from online free tools
-
Navigate to the Free Website Speed Test Tool - Lighthouse and PageSpeed Insights Analysis page in your browser.
-
Enter the URL of the website to be evaluated in the "Enter URL to analyze" input field.
-
Click the "Lighthouse" button to run the Lighthouse Report Viewer.
* There is also a "PageSpeed" button, which allows measurement with PageSpeed Insights as well.
-
Wait for the results to be displayed (usually 30 to 60 seconds).
-
After the measurement is completed, detailed results for each category of Performance, Accessibility, Best Practices, SEO, and PWA are displayed.
In addition, measurement results are displayed in detailed report format and include improvement suggestions, providing specific guidelines for site optimization.
However, since the measurement uses the Google PageSpeed Insights API, only public websites accessible from Google's servers are eligible. For measuring sites in local environments or intranets, the aforementioned developer tools or extension methods are more suitable.
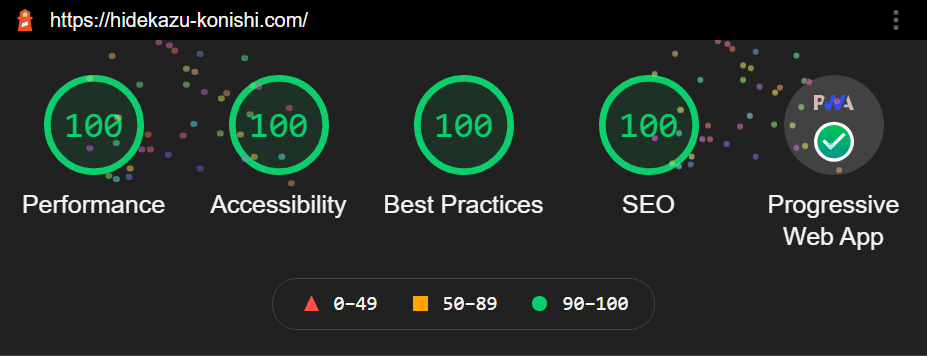
Result screen in Lighthouse Report Viewer
After running the Lighthouse Report Viewer for a few moments, you will see the scoring results for the Performance, Accessibility, Best Practices, and SEO categories, and whether or not the PWA is supported.The results of the evaluation will indicate what the problem is, and hints for countermeasures for each category will be displayed at the bottom of the results screen, so you can investigate the countermeasures and take action.
The following image shows the Lighthouse Report Viewer results screen for a category scoring partially failing to achieve 100 points. During the course of the measure, you will most likely see this simple screen.
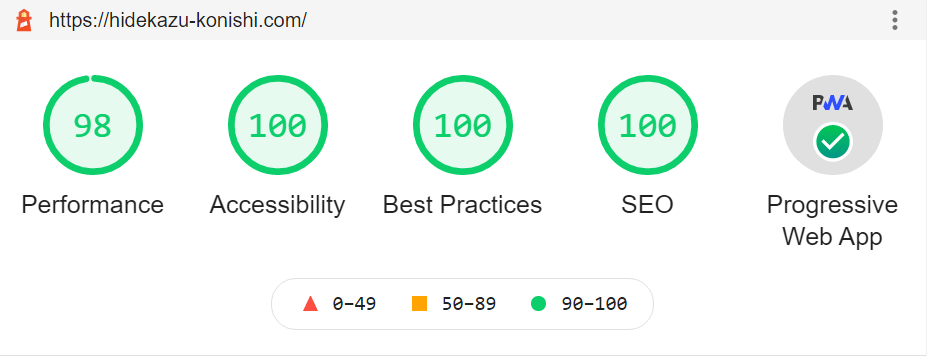
It is a common animation, but it is a chic performance that makes you inwardly happy as much as the hard work involved in the work process up to that point.
(For a time, the fireworks stopped going up due to a change in specifications, but returned to the specification of fireworks going up again around 2022-02-18.)
The reason why the evaluation score fluctuates depending on the number of attempts may be because the line speed between the Lighthouse Report Viewer and the website affects the evaluation.
The reason for not reducing the image size is that I wanted to make a fixed-point observation of the process of reducing the impact on image display performance as mobile terminal lines become 5G and faster in the future.
Considerations for a high score at Lighthouse
My test this time was a lightweight website with only index.html, so it scored some points from the beginning.However, I should point out that even with that, it can be difficult to achieve a high score in Lighthouse if you don't take this into consideration.
Responsive support
I used<meta name="viewport" content="width=device-width, initial-scale=1.0" /> and stylesheets @media queries to make the display flexible, so it can adapt to a wide range of screen sizes, from large PC monitors to small screens like those of the Apple Watch.To see if responsive was actually supported, I went to Google Chrome's Developer Tools, clicked on the Smartphone and Tablet symbol in the upper left corner, enabled the device toolbar, and specified various smartphones and custom devices (enter the size of Apple Watch or Galaphone).

Text size and color
The text size was initially set to 16px, but the "Google Search Console" gave an error message that the text was too small to read, so I cleared this up by changing the text size to 17px or larger, considering mobile devices.The text color was chosen to have a contrast ratio of 4.5 or more with the background color.
The contrast ratio is also related to the thickness of the text, so the following tool was used to determine the text color that would have a contrast ratio of 4.5 or higher while taking the background color and text thickness into consideration.
WebAIM: Contrast Checker
Lightweight images
Since there are various image compression tools available these days, I used them to try image compression and adopted the image that had the best compression effect.However, as mentioned above, I did not reduce the size in my case, so I did not follow the Lighthouse report completely.
Aiming for a high score on Lighthouse is a good thing from a site performance perspective, but it is important to note that, as mentioned above, Lighthouse Report Viewer is only a site performance measurement tool and does not evaluate whether a website publishes useful content.
Therefore, I believe that even if we do not get a score of 100 after taking sufficient measures based on the Lighthouse Report Viewer evaluation, we should not cut back on necessary content (non-negotiable content).
Each website has its own purpose for delivering content, and I want to remember that achieving that purpose is paramount, and site performance is what optimizes that content delivery.
I mention this as a reminder to myself because there have been times when the option of cutting down to the necessary content for a high score has come to mind when evaluating with the Lighthouse Report Viewer.
References:
Tech Blog with curated related content
Free Website Speed Test Tool - Lighthouse and PageSpeed Insights Analysis
PWA Advanced Implementation Guide - Service Worker Cache Strategies, Push, and Background Sync
Summary
In this case, I implemented PWA on a simple website with only index.html and implemented measures to make the scores in each category of the Lighthouse Report Viewer as close to 100 as possible.In this process, understanding the method for making a website PWA-compatible was a significant gain. Additionally, what I felt had the most significant impact was being able to learn and implement website SEO strategies through repeated audits and addressing issues using the Lighthouse Report Viewer.
Improving the quality of a site without any SEO knowledge or verification tools is very costly in terms of knowledge acquisition and research. However, I felt that repeatedly using the Lighthouse Report Viewer reports to investigate and apply solutions served as a guidepost.
As a result of continuing trial and error while advancing my learning in this way, I was able to steadily understand PWA implementation methods and modern SEO strategies, and successfully created an exemplary and practical PWA-compatible site (which is exactly this website).
Written by Hidekazu Konishi