Host a Static Website configured with Amazon S3 and Amazon CloudFront using AWS Amplify CLI
First Published:
Last Updated:
In this article, I will use AWS Amplify CLI, one of the AWS Amplify tools, to show how to build static website hosting with a different approach than AWS Amplify Hosting.
Example of building static website hosting configured with Amazon S3 and Amazon CloudFront using AWS Amplify CLI
As introduced in the previous article, "Host a Static Website using AWS Amplify Hosting in the AWS Amplify Console", the static website hosting environment deployed by AWS Amplify Hosting is managed by AWS, and the settings can only be changed via the AWS Amplify Console or the provided APIs. You cannot directly modify Amazon S3 and Amazon CloudFront settings.On the other hand, AWS Amplify CLI generates AWS CloudFormation templates from the configuration entered interactively from the command line and deploys serverless architecture such as static website hosting via Amazon S3 and Amazon CloudFront.
Therefore, it is possible to flexibly modify the AWS resources created by the AWS Amplify CLI or AWS CloudFormation template configuration changes.
In other words, AWS Amplify CLI is a tool that models the architecture using typical AWS serverless services, allowing for easy deployment from simple inputs and providing the flexibility to change configurations and settings as needed.
The architecture of the static website hosting that I will build as an example of using the AWS Amplify CLI this time is shown in the following figure.
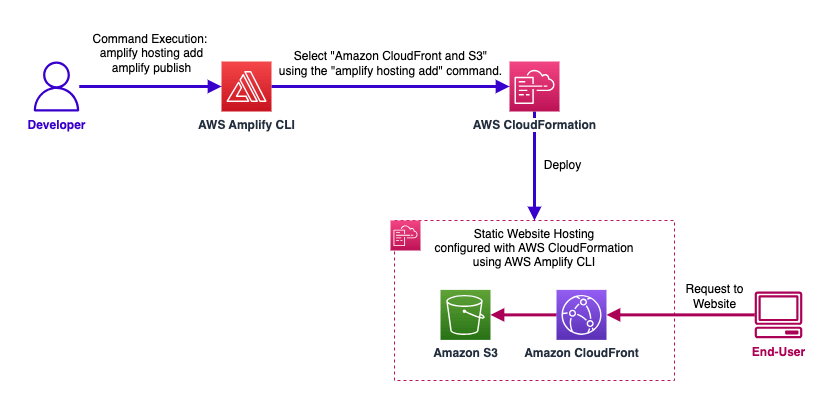
Static website hosting consists only of Amazon S3 and Amazon CloudFront and is a very simple one that does not include other backends or frontend applications.
Let's start by installing the AWS Amplify CLI first.
Installation and Configuration of AWS Amplify CLI
Installation of AWS Amplify CLI
There are several ways to install the AWS Amplify CLI, but a common method that works on any operating system is the installation via Node.js and NPM.There is also a method of installation via curl, but since Amplify CLI uses Node.js and NPM, these will be installed in any case.
Installation via Node.js and NPM
Node.js(version 12.x or later) and npm(version 6.x or later) should be installed, and then execute the following command.npm install -g @aws-amplify/cli
Installation via cURL Command (for Mac and Linux)
Execute the following command in the terminal of Mac or Linux.curl -sL https://aws-amplify.github.io/amplify-cli/install | bash && $SHELL
Installation via cURL Command (for Windows)
Execute the following command in Command Prompt or PowerShell of Windows.curl -sL https://aws-amplify.github.io/amplify-cli/install-win -o install.cmd && install.cmdIf curl command is not installed on Windows, download the file from the URL
https://aws-amplify.github.io/amplify-cli/install-win via your web browser, rename it to a .cmd extension such as install-win.cmd, and execute it.Reference: Get started - Installation - AWS Amplify Docs
Configuration of Amplify CLI
Begin the configuration by executing the following command.amplify configureYou will be interactively setting the AWS region and IAM user.
[ho2k_com@ho2k-com ~]$ amplify configure
Follow these steps to set up access to your AWS account:

Sign in to your AWS administrator account:
https://console.aws.amazon.com/
Press Enter to continue

Specify the AWS Region
? region:  (Use arrow keys)
❯ us-east-1
  us-east-2
  us-west-2
  eu-west-1
  eu-west-2
  eu-central-1
  ap-northeast-1
(Move up and down to reveal more choices)
Specify the AWS Region
? region:  us-east-1 ←[**us-east-1 was selected here**]
Follow the instructions at
https://docs.amplify.aws/cli/start/install/#configure-the-amplify-cli

to complete the user creation in the AWS console
https://console.aws.amazon.com/iamv2/home#/users/create
Press Enter to continue
If you need to create a new IAM user, open the AWS Management Console from the link displayed in the command line and configure it.
Set information such as the username and policies to apply and create an IAM user (in this case, an IAM user called amplify-cli was created).
For the policy, apply one that suits the AWS resources you will create, modify, and delete using AWS Amplify CLI.
As this time I am using my personal experimental AWS account, I applied
AdministratorAccess-Amplify like Get started - Installation - AWS Amplify Docs.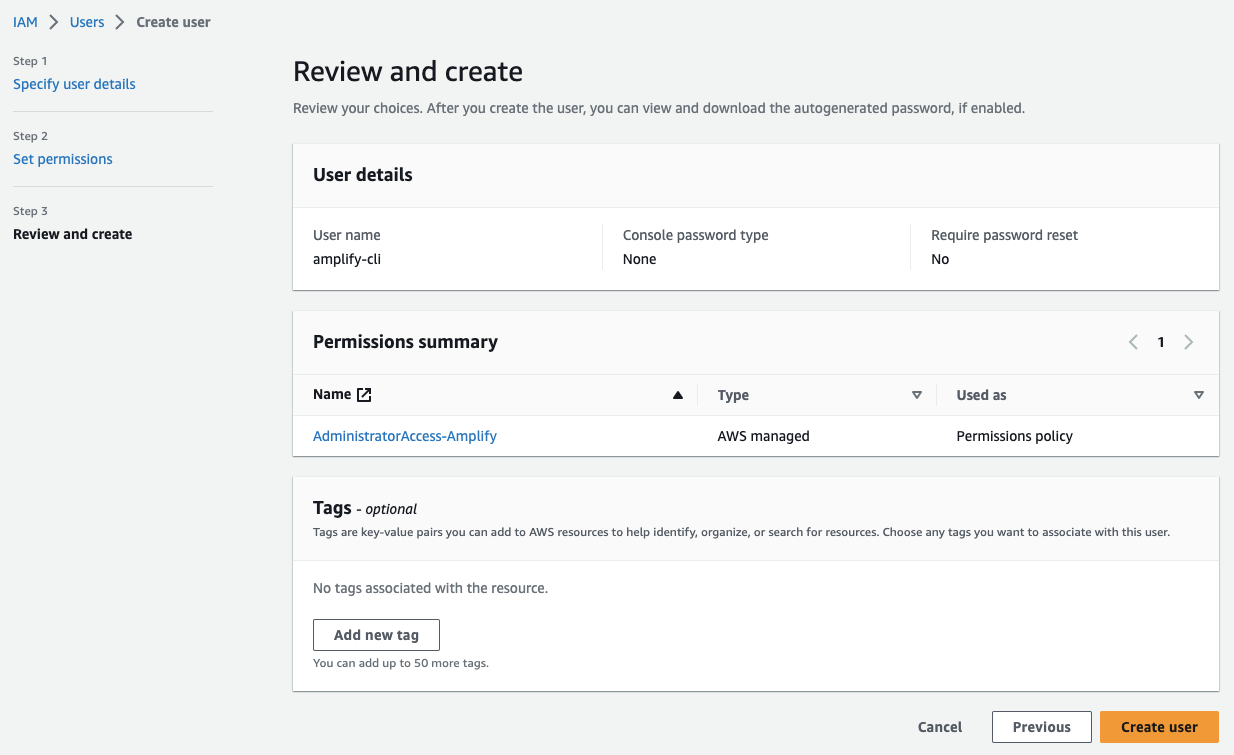
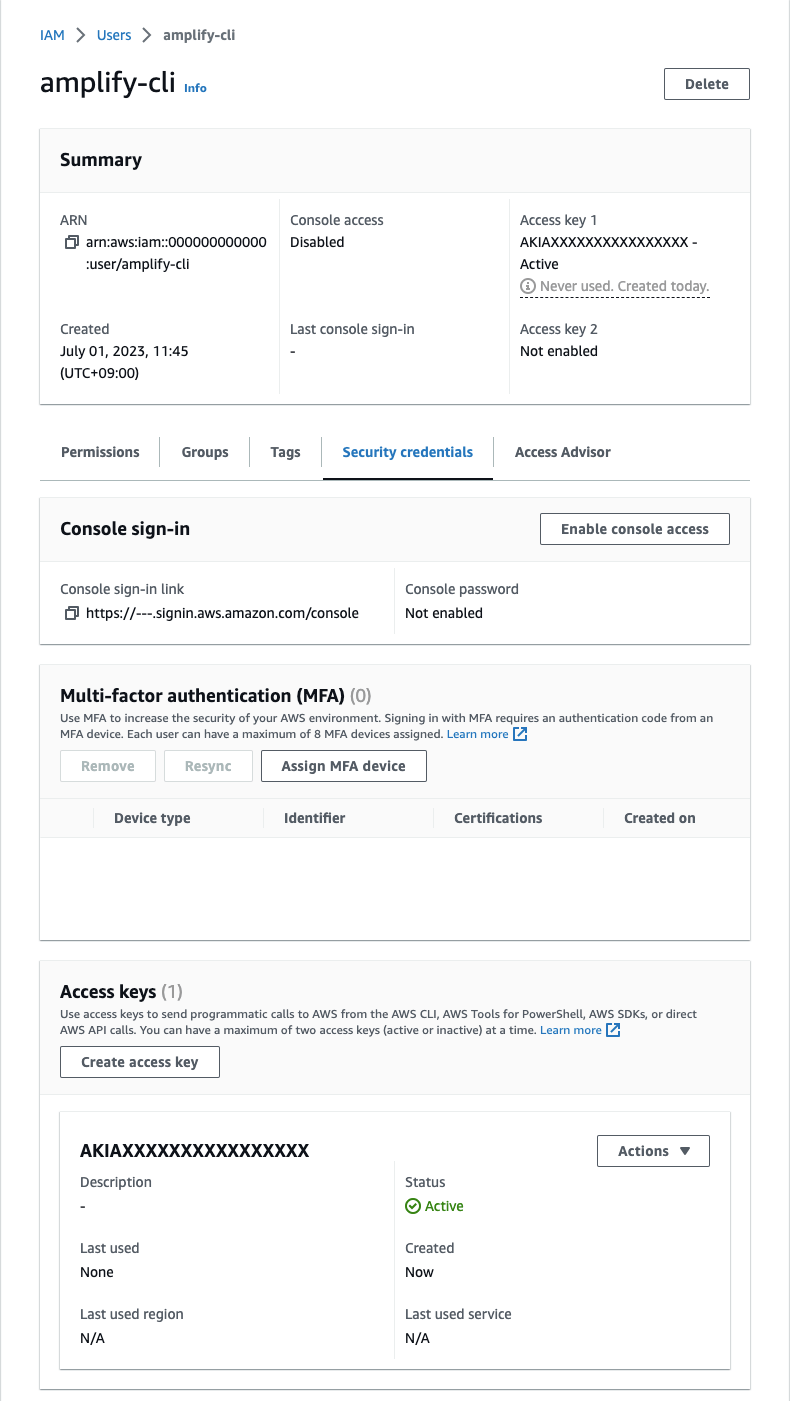
After creating the IAM user, click on 'Create access key' in the 'Access keys' area of the 'Security credentials' tab of the IAM user screen and create the Access key and Secret access key for the 'Command Line Interface (CLI)'.
After creating the IAM user, return to the command line, and enter the
accessKeyId and secretAccessKey and the profile name to save these settings.Here, be careful not to enter an existing profile name (such as default) used in AWS CLI, as it will overwrite it.
Enter the access key of the newly created user:
? accessKeyId:  ********************
? secretAccessKey:  ****************************************
This would update/create the AWS Profile in your local machine
? Profile Name:  amplify-cli ←[**Be careful as the existing profile name will be overwritten**]
Successfully set up the new user.
Building a Static Website Hosting Environment (Amazon S3 and Amazon CloudFront) Using AWS Amplify CLI
Next, I will create a project using AWS Amplify CLI.First, create a project directory and initialize the project with the
amplify init command. In this example, I use the project name "amplifyclidemo".* The project name should be between 3 and 20 characters and alphanumeric.
[ho2k_com@ho2k-com ~]$ mkdir amplifyclidemo
[ho2k_com@ho2k-com ~]$ cd amplifyclidemo
[ho2k_com@ho2k-com amplifyclidemo]$ amplify init
Note: It is recommended to run this command from the root of your app directory
? Enter a name for the project (amplifyclidemo) ←[**Keep as it is**]
The following configuration will be applied:

Project information
| Name: amplifyclidemo
| Environment: dev
| Default editor: Visual Studio Code
| App type: javascript
| Javascript framework: none
| Source Directory Path: src
| Distribution Directory Path: dist
| Build Command: npm run-script build
| Start Command: npm run-script start

? Initialize the project with the above configuration? (Y/n) ←[**Keep as it is, Y**]
? Initialize the project with the above configuration? Yes
Using default provider  awscloudformation
? Select the authentication method you want to use: (Use arrow keys)
❯ AWS profile ←[**Choose this as you are using the profile created with the previously mentioned aws configure**]
  AWS access keys
? Select the authentication method you want to use: AWS profile

For more information on AWS Profiles, see:
https://docs.aws.amazon.com/cli/latest/userguide/cli-configure-profiles.html

? Please choose the profile you want to use
  default
  ho2k.com
  AmazonCloudWatchAgent
❯ amplify-cli ←[**Choose this profile that was created with aws configure**]
? Please choose the profile you want to use amplify-cli
Adding backend environment dev to AWS Amplify app: xxxxxxxxxxxxxx

Deployment completed.
Deploying root stack amplifyclidemo [ ---------------------------------------- ] 0/4
        amplify-amplifyclidemo-dev-00… AWS::CloudFormation::Stack     CREATE_IN_PROGRESS             S
        UnauthRole                     AWS::IAM::Role                 CREATE_IN_PROGRESS             S
        DeploymentBucket               AWS::S3::Bucket                CREATE_IN_PROGRESS             S
        AuthRole                       AWS::IAM::Role                 CREATE_IN_PROGRESS             S

? Help improve Amplify CLI by sharing non sensitive configurations on failures (y/N) ‣ ←[**Choose according to your own policy**]
Deployment state saved successfully.
✔ Initialized provider successfully.
✅ Initialized your environment successfully.

Your project has been successfully initialized and connected to the cloud!

Some next steps:
"amplify status" will show you what you've added already and if it's locally configured or deployed
"amplify add <category>" will allow you to add features like user login or a backend API
"amplify push" will build all your local backend resources and provision it in the cloud
"amplify console" to open the Amplify Console and view your project status
"amplify publish" will build all your local backend and frontend resources (if you have hosting category added) and provision it in the cloud

Pro tip:
Try "amplify add api" to create a backend API and then "amplify push" to deploy everything
Once you've completed these interactive settings like this, AWS Amplify CLI will automatically provision the necessary AWS resources such as AWS CloudFormation stacks, IAM roles, and Amazon S3 buckets for deployment.The directory structure at this stage was as follows.
[ho2k_com@ho2k-com amplifyclidemo]$ tree
.
├── amplify
│   ├── #current-cloud-backend
│   │   ├── amplify-meta.json
│   │   ├── awscloudformation
│   │   │   └── build
│   │   │       └── root-cloudformation-stack.json
│   │   └── tags.json
│   ├── README.md
│   ├── backend
│   │   ├── amplify-meta.json
│   │   ├── awscloudformation
│   │   │   └── build
│   │   │       └── root-cloudformation-stack.json
│   │   ├── backend-config.json
│   │   ├── tags.json
│   │   └── types
│   │       └── amplify-dependent-resources-ref.d.ts
│   ├── cli.json
│   ├── hooks
│   │   ├── README.md
│   │   ├── post-push.sh.sample
│   │   └── pre-push.js.sample
│   └── team-provider-info.json
└── src
    └── aws-exports.js
Next, I will add Amazon S3 and Amazon CloudFront, the AWS resources that configure static website hosting, using the amplify hosting add command.
[ho2k_com@ho2k-com amplifyclidemo]$ amplify hosting add
? Select the plugin module to execute …  (Use arrow keys or type to filter)
  Hosting with Amplify Console (Managed hosting with custom domains, Continuous deployment)
❯ Amazon CloudFront and S3 ←[**Select Amazon CloudFront and S3 without using AWS Amplify Console**]
✔ Select the plugin module to execute · Amazon CloudFront and S3
? hosting bucket name ‣ amplifyclidemo-20230701054436-hostingbucket ←[**Use the Amazon S3 bucket name suggested automatically**]
✔ hosting bucket name · amplifyclidemo-20230701054436-hostingbucket
Static webhosting is disabled for the hosting bucket when CloudFront Distribution is enabled.

You can now publish your app using the following command:
Command: amplify publish
Next, I will create a file called package.json in the project's top directory and describe its contents as follows.
[ho2k_com@ho2k-com amplifyclidemo]$ vi package.json
[ho2k_com@ho2k-com amplifyclidemo]$ cat package.json
{
  "name": "amplifyclidemo",
  "version": "1.0.0",
  "description": "AWS Amplify CLI Demo",
  "dependencies": {},
  "devDependencies": {
  },
  "scripts": {
    "start": "",
    "build": ""
  }
}
The package.json file describes the version, dependencies, and build commands of the application to be deployed to the backend. However, since I am only deploying Amazon S3, Amazon CloudFront, and the demo static files this time, I have kept the description to a minimum.Next, I will create the directory and files to deploy to the Amazon CloudFront and S3 hosting environment.
[ho2k_com@ho2k-com amplifyclidemo]$ mkdir dist
[ho2k_com@ho2k-com amplifyclidemo]$ vi ./dist/index.html
[ho2k_com@ho2k-com amplifyclidemo]$ cat ./dist/index.html
<!DOCTYPE html>
<html>
<head>
<meta http-equiv="refresh" content="10; URL=https://hidekazu-konishi.com/">
<title>AWS Amplify CLI Demo</title>
</head>
<body>
Welcome! <br>
I'm sure that <br>
Amplify will amplify something in the 2020s. <br>
Let's use Amplify to see what it is. <br>
</body>
</html>
At this point, the directory structure looked like this.
[ho2k_com@ho2k-com amplifyclidemo]$ tree
.
├── amplify
│   ├── #current-cloud-backend
│   │   ├── amplify-meta.json
│   │   ├── awscloudformation
│   │   │   └── build
│   │   │       └── root-cloudformation-stack.json
│   │   └── tags.json
│   ├── README.md
│   ├── backend
│   │   ├── amplify-meta.json
│   │   ├── awscloudformation
│   │   │   └── build
│   │   │       └── root-cloudformation-stack.json
│   │   ├── backend-config.json
│   │   ├── hosting
│   │   │   └── S3AndCloudFront
│   │   │       ├── parameters.json
│   │   │       └── template.json
│   │   ├── tags.json
│   │   └── types
│   │       └── amplify-dependent-resources-ref.d.ts
│   ├── cli.json
│   ├── hooks
│   │   ├── README.md
│   │   ├── post-push.sh.sample
│   │   └── pre-push.js.sample
│   └── team-provider-info.json
├── dist
│   └── index.html
├── package.json
└── src
    └── aws-exports.js
Finally, I will deploy the previously mentioned settings and files using the amplify publish command.
[ho2k_com@ho2k-com amplifyclidemo]$ amplify publish
✔ Successfully pulled backend environment dev from the cloud.

    Current Environment: dev

┌──────────┬─────────────────┬───────────┬───────────────────┐
│ Category │ Resource name   │ Operation │ Provider plugin   │
├──────────┼─────────────────┼───────────┼───────────────────┤
│ Hosting  │ S3AndCloudFront │ Create    │ awscloudformation │
└──────────┴─────────────────┴───────────┴───────────────────┘
? Are you sure you want to continue? (Y/n) ‣ ←[**Select "Y"**]
✔ Are you sure you want to continue? (Y/n) · yes

Deployment completed.
Deploying root stack amplifyclidemo [ ---------------------------------------- ] 0/2
        amplify-amplifyclidemo-dev-00… AWS::CloudFormation::Stack     UPDATE_IN_PROGRESS             S
        hostingS3AndCloudFront         AWS::CloudFormation::Stack     CREATE_IN_PROGRESS             S
Deployed hosting S3AndCloudFront [ ======================================== ] 4/4
        OriginAccessIdentity           AWS::CloudFront::CloudFrontOr… CREATE_COMPLETE                S
        S3Bucket                       AWS::S3::Bucket                CREATE_COMPLETE                S
        CloudFrontDistribution         AWS::CloudFront::Distribution  CREATE_COMPLETE                S
        PrivateBucketPolicy            AWS::S3::BucketPolicy          CREATE_COMPLETE                S

Deployment state saved successfully.

Hosting endpoint: https://d2zhcd4b7isref.cloudfront.net

frontend build command exited with code 0
Publish started for S3AndCloudFront
✔ Uploaded files successfully.
Your app is published successfully.
https://d2zhcd4b7isref.cloudfront.net
Once the deployment is successful, the Hosting endpoint (Amazon CloudFront Distribution domain name) will be displayed. If you access this URL, the content of the demo file you created will be displayed.
With the above settings and deployment, I have been able to build a pure static website hosting environment using Amazon S3 and Amazon CloudFront, without including any applications.
About Extending AWS Amplify CLI Projects with AWS CloudFormation, AWS Cloud Development Kit(AWS CDK)
AWS Amplify CLI allows you to add and modify features using AWS CloudFormation or AWS CDK.For example, by customizing the AWS CloudFormation template generated by AWS Amplify CLI for Amazon S3 and Amazon CloudFront, or adding Custom AWS resources using AWS CloudFormation or AWS CDK, you can add features such as:
* Attach AWS Certificate Manager certificates and associate with a custom domain managed by Amazon Route 53
* Add Lambda@Edge to Amazon CloudFront and add basic authentication settings
* Add AWS WAF Web ACL to Amazon CloudFront for IP restriction
* Add Amazon S3 bucket and configure Amazon CloudFront origin failover
In this way, AWS Amplify CLI can also customize the project and add features such as SSL/TLS certificates and custom domains provided by AWS Amplify Hosting in the AWS Amplify Console.
Furthermore, with AWS Amplify Hosting in the AWS Amplify Console, you can also add and modify detailed settings, such as IP restrictions with AWS WAF Web ACL and Amazon CloudFront origin failover, which are not configurable at the time of writing this article.
References:
Tech Blog with curated related content
Summary
As you can see, AWS Amplify CLI allows you to deploy AWS resources that configure typical architecture models with simple commands and interactive settings.In addition to customization and adding features with Custom AWS resources, it is a highly convenient solution that allows for rapid and easy infrastructure deployment, rather than manually creating AWS resources or creating AWS CloudFormation templates from scratch, if the use case matches.
It is believed that the mechanism of AWS Amplify CLI can simplify the construction work of infrastructure in typical use cases, and can concentrate on application development and quickly construct numerous infrastructure environments.
I will continue to write articles on AWS Amplify when the opportunity arises.
* The relationship and differences between AWS Amplify Hosting and AWS Amplify CLI Focusing on Static Website Hosting are summarized in the following article if you are interested.
AWS Amplify Features Focusing on Static Website Hosting - Relationship and Differences between AWS Amplify Hosting and AWS Amplify CLI
Written by Hidekazu Konishi